Exercise: Build and integrate a new module
In this exercise, you'll create a standalone module and integrate it into an existing modular project.
As a prerequisite, you should have created a modularized project in GitLab.
While this guide enables quick, hands-on customizing in modular projects, you should still understand the theory of modularization (module boundaries, extension points, services, dependency management, and the transpile/merge model). A solid conceptual grasp is essential to make correct design decisions, avoid brittle overrides, manage module lifecycles, and keep your project maintainable.
After completing this exercise, you can:
- Create a standalone module and link it to a modular project.
- Configure peerDependencies and aliases, enable Liquibase, and manage DB schema via changelogs.
- Generate an Entity from an alias, configure fields, parameters, providers, and processes.
- Build a Context with multiple Views and integrate it into the project's global menu.
- Maintain translations that merge into the project.
- Implement and consume Services for modular behavior.
- Define Extension Points to allow further modular extensions by other modules or the project.
Create a module
Create a new module using this guide.
Alternatively, fork the module-template and place it in your GitLab space as memo-module.
Add the module in the Designer via: File -> New Project -> Clone from Git repository.
Update the package.json to set the module name and type:
{
    "name": "@myusername/memo-module",
    "version": "0.0.1",
    "adito": {
        "type": "module"
    }
}
Use a scoped package name (e.g., @myusername/memo-module) to avoid conflicts with other modules.
If you plan to publish your module, you must use the root namespace of the project hosting your packages as your scope. See the official documentation for more details.
Unlike a project (type: "project"), a module has type: "module". Modules use peerDependencies instead of dependencies. These enable access to referenced modules in the Designer (after npm install) but are not bundled or resolved during transpile. Modules themselves do not need to be transpiled to be usable by a project.
Compare memo-project and memo-module in the Designer's Project view; some folders are intentionally absent in modules.
Add the module to a project
In your modularized project, add a local dependency in its package.json:
{
  "dependencies": {
    "@myusername/memo-module": "../memo-module"
  }
}
Run npm install in the project to link the module.
Create a new context
We'll build a simple context with an Entity, Views, a database table, and required configuration inside the module, then test it in the project.
Database table, Data_alias, and Liquibase
Create a new database alias in memo-module with the name Memo_Data_alias.
In its properties, the targetAliasName must refer to the project's main alias (usually Data_alias). To make it selectable in the module, add the sharedalias module as a peer dependency:
{
  "peerDependencies": {
    "@aditosoftware/sharedalias": "^3.0.0"
  }
}
Run npm install.
Ensure the sharedalias version matches the one used in memo-project.
You should now see aliases from sharedalias under the Aliases node in the Designer. Select the shared Data_alias as the target.

Figure: Target alias for the module alias
You can toggle visibility of referenced entries (from dependencies and peerDependencies) in the project tree using the toolbar toggle described here: Show dependencies in project tree.
Enable Liquibase for Memo_Data_alias:
- In the module's file system, create
.liquibase/Memo_Data_alias/changelog.xmlas a placeholder file. - In the Designer, the Liquibase context menu should now appear for the alias.

Figure: Liquibase context menu for the alias
Create Liquibase files:
<?xml version="1.1" encoding="UTF-8" standalone="no"?>
<databaseChangeLog xmlns="http://www.liquibase.org/xml/ns/dbchangelog"
    xmlns:xsi="http://www.w3.org/2001/XMLSchema-instance"
    xsi:schemaLocation="http://www.liquibase.org/xml/ns/dbchangelog http://www.liquibase.org/xml/ns/dbchangelog/dbchangelog-3.6.xsd">
    <include relativeToChangelogFile="true" file="memo/changelog.xml"/>
</databaseChangeLog>
Create memo/create_Memo.xml:
<?xml version="1.0" encoding="UTF-8"?>
<databaseChangeLog xmlns="http://www.liquibase.org/xml/ns/dbchangelog" xmlns:ext="http://www.liquibase.org/xml/ns/dbchangelog-ext" xmlns:xsi="http://www.w3.org/2001/XMLSchema-instance" xsi:schemaLocation="http://www.liquibase.org/xml/ns/dbchangelog-ext http://www.liquibase.org/xml/ns/dbchangelog/dbchangelog-ext.xsd http://www.liquibase.org/xml/ns/dbchangelog http://www.liquibase.org/xml/ns/dbchangelog/dbchangelog-4.1.xsd">
    <changeSet author="j.doe" id="16ce338e-e132-418c-9d9c-5c04c0532b9e">
        <preConditions onFail="MARK_RAN">
            <not>
                <tableExists tableName="memo" />
            </not>
        </preConditions>
        <createTable tableName="memo">
            <column name="MEMOID" type="CHAR(36)">
                <constraints nullable="false" primaryKey="true" />
            </column>
            <column name="TITLE" type="VARCHAR(50)" />
            <column name="CONTENT" type="LONGTEXT" />
            <column defaultValueComputed="NULL" name="IS_OLD" type="TINYINT" />
            <column defaultValueComputed="NULL" name="DATE_EDIT" type="datetime" />
            <column defaultValueComputed="NULL" name="DATE_NEW" type="datetime" />
            <column name="USER_EDIT" type="VARCHAR(63)" />
            <column name="USER_NEW" type="VARCHAR(63)" />
        </createTable>
    </changeSet>
</databaseChangeLog>
Create memo/changelog.xml:
<?xml version="1.1" encoding="UTF-8" standalone="no"?>
<databaseChangeLog xmlns="http://www.liquibase.org/xml/ns/dbchangelog"
  xmlns:xsi="http://www.w3.org/2001/XMLSchema-instance"
  xsi:schemaLocation="http://www.liquibase.org/xml/ns/dbchangelog http://www.liquibase.org/xml/ns/dbchangelog/dbchangelog-3.6.xsd">
  <include relativeToChangelogFile="true" file="create_Memo.xml" />
</databaseChangeLog>
Your structure should now look like this:
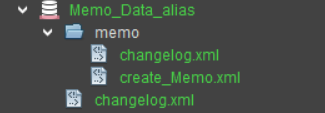
Figure: Liquibase structure for the module
Run Liquibase Update. Keep memo-project open while doing this. In the dialog, choose the correct data alias (for SSP systems typically cloud_data_alias). If it doesn't appear, briefly open the system -> default editor in memo-project.
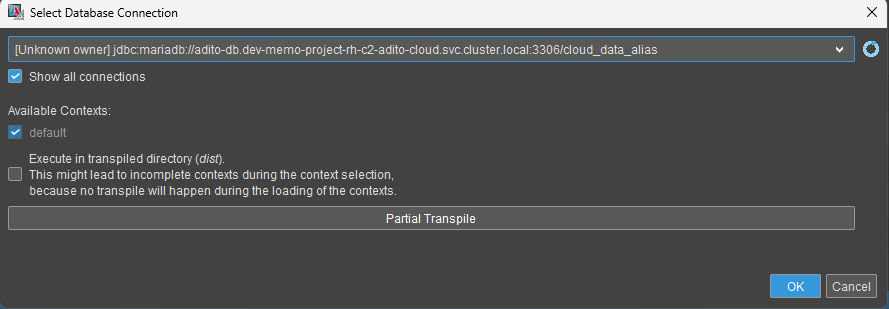
Figure: Liquibase Update dialog
You can proceed immediately; if there are no contexts, you don't need to wait for the spinner.
After a successful update:
- Add a new table node (
MEMO) under theMemo_Data_aliasin the Navigator. - Run Diff against the project to import the structure into the module.
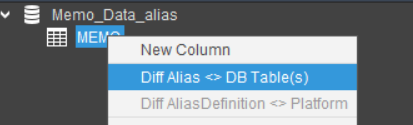
Figure: Diff context menu for the module
Although being in the memo-module, you need to select the memo-project an its system in the diff dialog.
Otherwise, you cannot diff against the database and will not get any results.
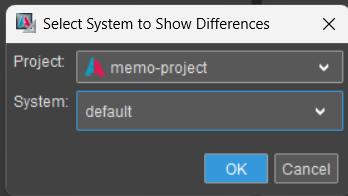
Figure: Diff dialog for the module
Now you can see your database structure in the module.
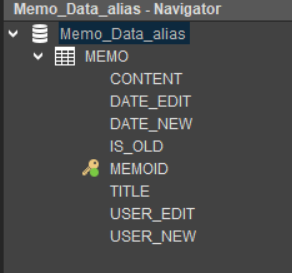
Figure: Diff result for the module
Create the Entity
Create Memo_entity in memo-module.
For the easiest way to create an Entity, we will use the "New with blueprint → Create Entity from AliasDefinition" action.
Ensure there's an entity folder in the module first, otherwise the context menu will not be available.
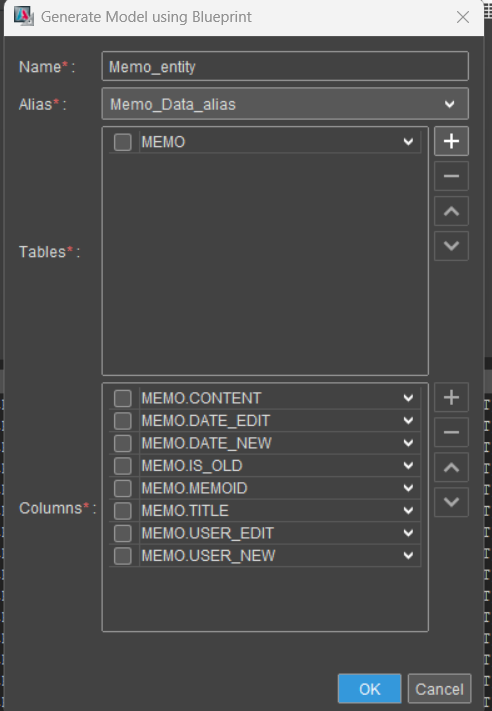
Figure: Entity blueprint dialog for the Memo_entity
Adjust your created entity:
- Add
iconProcess:iconProcessimport { result, vars } from "@aditosoftware/jdito-types";
result.string("TEXT:" + vars.get("$field.TITLE")); - Configure your Fields:
CONTENT(Title=Memo_Content; contentType=HTML)DATE_EDIT(Title=Memo_Edited_on; contentType=DATE; resolution=SECOND)DATE_NEW(Title=Memo_Created_on; contentType=DATE; resolution=SECOND)IS_OLD(Title=Memo_old, contentType=BOOLEAN)MEMOID(Title=Memo_ID)TITLE(Title=Memo_Title)USER_EDIT(Title=Memo_Editor)USER_NEW(Title=Memo_Creator)- Ensure your
DATE_NEW/DATE_EDITandUSER_NEW/USER_EDITfields use the standard valueProcess.
- Add parameter
OnlyCurrent_paramwithexpose = true. Add avalueProcessto it: - Add provider
Memos(do not setOnlyCurrent_param). - Add provider
CurrentMemoswithOnlyCurrent_paramset and this valueProcess:import { result } from "@aditosoftware/jdito-types";
result.string("true");
At the end, your Entity should look like this:
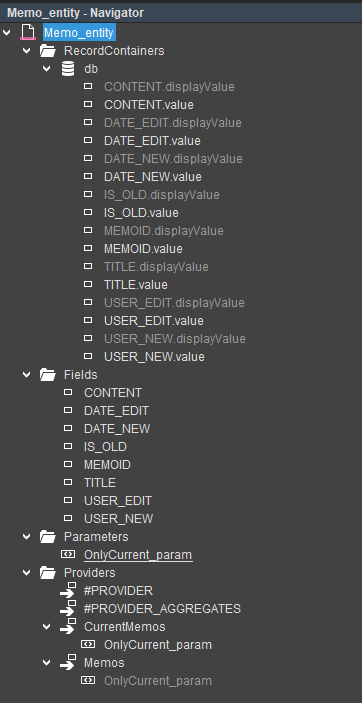
Figure: Entity with necessary fields for the Memo_entity
Create the Context
Create context Memo with title Memo_Memo and any icon you like. Assign Memo_entity to the context.
Create Views
Create and assign these views to the Memo context (layout is flexible; below is a suggested structure):
- MemoEdit_view: GenericViewTemplate (small edit)
- MemoFilter_view: TableViewTemplate with relevant columns
- MemoPreview_view:
- CardViewTemplate:
iconField:#ICONtitleField:TITLE
- GenericViewTemplate (name:
details)fields:IS_OLD,USER_NEW,USER_EDITshowDrawer:truedrawerCaption:Memo_Details
- GenericViewTemplate (name:
content)fields:CONTENTshowDrawer:truedrawerCaption:Memo_Content
- ScoreCardViewTemplate
- fields:
DATE_NEW,DATE_EDIT
- fields:
- CardViewTemplate:
- MemoMain_view: any elements you like to have in the main view
You should now have a context Memo with the following structure:
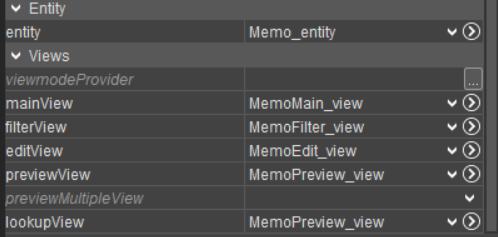
Figure: Context with views
Add to the project's global menu
Switch to memo-project.
Update dependencies (npm update or npm clean-install). You should now see the Memo context in the project.
In application/_____SYSTEM_APPLICATION_NEON, create a new menu section and add the Memo context. Assign a role so it becomes visible in the Designer.
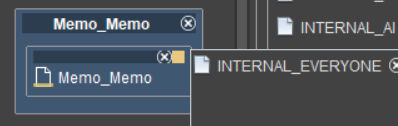
Figure: Memo entry in the application menu
Transpile and deploy. After re-login in the web client, the new menu group and Memo context should appear.
Now you can create some test data:

Figure: Memo filter view in the web client with some test data
Maintain translations
The keys used in titles and labels must be translated. Currently, they are not translated.
In memo-module, under language, create en and de language files. Use "Extract Key" to collect keys from the module (the System field stays empty because modules don't have DB connections).
In the extraction dialog, you can skip Modifications and external modules for this module-only setup. Once you add Modifications/Service Implementations/overridden processes containing keys, include them in extraction.
After extraction, synchronize keys and maintain values for English and German.
Run npm update. If the language files don't show in memo-project, use Refresh in the Designer. Deploy as usual. The module's language entries should merge into the project's _____LANGUAGE_en/de files (not as separate _____LANGUAGE_en_memo-module entries).
Flexibility with Services
Services allow modular behavior injection. Services can be global (project-wide) or entity-scoped. Create them under the "Service" node or via "New Service" within an entity. Implement behavior via "Add Implementation".
In Memo_entity, add service memoConditionProcess_service. Create an implementation onlyCurrent_impl with:
import { Utils } from "@aditosoftware/utility/process/Utils_lib";

// @ts-ignore
return (pCond) => {
  if (Utils.toBoolean(vars.get("$param.OnlyCurrent_param"))) {
    pCond.and("MEMO.IS_OLD", 0);
  }
};
If the import is marked invalid, add a matching @aditosoftware/utility version as a peerDependency in memo-module and run npm install.
Use the service in a process
Add parameter OnlyCurrent_param (exposed) with the following valueProcess:
import { result } from "@aditosoftware/jdito-types";

result.string("Creator");
Load the service in the db RecordContainer's conditionProcess:
import { modules, result } from "@aditosoftware/jdito-types";
import { newWhere } from "@aditosoftware/utility/process/SqlBuilder_lib";

let cond = newWhere();
let impls = modules.loadService("memoConditionProcess_service");
impls.forEach((impl) => impl()(cond));
result.string(cond.toString());
After transpile, the Designer generates explicit calls to discovered implementations. You can inspect the generated file under dist/entity/Memo_entity/recordcontainers/db/conditionProcess.js to verify.
The transpiled code should look like this:
import { modules, result } from "@aditosoftware/jdito-types";
import { newWhere } from "@aditosoftware/utility/process/SqlBuilder_lib";
import { Utils } from "@aditosoftware/utility/process/Utils_lib";


let cond = newWhere();
let impls = [_____GENERATED_memoConditionProcess_service_onlyCurrent_impl];
impls.forEach((impl) => impl()(cond));
result.string(cond.toString());

function _____GENERATED_memoConditionProcess_service_onlyCurrent_impl()
{
  // @ts-ignore
  return (pCond) => {
    if (Utils.toBoolean(vars.get("$param.OnlyCurrent_param"))) {
      pCond.and("MEMO.IS_OLD", 0);
    }
  };
}
After you have deployed your project, you should only see the new memos in the web client:

Figure: Memo filter view in the web client with some test data
Extensibility with Extension Points
Use Extension Points to make entities and views extensible from other modules or the project. They define where and how external additions can be made (fields, providers, parameters, view templates, etc.).
Example goal: Extend Memo with object linkage (e.g., link to a Company) via new fields OBJECT_TYPE and OBJECT_ROWID, connected to the existing logic through extension points.
Entity Extension Points
Add extension points in Memo_entity for:
- ActionField
- Consumer
- Field
- Parameter
- Provider
This enables controlled extensions without modifying the original entity.
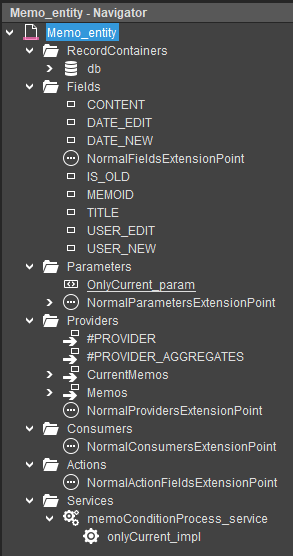
Figure: Entity extension points
View Extension Points
For each Memo view, add one extension point to allow insertion of additional ViewTemplates at specific positions:
- MemoEditExtensionPoint
- MemoFilterExtensionPoint
- MemoMainExtensionPoint
- MemoPreviewExtensionPoint
Conclusion
Your module is now ready to be extended by other modules and the project. As an exercise, enhance memo-project by adding fields or view templates to the Memo context using these extension points.