Dependency Management and Types
This guide explains how dependencies are managed in ADITO using npm, covering package types, configuration in package.json and .npmrc, dependency categories (dependencies, devDependencies, peerDependencies), local links, overrides, versioning, and best practices. It also includes useful commands and troubleshooting tips to keep projects consistent and buildable.
For broader npm concepts and the full set of options, see the official npm documentation.
ADITO specific elements in the package.json
Each ADITO package contains a package.json file. This file defines the package type, its dependencies, compatible platform version, scripts, and metadata for publication. Configuring this file correctly is essential for modular development.
For general package.json capabilities, see the official documentation
type of your package
You can state two different types in your package.json:
"type": "project": Used for the top-level package. It may include only system-level configuration and operational settings. It definesdependenciesand must not usepeerDependencies."type": "module": Used for all logic-bearing packages. Modules contain functionality and reference other modules viapeerDependencies.
A "project" package must never use peerDependencies. Doing so will prevent the project from being executed correctly.
You can set the type inside the adito attribute of package.json:
{
  "adito": {
    "type": "project"
  }
}
Non-modularized projects do not state any type.
engines
The engines field restricts the version of the ADITO core platform a module can run with:
{
  "engines": {
    "adito": ">=2026.1.0-RC <2026.1.1"
  }
}
The specified range determines the appropriate ADITO Docker image used to transpile and deploy the application; the system runs based on that selected image.
.npmrc explained
Npm installs only dependencies it can resolve and is affected by configuration options. If dependencies are published to a private registry (not npmjs.com), a .npmrc file is required.
Each package usually includes a .npmrc at its root.
Typically, you must declare the registry for @aditosoftware packages:
@aditosoftware:registry=https://gitlab.adito.de/api/v4/packages/npm/
You can configure multiple registries for different scopes, for example, in customer projects.
You can also use environment variables in .npmrc files. This might be useful for secrets like authentication tokens.
For general .npmrc capabilities, see the official documentation.
This file is usually committed to version control. Do not include sensitive data (for example, auth tokens) in it.
User-specific secrets must be stored in the .npmrc file located in your user's home directory or in environment variables.
Dependency Types
Node.js recognizes three dependency types:
dependencies: Packages required at runtime by your published package or application. Installed automatically for consumers.devDependencies: Packages needed only during development (tests, build, lint, docs). Not required at runtime.peerDependencies: Packages that your package expects its consumer (the final application or higher-level package) to provide. They express compatibility rather than cause automatic installation.
If multiple modules require different versions of the same dependency, this can lead to duplicate installations. Such conflicts must be resolved manually.
Whenever you change dependencies or switch branches, you should always run npm clean-install or npm install to ensure all downloaded dependencies are up to date.
See the documentation for npm clean-install and npm install for more information.
Basic rule of thumb: If you want to re-download everything based on your package-lock.json, run npm clean-install.
If you just want to update the dependencies, run npm install.
Anti-Pattern: Too many dependencies
While it can be tempting to add every possible module as a dependency, this is counterproductive.
Unneeded modules bring along contexts, entities, database configurations, and many more changes that are never used. During upgrades, they create avoidable effort because you must review changelogs for modules that provide no value to your project. Adding unnecessary packages also increases:
- Attack surface and security review scope.
- Build times, install size, and CI/CD duration.
- Cognitive load when debugging dependency graphs and resolving version conflicts.
- Risk of hidden coupling and accidental runtime behavior changes.
Before adding any new dependency, always ask: what concrete benefit does it provide? If you do not need a dependency, consider removing it.
dependencies
Dependencies are libraries your code needs to run (runtime requirements).
All dependencies are automatically installed with npm install. Transitive dependencies are installed as part of the dependency tree.
You can add a new dependency by running the following command:
npm install <package-name>
For a general and broader introduction to dependencies, see the official documentation.
devDependencies
DevDependencies are tools only needed during development or build time, like test frameworks, linters, bundlers, type-checkers, documentation generators.
You can add a new dev-dependency by running the following command:
npm install --save-dev <package-name>
devDependencies are local to the package that declares them, they are not available to other modules that consume your package.
For a general and broader introduction to devDependencies, see the official documentation.
peerDependencies
Declare packages your module requires at runtime but which must be installed by the project. Use this when your package expects the host to provide a single shared instance (typical for plugins, UI component libraries, or shared domain modules).
Declaring a peerDependency makes it part of your public contract, consumers must satisfy it and consider compatibility when upgrading.
Always ensure that peerDependencies are fulfilled by a compatible dependency declared in the project. This is required to produce a valid and executable build.
For a general and broader introduction to peerDependencies, see the official documentation.
Characteristics
- Defines expected modules and their compatible version ranges.
- Makes dependencies visible and accessible to superordinate modules.
- Enables sharing of data models and APIs across modules.
Installation
You cannot add a new peerDependency by running any command. Instead, you need to declare peerDependencies explicitly in the package.json file and run npm install afterward.
 {
  "peerDependencies": {
    "@aditosoftware/contact": "^2.0.0"
  }
}
Local Dependencies and Symlinks
Local dependencies allow direct referencing of sibling packages during development, useful when working on multiple modules in parallel. Instead of publishing each change, reference the source code directly by specifying a relative path as the version:
{
  "dependencies": {
    "@aditosoftware/activity": "../activity"
  }
}
This enables real-time access to the local dependencies without repeated publishing.
For a general and broader introduction to local dependencies, see the official documentation.
Use local dependencies only during development. Production systems must consume published dependencies.
For local dependencies, decide whether to install as symbolic links or as normal copies. The install-links flag controls this behavior for npm commands or via .npmrc.
See the NPM documentation for the options of the install-links flag.
If you work with local dependencies, you might need to remove the old copy from node_modules before reinstalling your changes.
You can either delete the specific package folder in node_modules and run npm install, or run npm clean-install.
Otherwise, you can run npm update to update all your packages to the latest version. This will also update local dependencies.
npm clean-install deletes the entire node_modules and re-downloads everything based on your lockfile, which can take longer.
Overriding Dependency Versions
Overrides in package.json can replace a dependency with a specific version or a different package. Use to control local resolution and achieve deterministic outcomes.
Overrides are powerful but risky. Conflicting or broad overrides may cause unexpected behavior, duplicate instances, or runtime incompatibilities, especially when multiple modules override the same target.
Avoid overrides for production; prefer upstream fixes and standard updates.
Learn more in the official documentation
When to use overrides
- Replace a vulnerable transitive dependency.
- Align all consumers to a consistent module version.
- Temporarily use a local or forked package for testing or hotfixes
Keep overrides small and short‑lived. Prefer upstream fixes.
Configuration examples
{
  "overrides": {
    "@aditosoftware/attribute": "2.0.1"
  }
}
This forces all occurrences of @aditosoftware/attribute in your dependency tree to resolve to version 2.0.1.
Overrides affect only your local dependency resolution. They do not modify other packages' peerDependencies and do not publish upstream.
Best practices
- Scope narrowly (target only the necessary package or subtree).
- Document reason, scope, and planned removal date near the overrides section.
- Validate with a
npm clean-installto ensure the lockfile is updated correctly. - Run the full test suite and critical flows after changes.
- Remove overrides as soon as upstream versions are fixed or aligned.
Limitations and warnings
- You must ensure compatible versions are present.
- Overlapping overrides are hard to reason about; avoid chaining or broad ranges.
- CI should perform a
npm clean-installto catch resolution issues.
ADITO guidelines
- Core modules generally avoid overrides.
- Customer projects may use overrides sparingly to mitigate critical issues or align versions; time-box and track such usage.
Versioning & ranges
You should always use semantic versioning.
You should check the npm documentation and semantic versioning spec on how semantic versioning works.
- Prefer ranges that allow compatible non-breaking updates, e.g.,
^1.2.0. - For peerDependencies, choose ranges that avoid incompatible major versions; consumers manage major upgrades.
Regular Dependency Update Policy
To keep modules healthy and reduce upgrade risks, regularly check for available updates to individual modules and bundle these into the next scheduled version update. Applying small, incremental updates typically lowers implementation effort, while the testing effort remains the same.
Update as frequently as possible to minimize the gap between versions and reduce the risk and cost of future upgrades.
Major releases may introduce breaking changes and are not guaranteed to be backward compatible. Plan additional validation and migration work for major upgrades.
Folder "External Libraries"
In the Designer's "Projects" window, the folder External Libraries appears at the bottom of the project tree. It contains all modules that are listed as dependencies of the current project. These modules are made available automatically.
This view allows direct access to the models of dependent modules for inspection or reference. If changes are made to these models, they are not written into the original module. Instead, a corresponding modification is created in the referencing module, as described in Modifications.
You can use this folder as a reference for the data models of external modules.
You do not need to, and should not, edit items in External Libraries. Instead, all data models from dependencies are directly visible in the project tree within the Designer.
Show Dependencies in Project Tree
There is a toolbar button (or via Ctrl + Shift + B) that toggles the visibility of dependencies. The current state also affects the Ctrl + O search.
When the button is enabled (as shown in this image), all dependencies are displayed in the project tree.
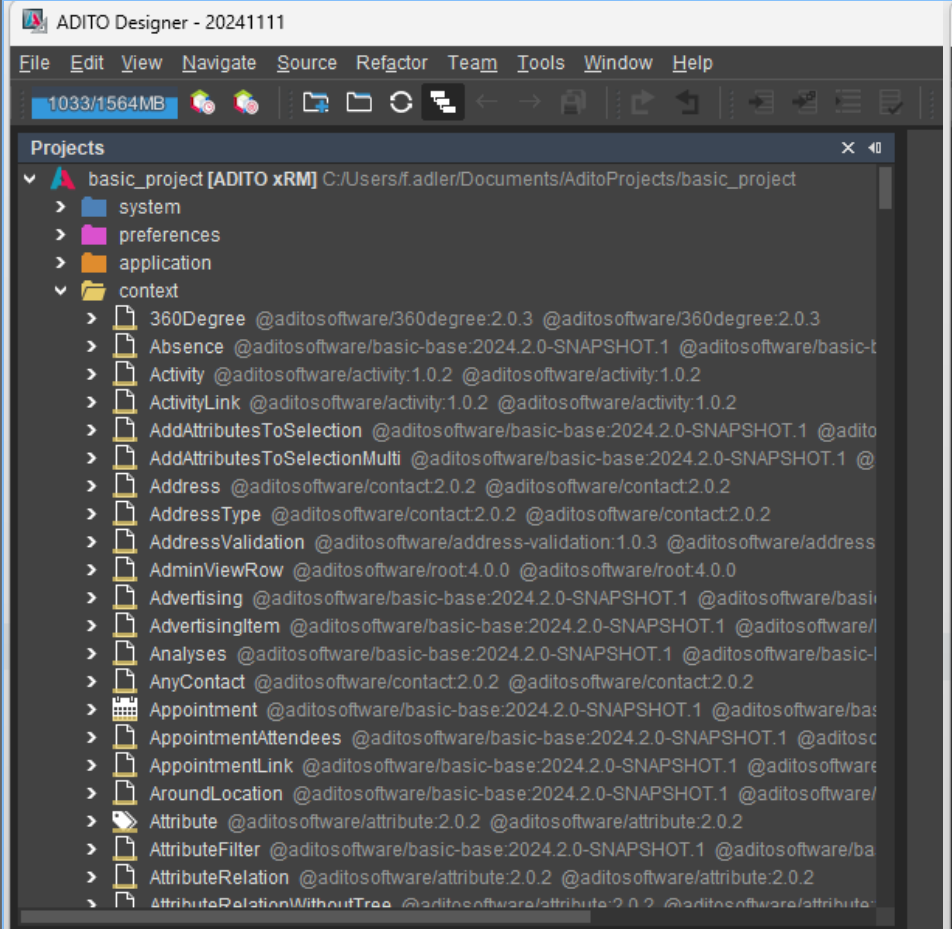
Figure: Enabled button "Show Dependencies in Project Tree" in the Designer's toolbar
When the button is disabled, only elements from the current package are displayed.
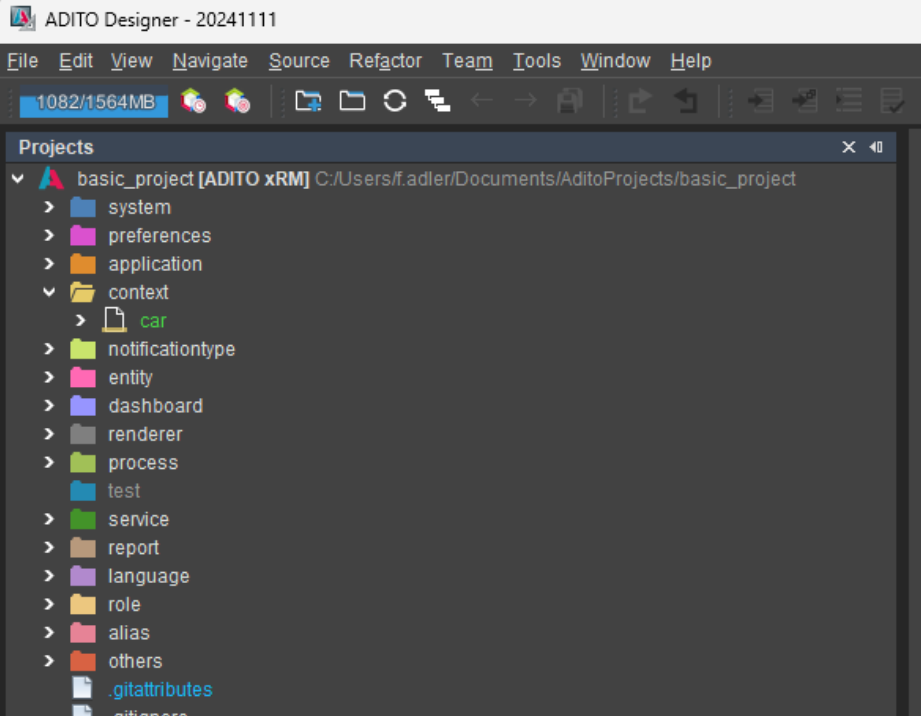
Figure: Disabled button "Show Dependencies in Project Tree" in the Designer's toolbar
Code Completion from modules (jsconfig.json)
When you are working with dependencies, it is important that your code completions will work.
With the help of jsconfig.json, you can configure your IDE to use the correct libraries and resolve module paths.
This file is generated automatically by @aditosoftware/devtools. On the first npm install of this dependency, a postinstall script creates it. It is regenerated only when you run a npm clean install.
If dependencies change (modules added/removed), run npm clean-install. Otherwise, your jsconfig.json may be outdated.
Optional: Provide a jsconfig.template.json. If present, it will be copied to jsconfig.json during installation, preserving your custom settings alongside the generated configuration.
For more details of the possibilities of the tsconfig/jsconfig file, see the TypeScript tsconfig documentation or the jsconfig documentation of VS Code.
Best practices (concise)
- Use
dependenciesfor runtime libraries. In aprojectpackage declare all runtime requirements asdependencies. - Use
devDependenciesfor build/test/tooling that are not needed at runtime. - Use
peerDependencieswhen your package must share a single instance or expose APIs/types from another package and theprojectprovides it. - Validate the graph in a realistic top-level environment to ensure
peerDependenciesare satisfied.
Troubleshooting
- Missing peerDependency at runtime: install the required package/version in the top-level project or parent module.
- Version conflicts: align versions in the top-level project or update ranges/releases.
- Useful commands:
npm ls,npm ls <package>, dependency graph visualizers.
Transitive dependencies during development
The Designer treats only direct dependencies as valid during development. Transitive dependencies are ignored for all IDE features (creation, editing, refactoring, Modifications, Services, autocomplete, imports).
This feature was introduced in ADITO 2026.0. Before that version, all dependencies were visible and usable.
Normal (direct) dependencies are the packages your project explicitly lists in its package.json and installs for use. Transitive dependencies are the packages that those direct dependencies require in turn; they are installed as part of the dependency tree but are not explicitly declared by your project.
Why this change
- Avoid hidden coupling: Features must not rely on packages that are not explicitly declared in your
package.json. - Stability across upgrades: Transitives can change or disappear due to hoisting/resolution updates, causing brittle builds and runtime issues.
- Consistent authoring: Mirrors common autocompletion behavior (e.g., Node/TypeScript) where only direct dependencies are suggested. See relevant issues describing the normal autocompletion behavior.
Effective scope
- Designer (IDE-time): Only artifacts from direct dependencies are visible/selectable and can be used as a basis for Modifications and Services.
- Transpile/Build (build-time): The full installed tree (including transitive dependencies) is processed to produce runnable artifacts.
How it works
You need to declare all dependencies that you need for your package explicitly in package.json.
- In modules: declare it in
peerDependencies(expectation). - In the project: declare it in
dependencies(provision).
Then, the direct dependencies will be visible in the Designer and can be used as a basis for Extension Points and Services.
The Transpile will process the full dependency tree and produce runnable artifacts.
node_modules Folder
The node_modules folder is created by npm install. It contains all installed dependencies defined in the project's package.json, including dependencies, devDependencies, and peerDependencies.
In the Designer, the node_modules folder is not directly visible, but it can be inspected via the file explorer or external editors such as Visual Studio Code.
The node_modules folder can be safely deleted at any time. It should be excluded from version control via .gitignore. Re-running npm install fully restores its contents.
Useful commands for working with dependencies
You should refer to the official documentation for a complete list of commands and their capabilities.
Inspecting the Dependency Tree
In a modularized ADITO project, the nesting of project and module packages can become complex. The dependency tree provides a structured overview and helps identify potential issues.
Visualize the dependency tree with:
npm ls --all
The output shows which versions are installed and where.
Use the tree view to understand the module structure, debug conflicts, and verify correct resolution without manually checking each package.json and the node_modules folder.
See the official documentation for more information about the npm ls command.
Forcing Updates with Package Lock
npm may not update to the latest compatible minor version if a version is locked in package-lock.json.
npm update --strict-peer-deps
This updates package-lock.json to the latest compatible versions allowed by package.json.
Then reinstall:
npm clean-install
Always verify version consistency between package.json and package-lock.json, especially when using local dependencies.
See the official documentation for more information about the npm update command.