Modularization Techniques
Extension Points
Extension Points allow modules to inject additional functionality—such as fields, actions, consumers, or views—into existing data models from other modules without directly modifying their source code. They are an essential mechanism for preserving modularity and avoiding conflicts in shared or reusable modules.
This mechanism enables developers to keep modules cleanly separated while still allowing for targeted extensions.
Why Use Extension Points?
When multiple modules work together, it’s often necessary for one module to expand the logic or structure defined in another. Extension Points solve this by providing dedicated locations in data models where other modules can hook into and contribute functionality.
Benefits:
- Prevent merge conflicts between modules
- Avoid direct modifications of shared code
- Enable flexible reuse and customization
- Maintain upgradeability and backward compatibility
How It Works
- The author of a module (e.g.
contact) defines one or more Extension Points in its data models. - A second module (e.g.
activity) declares the first as a dependency usingpeerDependencies. - After running
npm install, the second module gains read access to the data models of the first. - The second module adds its own fields, actions, consumers, or views at the designated Extension Points.
- During build (transpile), the implementations are injected at the correct positions in the final project structure.
Extension Points are not runtime hooks, but compile-time injection markers resolved by the ADITO transpiler.
Extension Point Types
Each type of Extension Point corresponds to a different kind of extension in the target data model.
| Type | Purpose |
|---|---|
Field | Add new EntityFields |
ActionField | Add custom Actions |
Consumer | Link Consumers to the entity |
View | Inject Views into other Views |
These are configured inside Entities or Views using the Designer’s context menu.
Modifications and Build Integration
All extensions defined through Extension Points are stored in the extending module as modifications. The original source of the extended module remains unchanged.
The transpiler collects these modifications and injects the configured extensions into the original data models during the transpile step. The result is a flattened, deployable structure in the dist folder.
Each Extension Point has a includeInBuild property:
- If set to
true(default), the Extension Point and its implementations are included in the build. - If set to
false, the Extension Point and all its implementations are excluded.
This can be useful to temporarily disable features, especially in customer projects.
Use includeInBuild: false to disable specific views or components without deleting or refactoring them.
Technical Behavior
The includeInBuild flag is evaluated during the transpile phase. If set to false:
- The Extension Point and all its implementations are excluded from the build output.
- No
.aodfragments are generated for this Extension Point. - Any model elements referencing it will silently ignore its absence.
This mechanism is useful for:
- Temporarily disabling customer-specific functionality
- Hiding unfinished features during incremental development
- Implementing conditional release pipelines
Ensure that no runtime dependency expects the excluded Extension Point. Otherwise, errors may occur if services, views, or consumers refer to missing elements.
One-Sided Extension Points
Normally, Extension Points are defined in the module that owns the data model (e.g., contact) and implemented in another module (e.g., activity). This is a two-sided pattern.
In some cases, you may want to add extensions to a model from another module without the original module declaring an Extension Point. This is called a one-sided Extension Point.
- The Extension Point is added and implemented in the same (extending) module.
- It works because the model is accessible through a
peerDependency.
This provides flexibility when working with third-party or legacy modules.
Extensions Without Extension Points
In principle, it's possible to extend a data model from another module without using an Extension Point—for example, by directly adding a new field or process in the extending module. The Designer will still create a modification, and the transpiler will resolve it.
This approach breaks modular transparency and should be avoided. It makes extensions harder to track and disables fine-grained build control via includeInBuild.
Instead, prefer defining a one-sided Extension Point to maintain clarity.
Summary
| Use Case | Recommended Pattern |
|---|---|
| Extend fields/actions in shared entities | Two-sided Extension Point |
| Add new UI tabs to a View | ViewExtensionPoint |
| Modify external models without upstream hooks | One-sided Extension Point |
| Quick ad-hoc patch | Modification (exception) |
Example
Extending Organisation_entity with Fields
This example demonstrates how an activity module can inject new fields into the Organisation_entity defined in the contact module, using a Field Extension Point.
Step 1 – Base module: Define the Extension Point
In the contact module:
- Open
Organisation_entity. - Add a new Extension Point under
Fields. - Set its type to
Fieldand assign a name, e.g.:
Type: Field
Name: FieldExtensionPoint
This creates a placeholder in the Entity model, allowing external modules to inject additional fields without modifying the source Entity.
Step 2 – Extending module: Declare the dependency
In activity/package.json, declare a peerDependency to contact:
"peerDependencies": {
  "@aditosoftware/contact": "^1.0.2"
}
This allows the Designer and transpiler to resolve the models of contact for usage and modification in activity.
Step 3 – Add an implementation to the Extension Point
In the activity module:
- Navigate to
Organisation_entity > FieldExtensionPoint. - Right-click and select "Add Implementation".
- Create a new field, such as:
Name: CountActivity
Title: Number of activities
A corresponding EntityField will be added and saved as a modification, not as a direct part of the contact source module.
This ensures the extension is modular and non-invasive.
 Figure: Adding an EntityField implementation to an Extension Point
The Designer stores this implementation in the modification/ directory of the activity module. During build, the transpiler merges this implementation into the original Organisation_entity.
What Happens During Transpile
At transpile time, the system performs the following steps:
- Resolves the
peerDependencyand reads theOrganisation_entitymodel fromcontact. - Loads all matching
FieldExtensionPointimplementations from dependent modules. - Inserts the additional field definitions (like
CountActivity) into the final Entity model in thedistfolder. - Keeps original source modules untouched—modifications exist only in the extending module.
This results in a combined, deployment-ready Entity containing both base fields and the injected ones.
Resulting Benefits
- Clean separation between core and extension logic
- Safe and upgradeable customization
- Central control over which modules provide which extensions
To inspect all current modifications, explore the modification/ directory in the referencing module or view the merged model in the dist/ folder after transpile.
Overriding
Overriding allows you to replace modules or specific parts of their logic, such as processes, without changing the original module. This mechanism can be used to patch dependencies, replace versions, or alter behavior in customer-specific projects.
Overriding is technically powerful but should be used with great care. Misuse may lead to unexpected side effects, especially when multiple modules override the same target.
Use Cases
| Scenario | Recommended Technique |
|---|---|
| Patch a transitive dependency | Module override |
| Replace a vulnerable or outdated module version | Module override |
| Replace a process implementation in a dependent module | Process override |
| Customize model behavior in a modular and safe way | Use Services or Extension Points instead |
Module Overrides (overrides in package.json)
Overrides can be configured in your module’s package.json file to replace one dependency with a specific version or even a different package.
When to Use
- Replace a vulnerable version of a transitive dependency
- Align all consumers to a consistent module version
- Swap in a local or forked version for testing or hotfixes
Configuration Example
"overrides": {
  "@aditosoftware/attribute": "2.0.1"
}
This ensures that any other module declaring a different version of @aditosoftware/attribute will receive version 2.0.1 instead.
Overrides only affect your local dependency tree. They do not change the original module's peerDependencies.
For more information, refer to the official npm documentation on overrides.
ADITO Guidelines
- The ADITO xRM core modules generally do not use overrides.
- Customer projects may use them sparingly to patch critical issues or align versions.
Services
Services allow modules to extend the logic of JDito processes by injecting custom code. This complements Extension Points, which are used to extend data models. Services are especially useful for logic that should be injected across multiple modules or at runtime-specific positions such as insert/update/delete hooks.
There are two types of Services:
- Global Services: Can be used from anywhere in the project
- Entity Services: Scoped to a specific Entity
Why Use Services?
- Encapsulate reusable logic across modules
- Avoid direct process overrides
- Enable clean injection points in shared processes
- Dynamically extend logic without breaking modular separation
Use Services to extend complex processes such as:
onDBInsert,onDBUpdate,onDBDelete- Dependency calculation (e.g.,
Dependency.mapping) - Validation, enrichment, transformation
Definition and Implementation
Global Services
Created under the service node in the Designer:
- Right-click the
servicefolder → New - Choose type:
service, name:lowerCamelCase_service - Right-click the service → Add Implementation
- Name the implementation:
lowerCamelCase_impl - Provide your implementation logic in the
processproperty
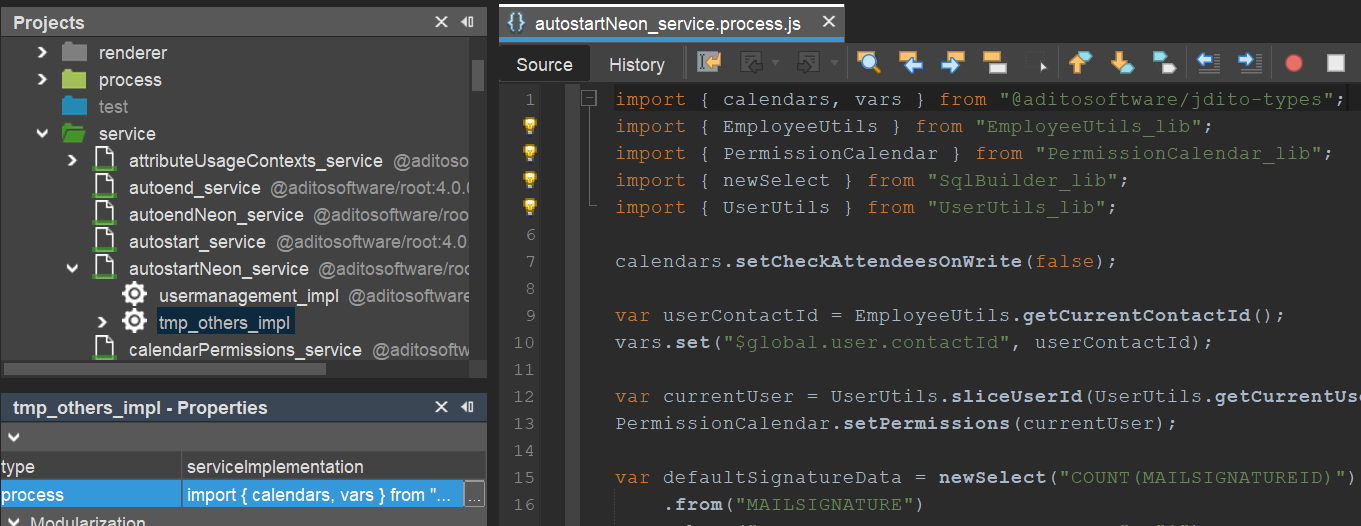 Figure: Global Service with one implementation
Entity Services
Defined directly inside an Entity and only usable there.
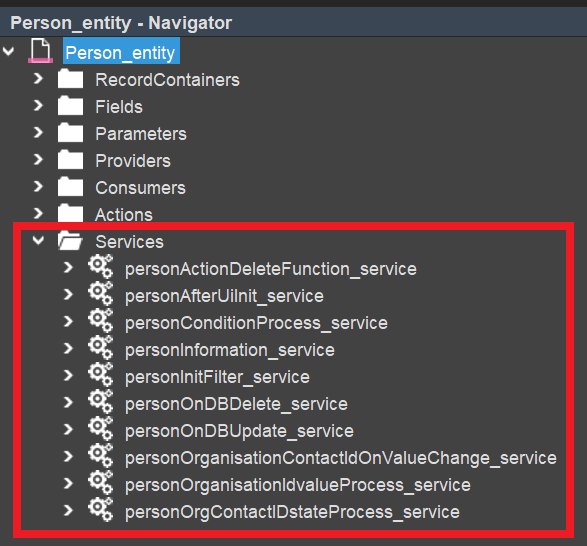 Figure: Entity Service inside a specific Entity
Calling Services
Use modules.loadService("serviceName_service") to access implementations.
Example (without parameters):
import { modules } from "@aditosoftware/jdito-types";

modules.loadService("serviceName_service").forEach(impl => impl());
Each implementation is transpiled into a function. The transpiler replaces the loadService() call with an array of generated implementations.
Generated code at transpile time:
[
  _____GENERATED_serviceName_service_impl1,
  _____GENERATED_serviceName_service_impl2
].forEach(impl => impl());
Passing Parameters
If implementations need parameters, they must return a function.
Usage:
modules.loadService("myService").forEach(impl => impl()(param1, param2));
Implementation:
let fn = (p1, p2) => {
  // logic
};

//@ts-ignore
return fn;
Example: Entity Service
Extending the onDBUpdate process of Person_entity.
- Define a
personOnDBUpdate_service - Implement it in two modules:
duplicateanddsgvo - Call it inside
Person_entity.db.onDBUpdate
Transpiled code:
[
  _____GENERATED_personOnDBUpdate_service_dsgvo_impl,
  _____GENERATED_personOnDBUpdate_service_duplicate_impl
].forEach(fn => fn());
Example: Global Dependency Mapping
Used in Dependency_lib to consolidate entity dependencies.
Before Modularization:
Dependency.mapping = function() {
  return { /* huge object */ };
};
After Modularization:
Dependency.mapping = function() {
  let result = {};
  let services = modules.loadService("entityDependencyMapping_service");

  for (let impl of services) {
    Object.assign(result, impl());
  }
  return result;
};
Each module provides one service implementation that returns its portion of the dependency structure.
Notes
- Implementations are merged by the transpiler
- ESLint may show false warnings: use
//@ts-ignorebeforereturn - Service implementation code is stored in the module’s
modificationfolder
Process Overrides
Instead of replacing entire modules, you can override individual JDito processes from a dependent module (e.g., valueProcess, contentProcess, or library logic).
How to Override a Process
- Open a process in a dependent module (via External Libraries).
- Click "Override Process" in the toolbar.
- The process is copied into your module’s
modificationfolder and marked as overridden.
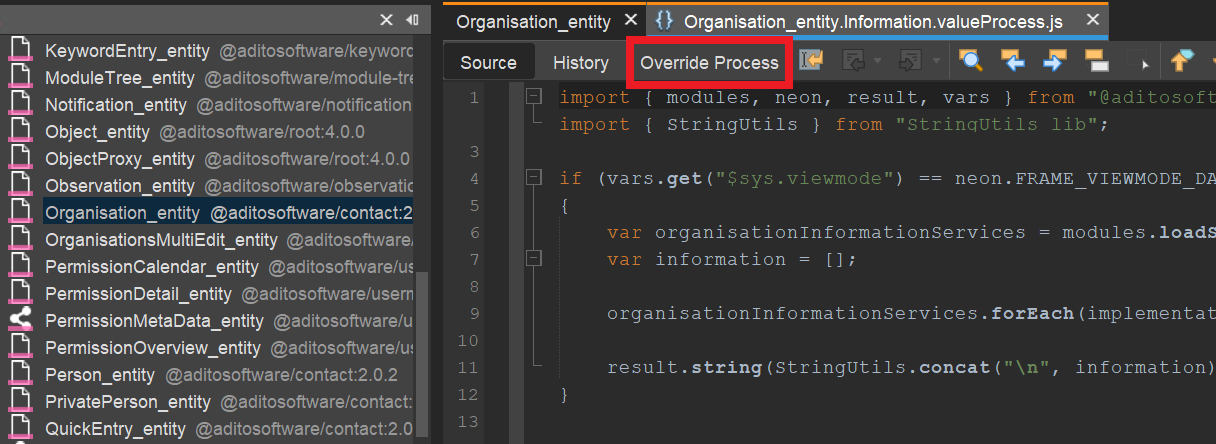 Figure: Overriding a process in the Designer
This creates a modification entry that replaces the original implementation at transpile time.
Overridden processes behave like local source code during development and are merged into the transpiled project.
Alternatives to Overrides
Whenever possible, use Extension Points or Services to inject logic or extend behavior. These techniques are safer, more transparent, and compatible with ADITO’s modular architecture.
For excluding specific code without overriding, see includeInBuild.
Summary: Override vs. Service / Extension Point
| Criterion | Override | Service / Extension Point |
|---|---|---|
| Scope | Full process or module replacement | Targeted code injection (hook-based) |
| Transparency | Low (only visible in local module) | High (clear and traceable) |
| Risk of conflicts | High, especially with multiple overrides | Low |
| Multi-module compatibility | No | Yes |
| Traceability | Limited | Good |
| Recommended in ADITO xRM? | No, only in isolated cases | Yes, preferred |
Modifications
When a module modifies a data model from another module, the original source is not changed. Instead, ADITO creates a modification entry in the modifying module. These entries are stored in a folder named modification, which is not visible in the Designer’s "Projects" view but exists in the file system.
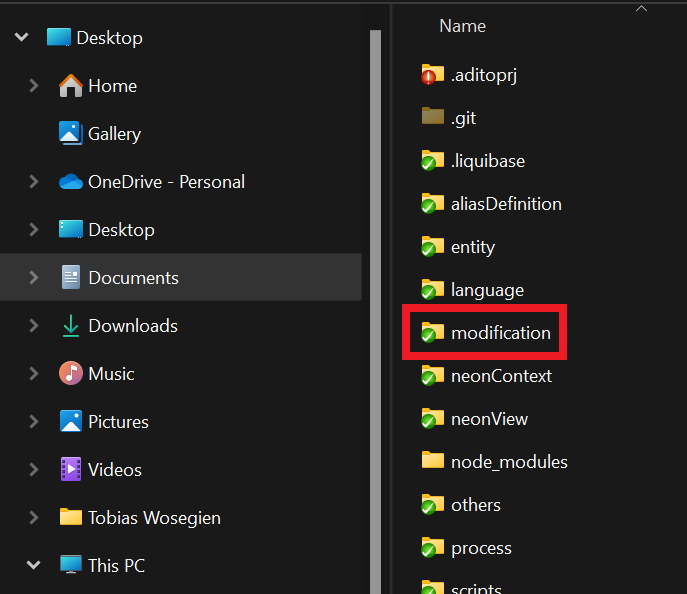 Figure: Modification folder at file system level
Each modification represents an injected or overridden element such as:
- Extension Point implementations
- Service implementations
- Overridden processes
For example, when adding an EntityField to a dependent module’s Entity, the field is stored as a modification—not directly in the Entity’s source.
Modification Mechanics
When working in the Designer:
- You may view and interact with models from dependent modules.
- But any changes are written as modifications in your own module.
- Each modification consists of:
- A folder with a unique GUID
- An
.aodfile describing the change (name matches the folder) - Optional additional files (e.g.,
.jslogic files)
During transpile, the transpiler:
- Resolves all
modificationentries - Merges them into a unified
distproject - Applies changes as specified in the
.aodfiles
If a module of type project is deployed, a transpile is executed automatically before deployment.
Example: Injecting an EntityField
If module activity implements a FieldExtensionPoint of contact’s Organisation_entity, the Designer creates a new GUID-named folder inside activity/modification.
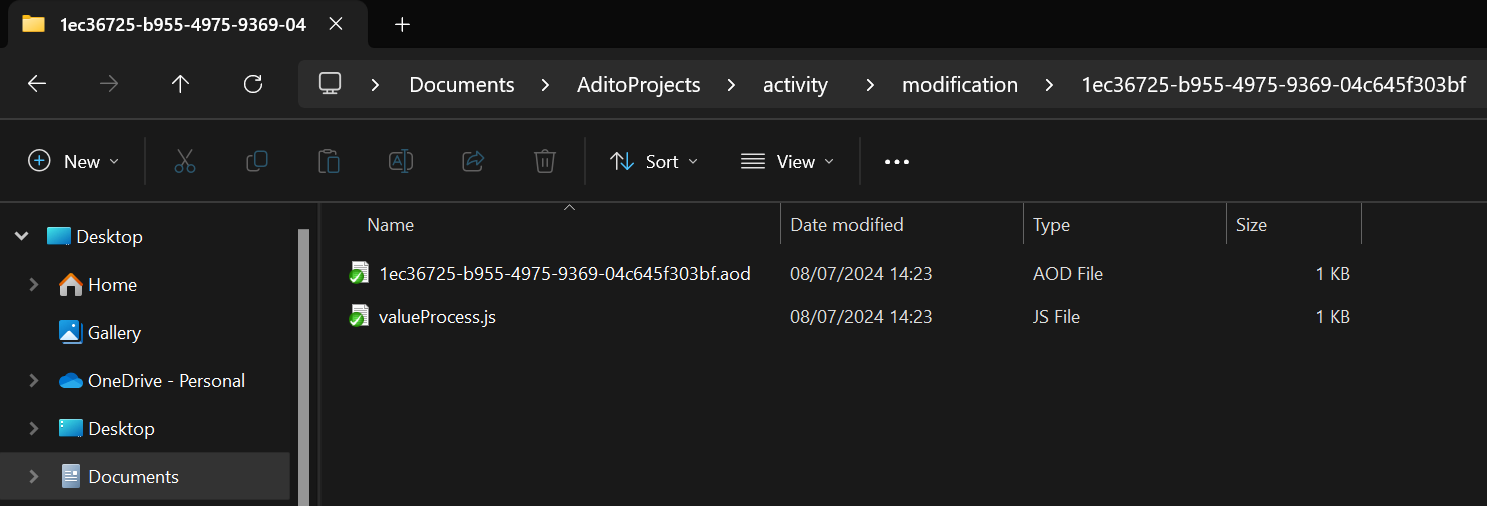 Figure: Structure of a modification folder
A simplified .aod file might look like this:
<?xml version="1.0" encoding="UTF-8"?>
<modification VERSION="1.1.0" xmlns="http://www.adito.de/2018/ao/Model"
 xmlns:xsi="http://www.w3.org/2001/XMLSchema-instance"
 xsi:schemaLocation="http://www.adito.de/2018/ao/Model adito://models/xsd/modification/1.1.0">
  <name>1ec36725-b955-4975-9369-04c645f303bf</name>
  <majorModelMode>DISTRIBUTED</majorModelMode>
  <changeType>INSERT</changeType>
  <modelType>entity</modelType>
  <modelName>Organisation_entity</modelName>
  <path>Organisation_entity/entityFields/FieldExtensionPoint/implementations</path>
  <value>
    <modelValueWrapper>
      <name>value</name>
      <value>
        <entityField>
          <name>CountActivity</name>
          <title>Number of activities</title>
          <valueProcess>%aditoprj%/modification/1ec36725-b955-4975-9369-04c645f303bf/valueProcess.js</valueProcess>
        </entityField>
      </value>
    </modelValueWrapper>
  </value>
</modification>
Relevant fields:
changeType:INSERT,UPDATE, orDELETEmodelNameandpath: Targeted model and injection pointvalue: The new or modified content (e.g., anEntityField)
After Transpile
After transpiling, the dist project contains:
- The merged
Organisation_entity - Including the
CountActivityfield - With logic (e.g., valueProcess) correctly linked
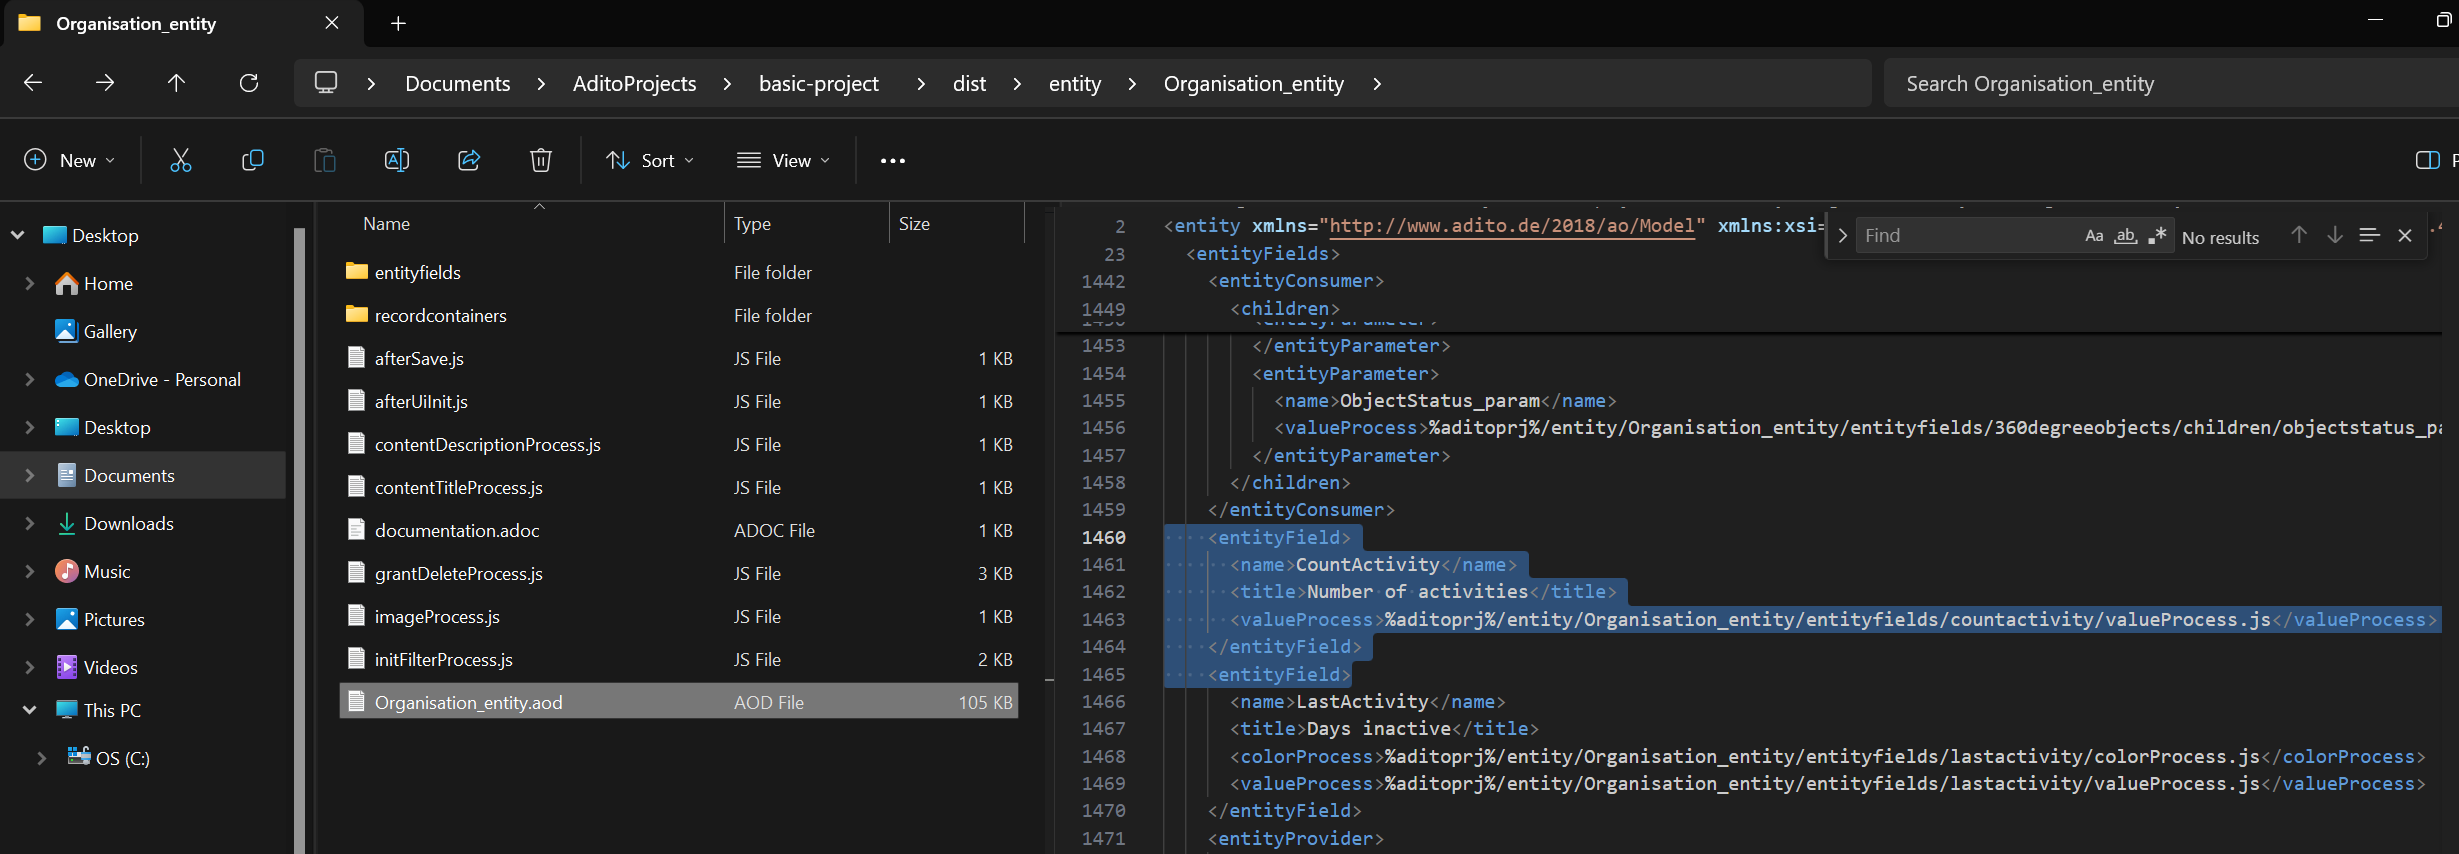 Figure: Transpiled output including the extension