Solr AdminUI
This section provides a brief introduction to Solr's AdminUI. The AdminUI offers the ability to view information about the service and collections, activate additional logging for Solr, and perform management actions for individual collections. Here we describe the most common views and options that are relevant for troubleshooting and problem resolution.
Accessing the AdminUI
To access the AdminUI of the Solr, an SSH tunnel to connect to the ADITO system must be established first.
Then by using either http://localhost:8983/solr/ or http://adito-solr.[My-ADITO-Domian]:8983/solr/ as URL will show the main dashboard.
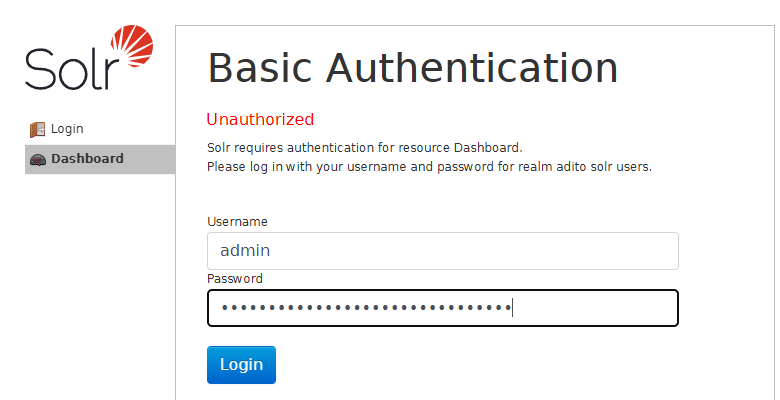
If basic auth is enabled, the first access will show the login screen.
The port 8983 is the default used in all ADITO-Cloud systems and the legacy adito/solr docker image.
The actual URL to access the Solr depends on the System and the way used to open the SSH tunnel that manages port mapping and forwarding. Look up the actual host and port in your designer or script used to establish the tunnel.
Login
By default, the user admin is set up.
The password can be found in the SSP in the Details tab under Config Maps stored in the parameter INFO_secret_SOLR.admin.
When accessing via Kubernetes, the parameter can be found in the secrets of the ADITO system.
Dashbord
The dashboard shows the basic information about the Solr, including the version, number of processes, amount of RAM, and active settings. This is the default landing page of the AdminUI. On the left side of the page are the main menu options, which are described in the following sections.
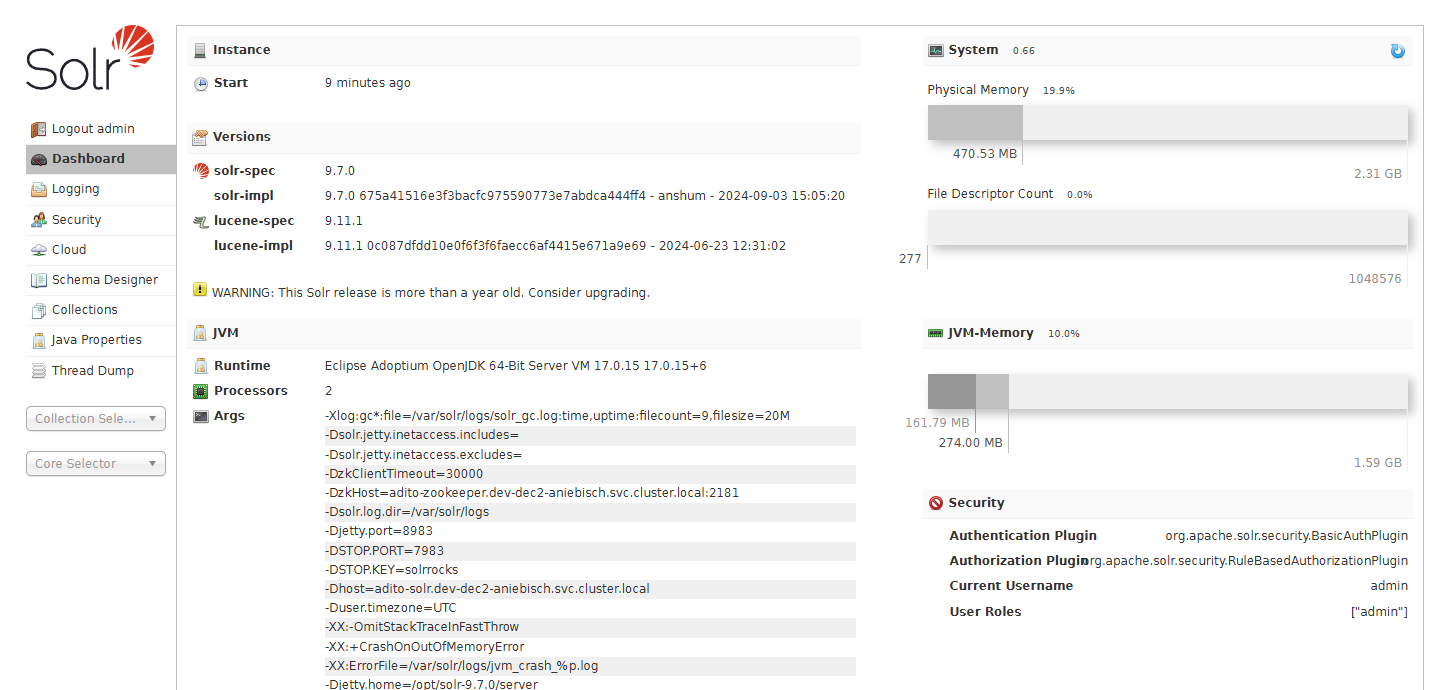
The dashboard contains the following panels:
- Instance - Shows the uptime of the Solr instance.
- Versions - Shows the version of the Solr and underlying Lucene version.
- JVM - Contains all information about the JVM used by the Solr.
- Runtime - Shows the JVM version of the Solr.
- Process - Shows the number of processes used by the Solr.
- Args - Shows a list of all arguments used to start the Solr.
- System - Shows the information for physical memory and file descriptor count.
- JVM Memory - Shows the currently used and maximum memory of the JVM.
- Security - Shows the currently used security plugin.
Logging
The logging page contains a list of all current log messages from the Solr.
In SPP systems, the logging page only shows log messages that occurred during the startup of the Solr instance. All other log messages are redirected and only available in the GrayLog of the ADITO system.
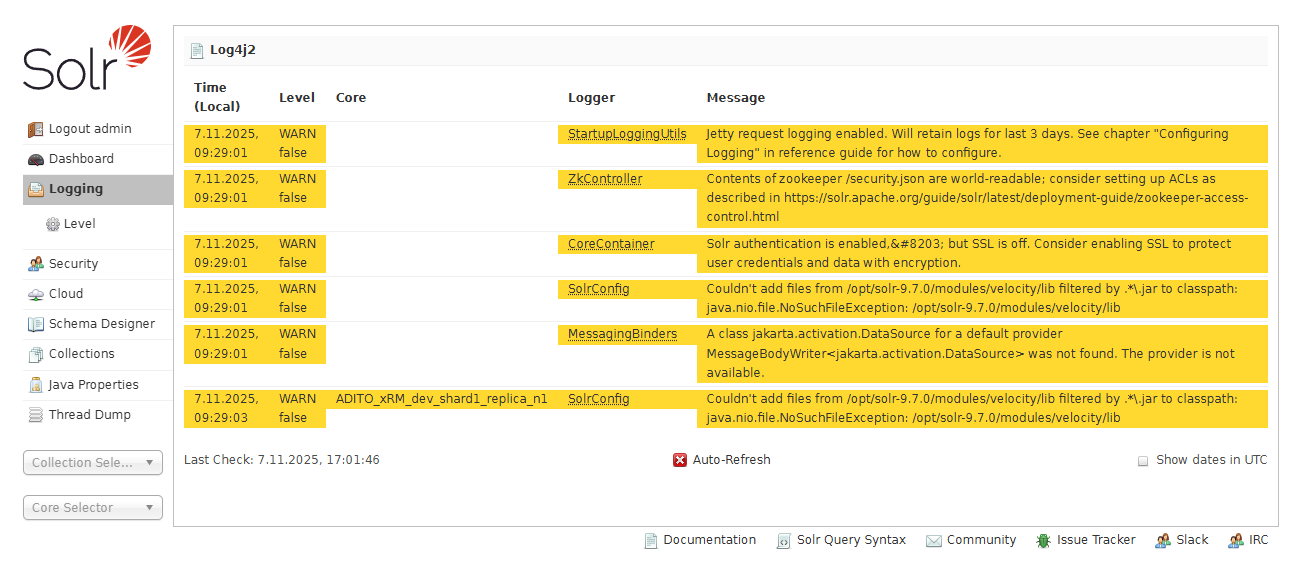
- Solr uses the Log4j2 logging framework.
- The default log level is set to
WARNso only warnings and errors are shown. - This page does automatically refresh.
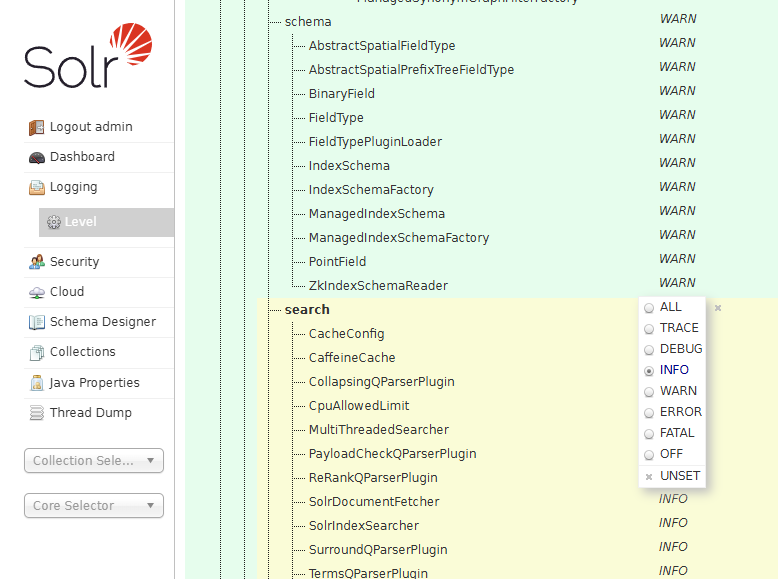
Change the Log Level
The log level can be changed by clicking on the Level option within the Logging menu.

- This page contains a list of all available Log4j loggers and their current log level.
To change the log level of a specific logger, click on the logger in the tree and select the desired log level.
- This will change the log level of all loggers that are below the selected logger.
- All changes are applied immediately at runtime.
Useful Loggers
| Logger | Description |
|---|---|
org.apache.solr.core.SolrCore.SlowRequest | Logs if all slow requests to a core of the collection. |
org.apache.solr.handler.SchemaHandler | Logs all actions done to the schema of a collection . |
org.apache.solr.component | Creates detailed logs for specific query operations during search, like the facade search. |
org.apache.solr.search | Creates detailed logs for all search requests. |
org.apache.solr.servlet.HttpSolrCall | Logs all incoming http requests of the Solr. |
org.apache.solr.update.UpdateHandler | Creates logs for all update operations done during indexing. |
Security
The security menu allows to configure basic authentication settings and to manage users and roles and their permissions.
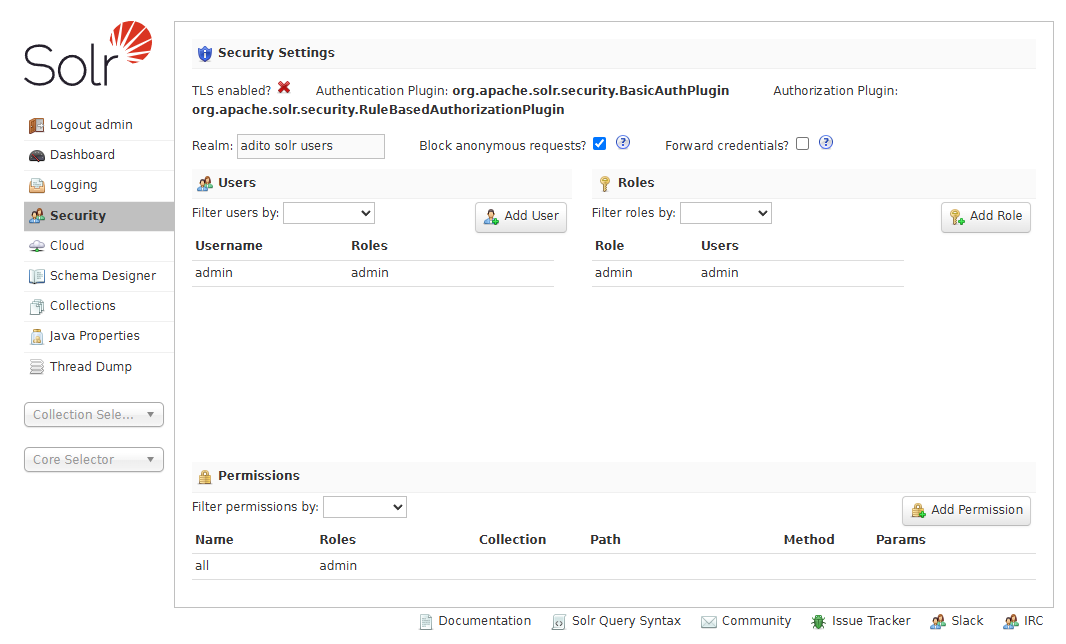
- The security menu is only available if a security plugin like the basic authentication plugin is enabled.
- The solr user used by the ADITO server and administrator if separate must have the
adminrole with the permissionallto grant full access to the Solr. - The password for the solr user for unmanaged or on-premise ADITO systems can be configured here after the initial setup.
- To edit the password of an existing user, click on the user in the list under the Users section. This will open a dialog where the password and roles can be changed.
Any changes of the security settings in a managed ADITO system will be lost after the next restart of the Solr instance. This is because the ADITO operator manages the security settings and will overwrite any changes made in the AdminUI.
Cloud
The menu Cloud contains information about the current state and configuration files of the Solr Cloud. It contains the sections Nodes, Tree, ZK Status and Graph. The individual sections are described below.
Nodes
The Nodes section shows the current state of the all Solr Cloud nodes, which in the case of an ADITO system is a single node. It contains general information about the node, the current state, the host, the memory and cpu usage, disc space usage and document count.
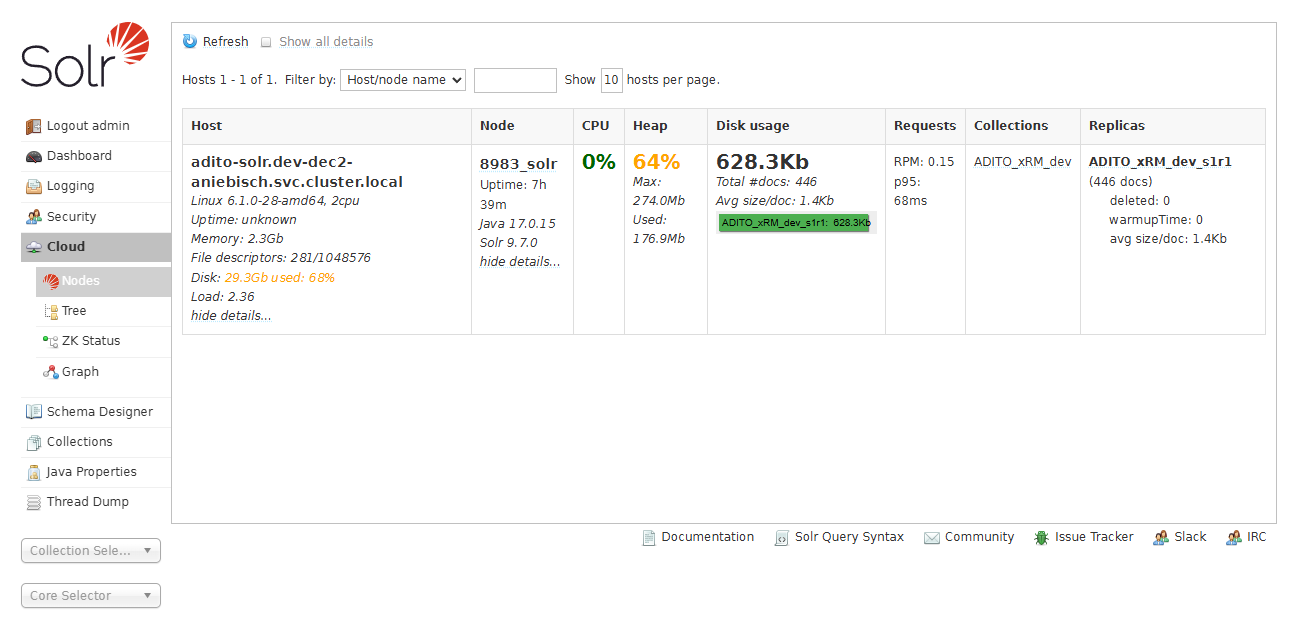
- If the node is not in the state
active, it will be highlighted in red and most of the information is unavailable.
The node information is only available if the Solr and Zookeeper are correctly configured.
The Status is monitored by the Zookeeper.
If the Zookeeper cannot reach the Solr via the configured Solr host, the node will be marked as down.
Tree
The Tree section provides a simple file browser for all files used by the Solr.
- The browser can only display JSON, XML and TXT files.
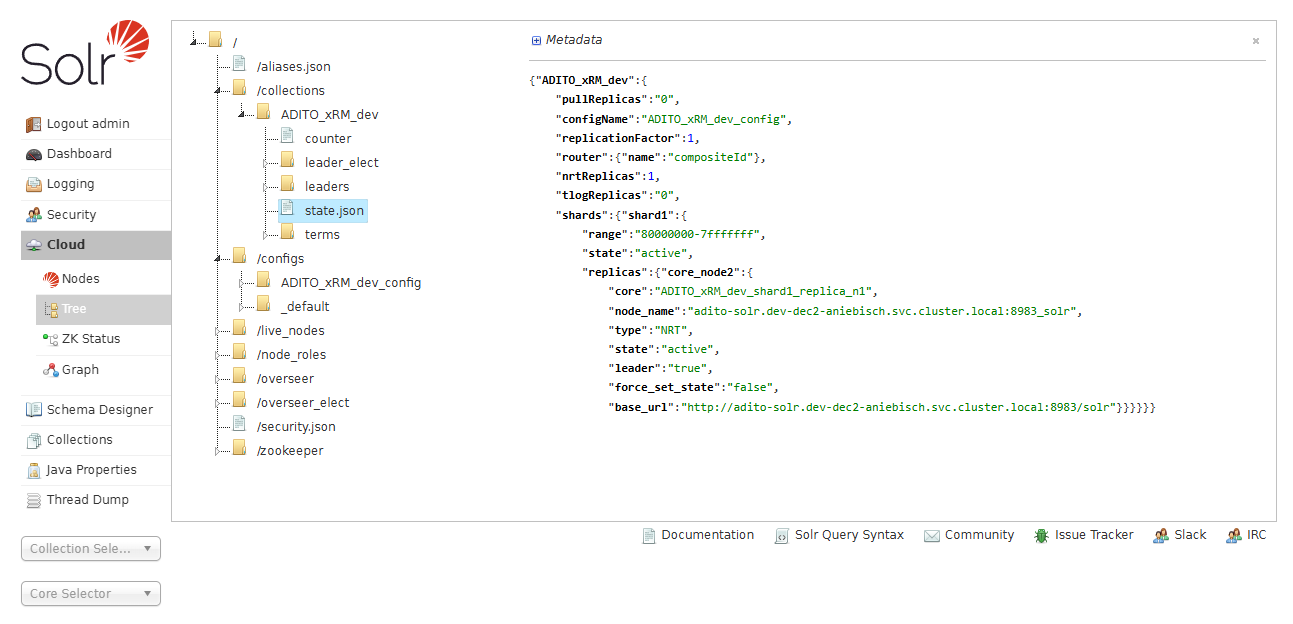
Useful files and folders:
/security.json- The current active security configuration of the Solr. Empty if no security plugin is enabled./configs- Folder containing all available ConfigSets./collections- Folder containing all existing collections./collections/<My-Collection>/state.json- Managed file containing the current state of the collection.
ZK Status
Shows general information and the current status of the Zookeeper.
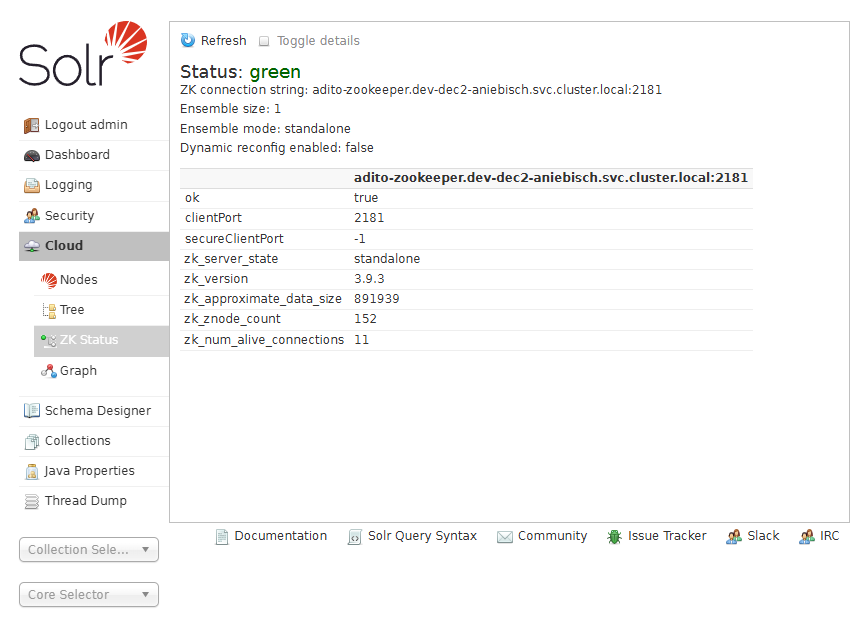
- If the Zookeeper is not reachable, the status will be marked as
down. - If the ZooKeeper works correctly, the status will be marked as
green.
Collections
The Collections section shows a list of all existing collections and allows performing basic actions like creating and deleting collections.
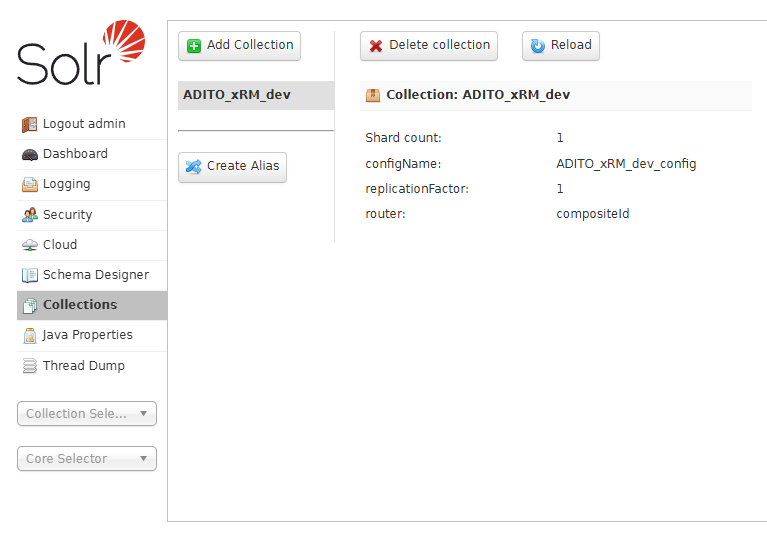
- When selecting a collection, additional information for the collection is shown like the used ConfigSet and number of shards and the replication factor.
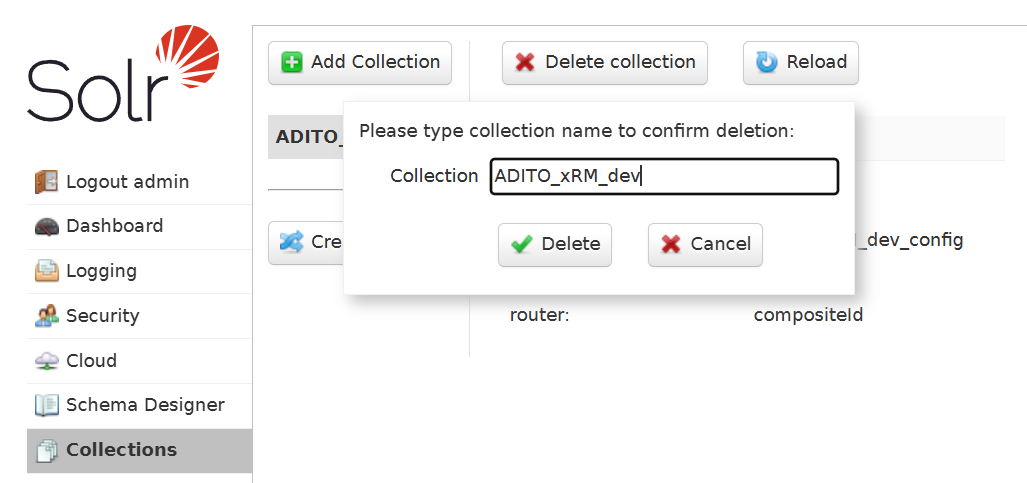
- With the
Delete Collectionbutton, the collection can be deleted.- This will show a small popup window where the name of the collection needs to be entered manually to confirm the deletion.
Official Guides
For more detailed information regarding the AdminUI please see the official guide if needed.
Solr Reference Guide — Solr Admin UI
Common Actions
A short description of the most common actions that can be done with the AdminUI to help troubleshooting.
Checking the Status Information
Overall System Status of the Solr
The overall status of the Solr can be checked in the Dashboard section.
- This shows the uptime of the Solr instance, general information like the processor count and memory usage.
- The Args lists all active arguments used to start the Solr.
Collection Status
The overall status of the collection can be checked in the Nodes section.
- If the collection is not in the state
active, it will be highlighted in red and most of the information is unavailable. - If the node information does not contain an active collection, the collection is not created yet.
For more detailed information about the collection can be found in the Collections section.
- To view the information about the collection, select the collection in the list.
- If the collection is not shown in the list, it is not created yet.
For the most detailed information about the collection status, the state.json file of the collections folder can be accessed via the Tree section.
- The
state.jsoncontains the current state of theshardsandreplicasof the collection. - All
statefields should have the valueactive. - If the
stateof one is notactive, the collection is not running correctly.- A restart of solr can fix this issue, otherwise the collection will not be recreated.
Zookeeper Status
The overall status of the Zookeeper can be checked in the ZK Status section.
- If the Zookeeper is not reachable, the status will be marked as
down. - If the ZooKeeper works correctly, the status will be marked as
green.
Checking the ADITO-ConfigSet Information
The required ConfigSet for the ADITO version used can be found on the Versions and Dependencies page. This section describes how to check and verify if the collection uses the correct ConfigSet or what the name of the used ConfigSet is.
The name of the ConfigSet actually used by the collection does not match the name of the ConfigSet stated as baseConfigSet in the version guide.
On collection creation the ConfigSet is either copied from the baseConfigSet or directly uploaded by the ADITO server.
In order for multiple collections to not use the same ConfigSet, the ConfigSet actual ConfigSet is named <My-Collection>_config.
Finding the name of the uses ConfigSet
-
In the Collections section, the name of used ConfigSet is viewed when selecting it in the list.
-
Alternatively, the name of the used ConfigSet can be found in the
configoverlay.jsonfile of the collection. -
This file can be accessed
- either via the file browser of Tree menu under
/collections/<My-Collection>/configoverlay.jsonfolder. - or via the Files menu of the selected Collection on the left side of the page.
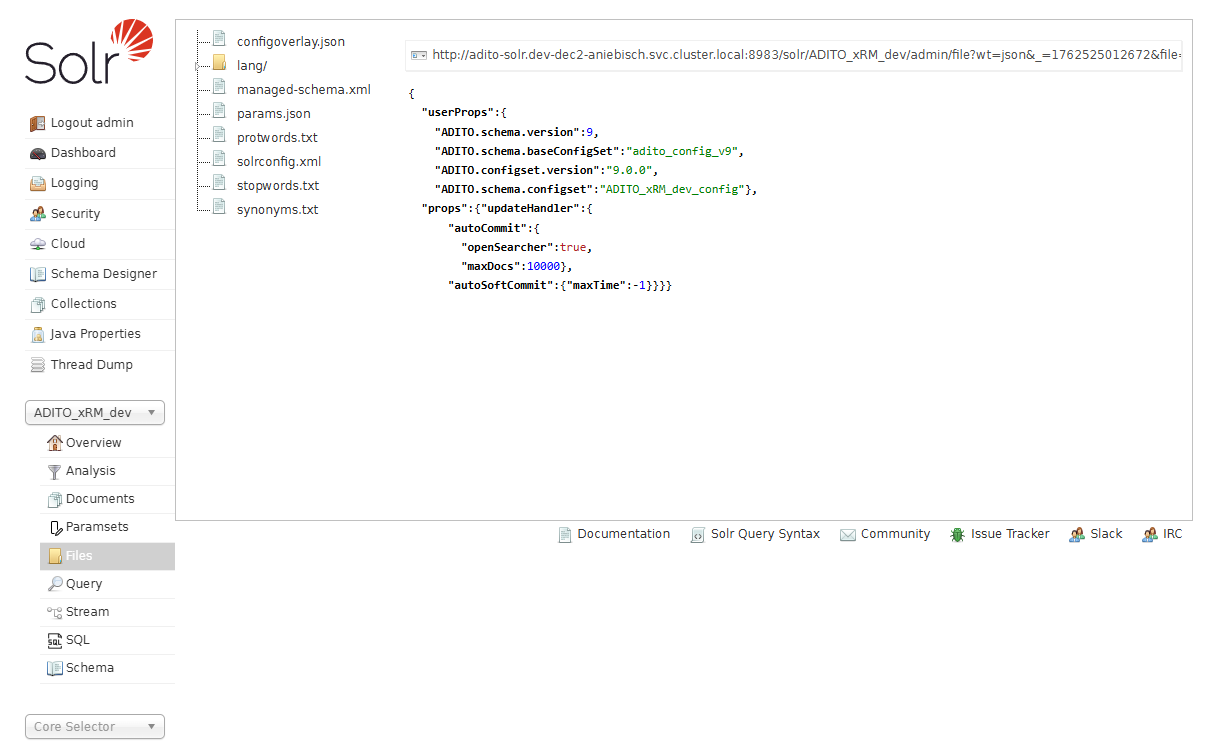
- either via the file browser of Tree menu under
Checking the ConfigSet
- ADITO 2025
- ADITO 2024 and older
{
  "userProps":{
    "ADITO.schema.version":9,
    "ADITO.schema.baseConfigSet":"adito_config_v9",
    "ADITO.configset.version":"9.0.0",
    "ADITO.schema.configset":"ADITO_xRM_dev_config"},
  "props":{"updateHandler":{
      "autoCommit":{
        "openSearcher":true,
        "maxDocs":10000},
      "autoSoftCommit":{"maxTime":-1}}}}
-
The ConfigSet must contain a
userPropselement in with allADITOproperties are stored.- The ADITO server writes and uses requires the properties to verify the collection.
- If this part is missing or does not contain all required properties, the indexsearch of the ADITO server will not start.
-
Required properties:
ADITO.schema.version- The main version of the used schema.ADITO.schema.baseConfigSet- The name of the base ConfigSet used as template.ADITO.configset.version- The version of the used ConfigSet.ADITO.schema.configset- The name of the ConfigSet.
{
  "userProps":{
    "ADITO.schema.version":7,
    "ADITO.schema.baseConfigSet":"adito_config_v7.1.2",
    "ADITO.config.version":"7.0.1",
    "ADITO.schema.version.build":"7.1.2"},
  "props":{"updateHandler":{"autoCommit":{
    "openSearcher":true,
    "maxDocs":10000}}},
  "searchComponent":{"tag_search":{
    "name":"tag_search",
    "class":"solr.SuggestComponent",
    "suggester":[
      {
        "name":"tag_fuzzy",
        "lookupImpl":"FuzzyLookupFactory",
        "dictionaryImpl":"DocumentDictionaryFactory",
        "maxEdits":"2",
        "unicodeAware":"true",
        "field":"_tags_suggest_",
        "suggestAnalyzerFieldType":"tag",
        "buildOnStartup":"true",
        "buildOnCommit":"false"},
      {
        "name":"tag_infix",
        "lookupImpl":"BlendedInfixLookupFactory",
        "dictionaryImpl":"DocumentDictionaryFactory",
        "indexPath":"TagLookupSearchBlendedIndexDir",
        "field":"_tags_suggest_",
        "contextField":"_tags_",
        "suggestAnalyzerFieldType":"tag",
        "queryAnalyzerFieldType":"tag_suggest",
        "buildOnStartup":"true",
        "buildOnCommit":"false",
        "highlight":"false",
        "blenderType":"position_linear"}]}}}
-
The ConfigSet must contain a
userPropselement in with allADITOproperties are stored.- The ADITO server writes and uses requires the properties to verify the collection.
- If this part is missing or does not contain all required properties, the indexsearch of the ADITO server will not start.
-
Required properties:
ADITO.schema.version- The main version of the used schema.ADITO.schema.baseConfigSet- The name of the base ConfigSet used as template.ADITO.config.version- The version of the contained configuration (solrconfig.xml).ADITO.schema.version.build- The version of the used schema (managed-schema.xml).
Checking Basic-Auth and Security
- The first indicator if basic authentication is enabled is if the login screen is shown when accessing the AdminUI.
- The active security plugin is shown in the Security part of the Dashboard in the bottom right corner.
- If no security plugin is enabled, the Security menu in the main menu on the left side will not be available.
All solr related security settings are stored in the security.json file.
This /security.json file can be accessed via the file browser of the Tree menu under Cloud.
If basic authentication is enabled, the security.json file will contain the following information:
{
  "authentication":{
    "blockUnknown": true,
    "class":"solr.BasicAuthPlugin",
    "credentials":{"admin":"Lux..BASE64-HASH-VALUE..U= AYw..BASE64-HASH-VALUE..kpo="},
    "realm":"adito solr users",
    "forwardCredentials": false
  },
  "authorization":{
    "class":"solr.RuleBasedAuthorizationPlugin",
    "permissions":[{"name":"all", "role":"admin"}],
    "user-role":{"admin":"admin"}
  }}
-
The
authenticationsection contains the settings for the authentication plugin used.- The
blockUnknownsetting is set totrueto prevent anonymous access. - The
classsetting is set tosolr.BasicAuthPluginto use the basic authentication plugin. - The
credentialssection contains the username and password of the solr user. - The
realmsection contains the name of the security realm.
- The
-
The
authorizationsection contains the settings for the authorization plugin used.- The
classsetting is set tosolr.RuleBasedAuthorizationPluginto use the local rule-based authorization plugin. - The
permissionssection contains the permissions for the solr user.- The
namesetting is set toallto grant full access to the Solr. - The
rolesetting is set toadminto assign the solr user to theadminrole.
- The
- The
user-rolesection contains the mapping between the solr user and the role.- The
adminsetting is set toadminto assign the solr user to theadminrole.`
- The
- The
Deleting a Collection
- Got to the Collections section.
- Select the collection to delete.
- Click the
Delete Collectionbutton at the top of the page. - This will show a small popup window where the name of the collection needs to be entered manually.
- Confirm the deletion by clicking the
Deletebutton.
Deleting a specific ConfigSet
Delete a specific ConfigSet is not possible in the AdminUI. But it can be done via a REST call to the ConfigSet API.
-
Directly via the Browser:
http://adito-solr.<MY-SYSTEM>.svc.cloud.local:8983/solr/admin/configs?action=DELETE&name=<MY-CONFIG-SET>&omitHeader=true -
via Curl:
curl -X DELETE 'http://adito-solr.<MY-SYSTEM>.svc.cloud.local:8983/solr/admin/configs?action=DELETE&name=<MY-CONFIG-SET>&omitHeader=true'
When the operation is successful the ConfigSet will no longer be available in the Tree menu under /configs.