Stepper
The Stepper ViewTemplate provides a visual representation of a process composed of discrete steps. Each step is rendered as a circle aligned horizontally, displaying a title, an icon, and a state. This ViewTemplate is primarily used for illustrating progress in multi-step workflows such as sales phases, approval processes, or structured user journeys.
Appearance in the Client
In the ADITO client, the stepper appears as a horizontal sequence of labeled steps. Each step shows:
- An icon (configured via the
iconField) - A title (via the
titleField) - A state (via the
stateField) such asACTIVE,EDITABLE, orDISABLED
The stepper is typically embedded via a LookupViewTemplate, for example in the MainView (tab "Overview") of the Context "Opportunity" under the "Sales" menu group.
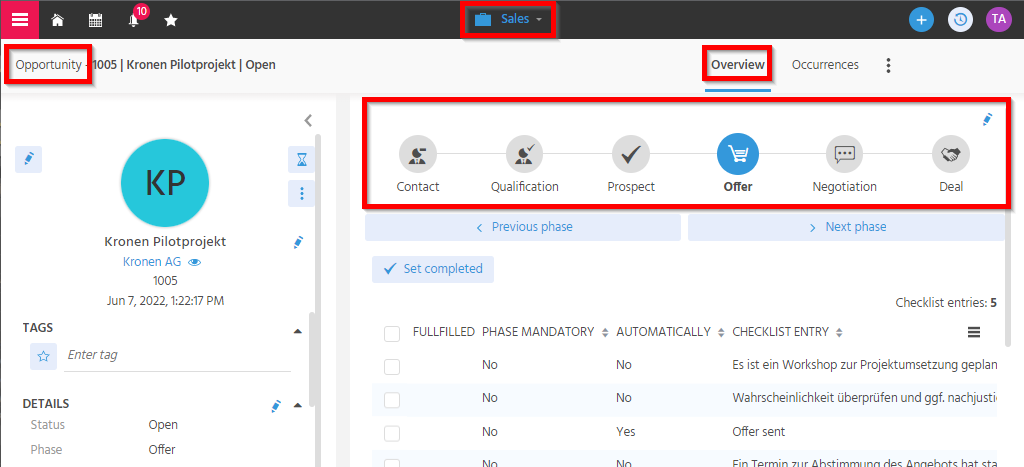
Figure: Stepper in a sales phase view
Configuration
Required Properties
| Property | Description | Required |
|---|---|---|
stateField | Field containing the state of each step (e.g., ACTIVE, EDITABLE, DISABLED) | ✅ |
titleField | Field holding the visible title for each step | ✅ |
iconField | Field providing the step icon (optional). Supports keyword icons or Base64 image content | ⬜ |
Step logic is typically implemented in the RecordContainer's contentProcess, via jDito logic.
Basic Example: contentProcess
var res = [];
var steps = ["BEGINNER", "ADVANCED", "PRO"];
var selected = vars.get("$param.CurrentLevel_param");

steps.forEach(function(stepId) {
    var stepState = stepId === selected ? "ACTIVE" : "EDITABLE";
    res.push([stepId, stepState, stepId, _getIcon(stepId)]);
});

result.object(res);

function _getIcon(id) {
    return {
        BEGINNER: "VAADIN:MINUS",
        ADVANCED: "VAADIN:PLUS_MINUS",
        PRO: "VAADIN:PLUS"
    }[id] || "VAADIN:CIRCLE-THIN";
}
Step-by-Step Implementation Example
Use Case
Display a stepper for a contact person’s experience level (BEGINNER, ADVANCED, PRO) in a dedicated tab in PersonMain_view.
Step 1: Define Keywords
- KeywordCategory:
ExperienceLevel - KeywordEntries:
BEGINNER,ADVANCED,PRO - KeywordAttribute:
icon - Assign icons:
BEGINNER→VAADIN:MINUSADVANCED→VAADIN:PLUS_MINUSPRO→VAADIN:PLUS
Step 2: Register Keywords in JavaScript
$KeywordRegistry.ExperienceLevel = () => "ExperienceLevel";
$KeywordRegistry.ExperienceLevel$beginner = () => "BEGINNER";
$KeywordRegistry.ExperienceLevel$advanced = () => "ADVANCED";
$KeywordRegistry.ExperienceLevel$pro = () => "PRO";
Step 3: Extend Data Model
- Add column
EXPERIENCELEVELto thePERSONtable - Set default value to
"BEGINNER" - Add EntityField
EXPERIENCELEVELinPerson_entity(module contact) with properties:title: Experience levelstate:EDITABLEmandatory:truecontentType:TEXT
Step 4: Map Fields in RecordContainer
Link EXPERIENCELEVEL.value to PERSON.EXPERIENCELEVEL
Display value expression:
var sql = KeywordUtils.getResolvedTitleSqlPart($KeywordRegistry.ExperienceLevel(), "PERSON.EXPERIENCELEVEL");
result.string(sql);
valueProcess:
if (vars.get("$sys.recordstate") == neon.OPERATINGSTATE_NEW && vars.get("$this.value") == null) {
    result.string($KeywordRegistry.ExperienceLevel$beginner());
}
displayValueProcess:
var res = KeywordUtils.getViewValue($KeywordRegistry.ExperienceLevel(), vars.get("$field.EXPERIENCELEVEL"));
result.string(res);
Step 5: Create Lookup View
- Create
PersonExperienceLevel_view(layout: BoxLayout) - Add a
LookupViewTemplate:consumerField:EXPERIENCELEVELconsumerPresentationMode:EMBEDDED
- Integrate this view into
PersonMain_view(e.g., as tab "Experience Level")
Step 6: Create Controlling Entity
- Context:
PersonExperienceLevel - Entity:
PersonExperienceLevel_entity - Fields:
UID,TITLE,ICON,STATE - Parameters:
CurrentLevel_param,DisabledLevels_param - RecordContainer:
jDito
contentProcess:
var res = [];
var ids = vars.get("$local.idvalues");
var disabledLevels = JSON.parse(vars.get("$param.DisabledLevels_param")) || [];
var steps = KeywordUtils.getEntryArray($KeywordRegistry.ExperienceLevel(), null, true);
var selected = vars.get("$param.CurrentLevel_param");

if (ids) {
    steps = steps.filter(pStep => ids.includes(pStep[0]));
}

steps.forEach(function([stepId, title]) {
    var stepState = "DISABLED";
    if (stepId === selected) {
        stepState = "ACTIVE";
    } else if (!disabledLevels.includes(stepId)) {
        stepState = "EDITABLE";
    }

    res.push([stepId, stepState, title, _getIcon(stepId)]);
});

result.object(res);

function _getIcon(pLevel) {
    var iconAttr = new KeywordAttribute($KeywordRegistry.ExperienceLevel(), "icon", "VAADIN:CIRCLE-THIN");
    return iconAttr.getValue(pLevel);
}
Step 7: Create Stepper ViewTemplate
- View:
PersonExperienceLevelStepper_view - Template name:
ExperienceLevelStepper - Set layout:
BoxLayout - Configure properties:
stateField:STATEtitleField:TITLEiconField:ICON
- Set this view as
lookupViewin the contextPersonExperienceLevel
Step 8: Create Consumer
- Consumer name:
PersonExperienceLevelStepper - Target entity:
Person_entity - Configuration:
entityName:PersonExperienceLevel_entityfieldName:#PROVIDERstate:EDITABLE
valueProcess for parameter CurrentLevel_param:
result.string(vars.get("$field.EXPERIENCELEVEL"));
Assign this consumer to the EXPERIENCELEVEL.consumer property.
Step 9: Add for Testing
Add the EXPERIENCELEVEL field to:
- ViewTemplate
"Edit"ofPersonEdit_view - ViewTemplate
"Info"ofPersonPreview_view
Navigate to Contact > Person, open a contact in the MainView, and use the tab "Experience Level" to test the stepper.
Use the pencil icon to enter edit mode and select a step. Click "Save" to persist the change.
Optional: Disabling Steps Dynamically
You can use the parameter DisabledLevels_param to disable steps based on business rules. This prevents selection and changes the icon appearance.
valueProcess example:
result.string(JSON.stringify([
  $KeywordRegistry.ExperienceLevel$beginner(),
  $KeywordRegistry.ExperienceLevel$pro()
]));
This disables BEGINNER and PRO.
This is only one approach to control stepper behavior.
More advanced use cases are possible, including dynamic logic, custom icons, or using entities other than keywords.