Notifications and Observations
Basics
Notifications are pieces of information shown in ADITO
-
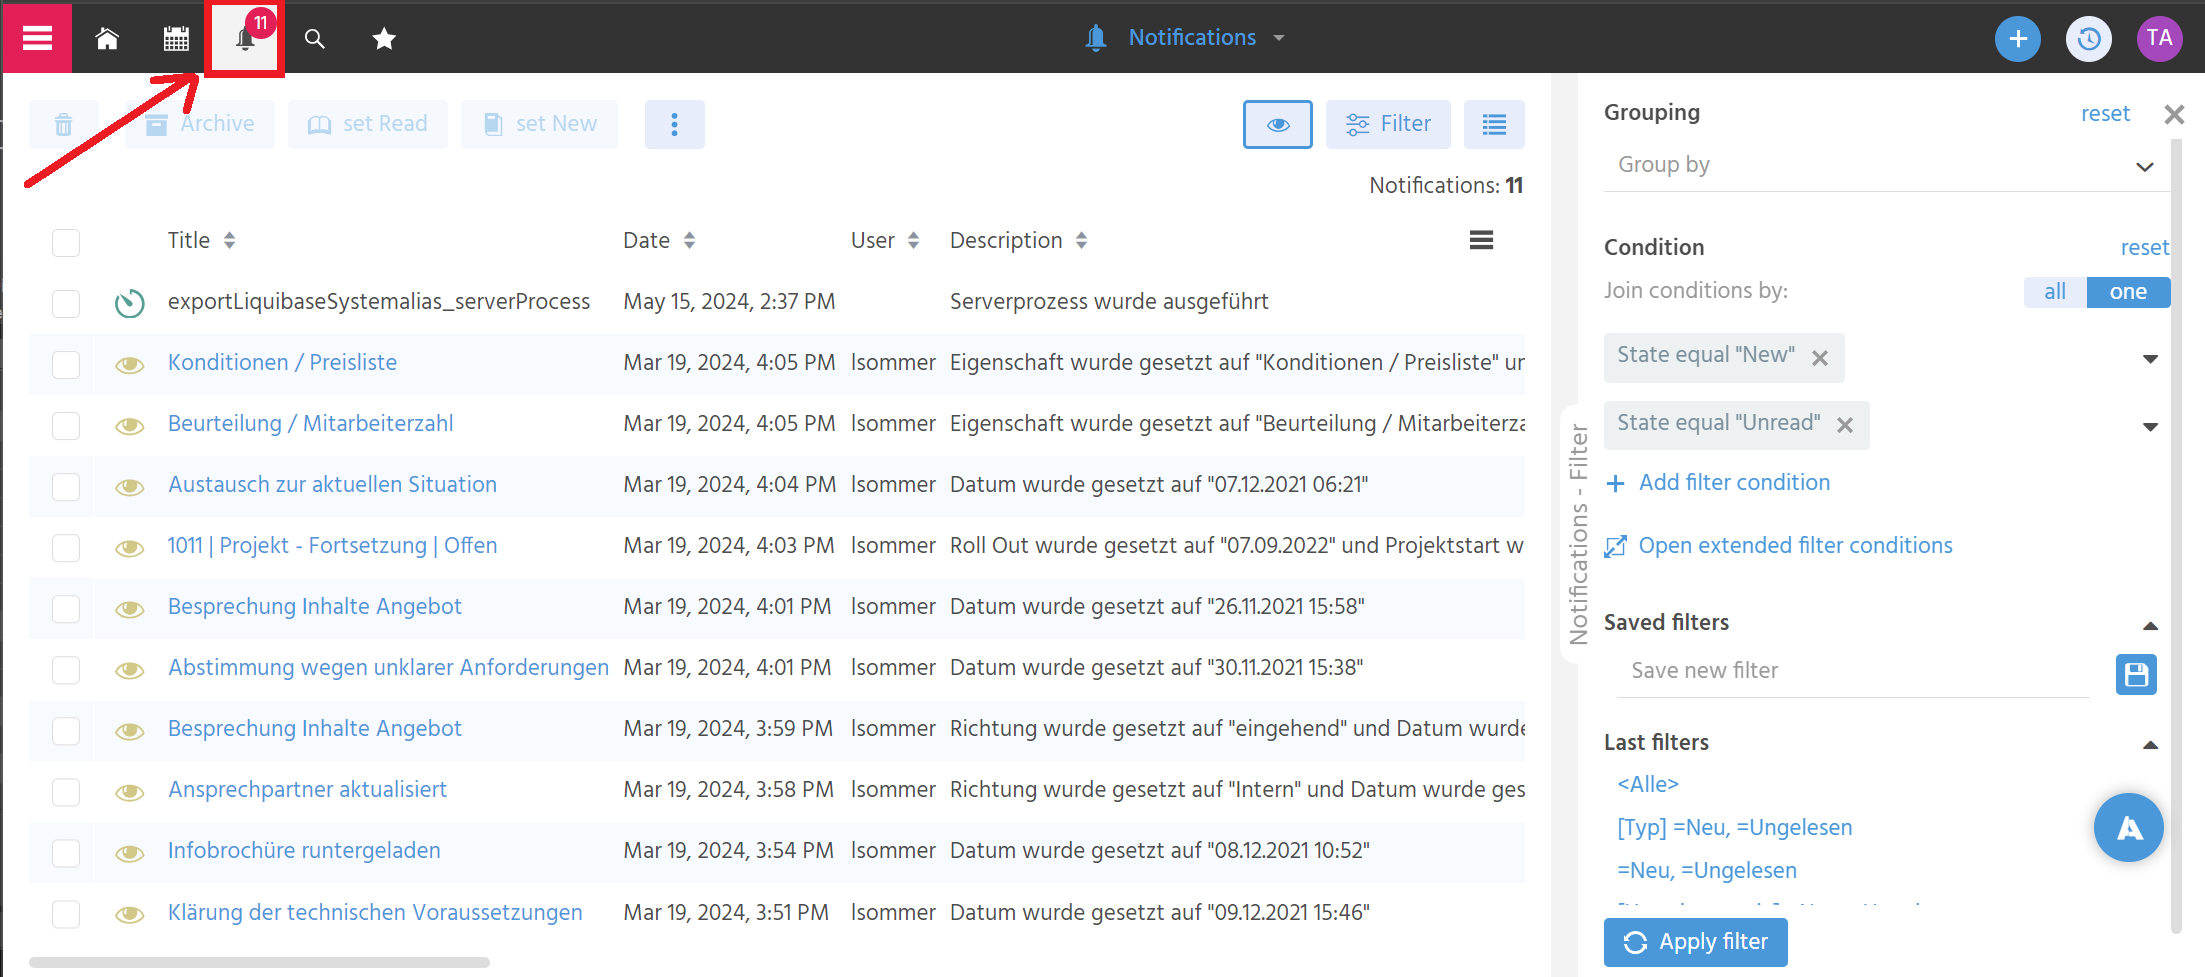
in the NotificationFilter_view, available via the "Bell" icon in the left upper corner of the ADITO web client:

Here, one or multiple notifications are displayed in a table, with the option to filter them, mark them as "read", etc.:
-
via a popup appearing in the lower right corner of the web client (once per one single notification), given that you had once accepted being notified by ADITO
Notifications can be triggered in various ways, in particular via
- changes of data that is covered by "observation". Observations can be set by the web client user, in various ways - find more information in the ADITO end user training course "Notifications and observations" and the corresponding documentation.
- storing datasets that include hyper-references to a specific ADITO user (Employee), e.g., "(...) @J.Smith (...)"
- incoming telephone calls - find extensive information in the chapter Telephony Integration.
- manual triggering of a notificaton via JDito
Setup
Every new ADITO cloud system comes with a ready-to-use notification functionality. This includes a notification queue, in which all notifications remain (e.g., as long as someone is offline), until it is possible to deliver them to the respective users (recepients).
Normally, you do not need to customize anything to use notifications. (In case you have an earlier ADITO system without notification functionality, contact ADITO for further instructions.) Also, the triggering of notifications via hyper-references is already built-in and does not need to be configured or activated. The setup of CTI is explained in chapter Telephony Integration.
Thus, the only functionalities that require customizing are manual notification triggers and observation.
Manually triggered notifications
You can arbitrarily trigger a notification manually via JDito, by using the backend methods of class notification. There are 2 steps:
- Create and set a configuration object
- Execute the notification trigger, using the configuration object - with "execute" actually meaning to add a notification to the list (queue) of notifications to be sent to the user(s)
Here is an example, included in the ADITO xRM project. You may use this example as a pattern to design your own notification triggers:
let notificationConfig = notification.createConfig()
    .addUserWithId(employeeUserId)
    .forcedPriority(notification.PRIO_LOW)
    .notificationType("Like")
    .initialState(notification.STATE_UNSEEN)
    .caption(caption)
    .description(description);

notification.addNotificationWith(notificationConfig);
Observation
If you want to augment an Entity with the option to "observe" one or multiple datasets of it, you need to add specific Actions and configure them accordingly.
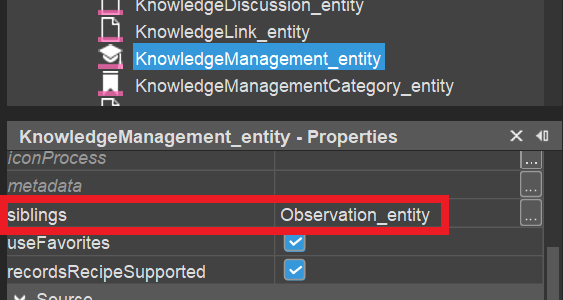
As a first step, add Observation_entity (module observation) as sibling to the Entity that is to be observed. See, e.g., KnowledgeManagement_entity (module knowledge-management):
Setting this sibling makes sure that the corresponding actions (see below) will be updated automatically. (Otherwise, e.g., it would be possible that an observation can be added multiple times.)
Furthermore, in the RecordContainer's process onDBInsert/onDBUpdate/onDBDelete you need to add the function EventHandler.onInsert()/EventHandler.onUpdate()/EventHandler.onDelete().
Then, open Dependency_lib (module root) and add the connection of the dependent Entities.
Observation of selected datasets
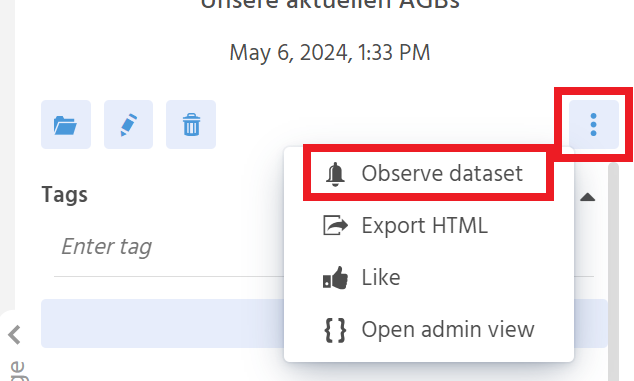
Selected datasets can be observed (and "un-observed") via a corresponding Action in the PreviewView, executed by the web client user:
To include this functionality, proceed as follows:
- Add an ActionGroup named "observeActionGroup".
- Under this ActionGroup, add 2 Actions named "observe" and "cancelObservation".
- Configure these Actions' properties, following the pattern given in several Entities of the ADITO xRM project, e.g., KnowledgeManagement_entity (module knowledge-management).
TIP
An even faster approach is to simply
- copy & paste this ActionGroup from another Entity of the ADITO xRM project, e.g., KnowledgeManagement (module knowledge-management);
- adapt parameter "pUid" of method
Observation.actionStateRecordsRecipein propertystateProcess.
Observation of filtered datasets
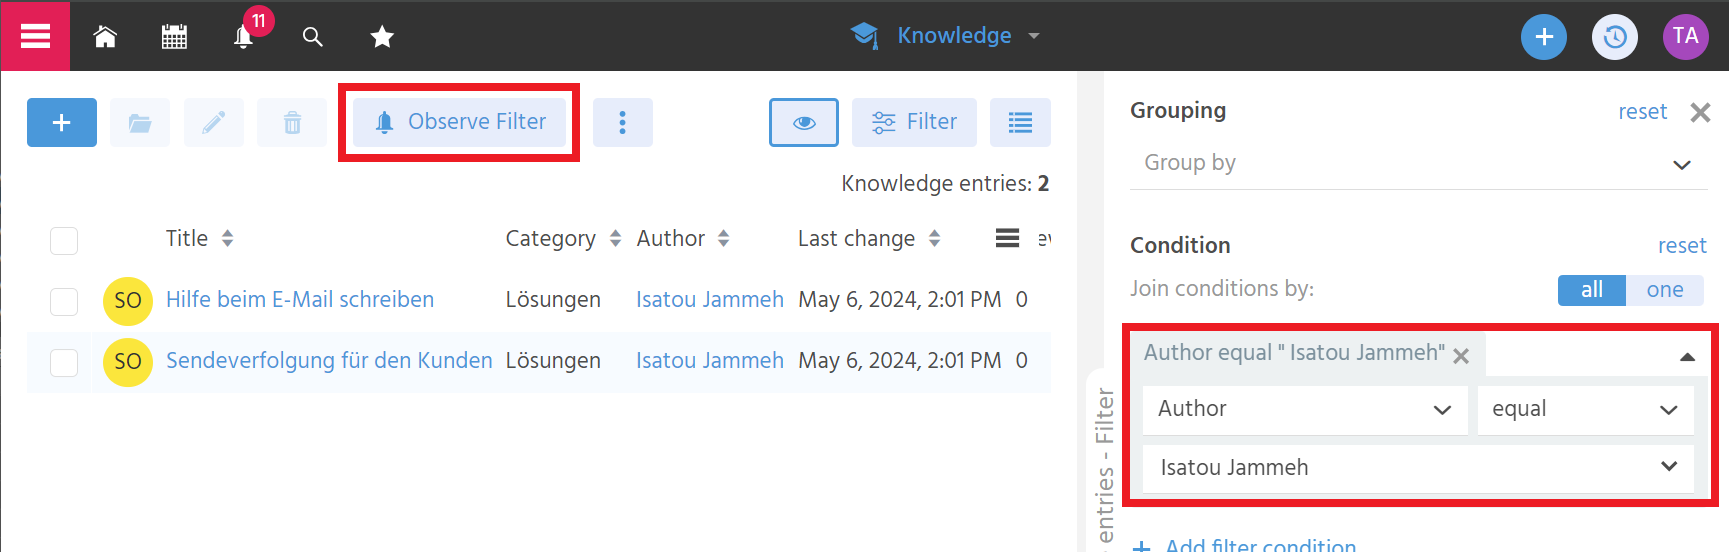
Selected datasets can be observed (and "un-observed") via a corresponding Action in the FilterView, executed by the web client user:
To include this functionality, proceed as follows:
- Add the functionality for observing selected datasets, as explained in chapter Observation of selected datasets.
- Select ActionGroup "observeActionGroup" as favoriteActionGroup of the TableViewTemplate (or TreeTableViewTemplate etc.) of your FilterView.
Notifications with multiple ADITO servers
If your system includes multiple ADITO servers, it would be negative, if each server managed only his own notifications, independently from the notifications triggered on the other servers. In this case, server A had no information what happens on server B, and vice versa.
Example:
Each managed ADITO cloud system consists of at least one background server and one foreground server. Now, if a CTI telephone call came in at the background server, the respective user would get no notification, as they is logged into the foreground server.
To avoid this, a so-called cluster messaging server needs to be applied, in order to ensure a distributed notification management. Therefore, every managed ADITO cloud system comes with an installation of Apache Ignite as pre-configured, ready-to-use cluster messaging server. (Besides, ADITO utilizes Ignite also as remote cache server, see chapter Shared caching with multiple ADITO servers.) Its alias has the type "Cluster Messaging", see AliasConfig:
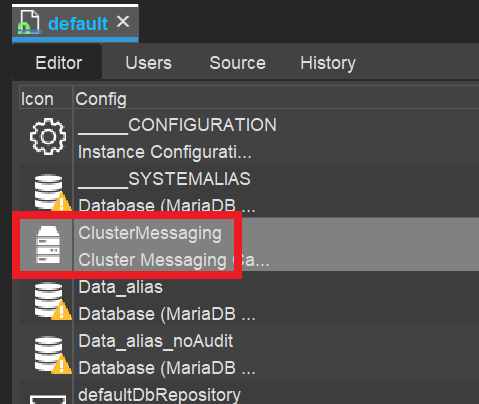
If this alias is not present yet, you need to add it first:
-
In the project tree, right-click on node "alias" and choose "New" from the context menu.

-
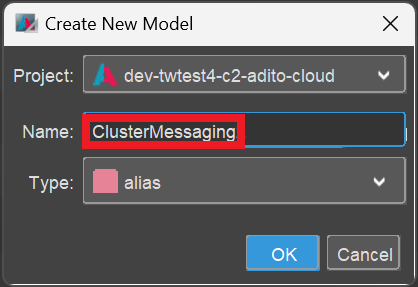
A dialog named "Create New Model" appears. Here, type in a suitable name (e.g., "ClusterMessaging").
-
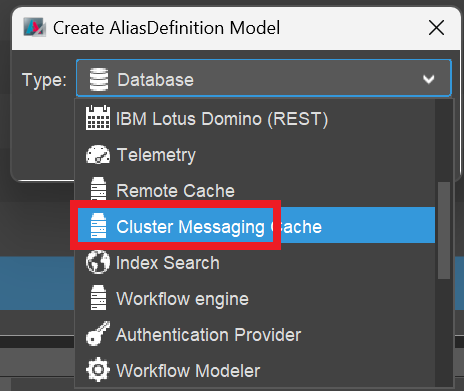
A dialog named "Create AliasDefinition Model" appears. Here, select the type "Cluster Messaging".
-
Deploy your project. Then, the new alias appears in the AliasConfig.
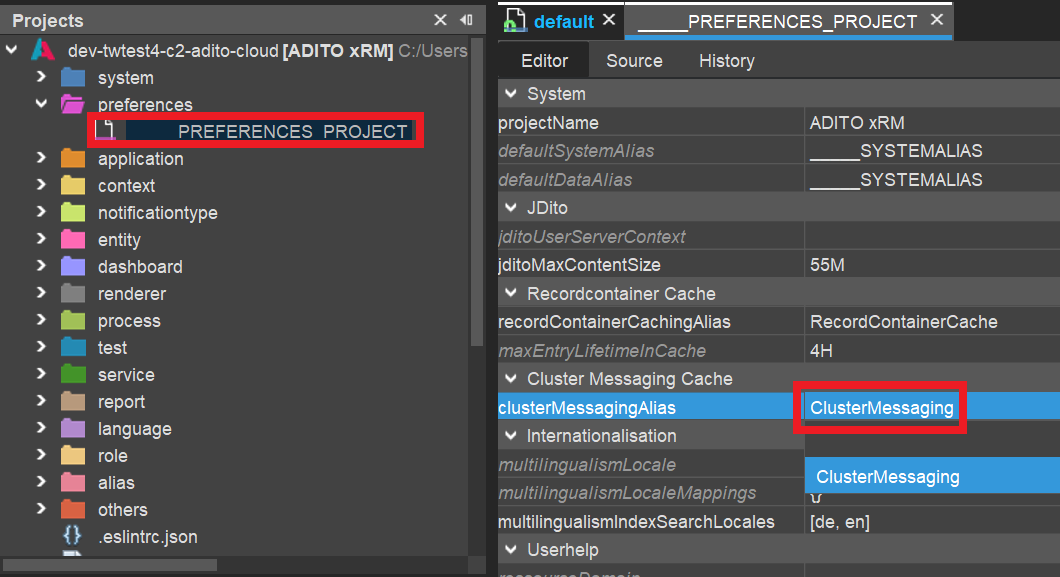
Now, check if the cluster messaging alias is set as value of the project property clusterMessagingAlias (see preferences > ____PREFERENCES_PROJECT, in the project tree):
If it is not set yet:
- set it now,
- deploy your project,
- restart the ADITO server,
- re-establish the tunnel to your cloud system,
- reconnect to your system, in order to see the AliasConfig again.
Now, if you click on the cluster messaging alias in the AliasConfig, you can inspect its properties in the "Properties" window. Here, you should see that the address of the cluster messaging server (properties host and port) has been set automatically:

This semi-automatic activation of a cluster messaging server only works for managed ADITO cloud systems, as these systems by default come with a pre-configured, ready-to-use installation of a cluster messaging server. If, however, your system is an unmanaged cloud system, you first need to order the transformation of your system to a managed cloud system from ADITO.
ADITO does not offer support of integrating cluster messaging servers into "on premise" (not cloud-based) systems. Although, in principle, this is possible, the installation and integration of a cluster messaging server must be realized by the customers themselves.