Adding Activities
Introduction
Instead of creating a new Activity in the xRM Context "Activity" (module activity) (and connecting it manually with a Contact, a Company, an Opportunity, etc.) you can also create an Activity directly in certain Contexts that should be connected with the Activity. Usually, this is done via an Action that is available via the "hourglass" button in the CardViewTemplate of the PreviewView. Here is an Example from Context "Organisation" (module contact):
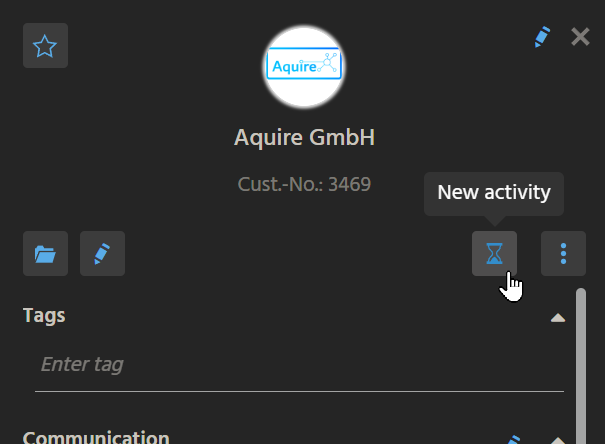
Action "New activity" in the CardViewTemplate of OrganisationPreview_view (module contact).
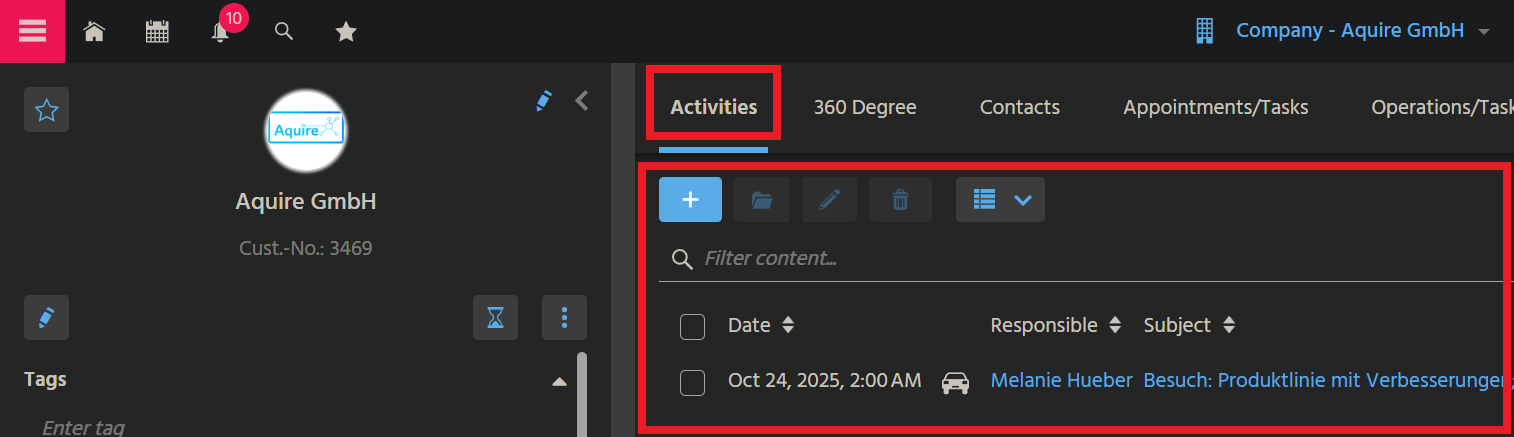
In the MainView, there is a tab titled "Activities":
This chapter explains how to add "Activity" functionality to a Context, using the example of Context "Organisation" (module contact).
Step by step instructions
These are the steps to add a similar "New activity" functionality to the PreviewView of a Context:
For training purposes, you may perform these steps using an xRM Entity that has got no "New activity" Action yet - e.g., Questionnaire_entity (module questionnaire).
Create Consumer of Provider "LinkedObjects"
Create a Consumer named and titled "Activities" and connect it with Provider "LinkedObjects" of Activity_entity - cf., e.g., Organisation_entity (module contact):

Configure "Activities" Parameters
In the Navigator window, unfold Consumer "Activities" and set its Parameters Objectid_param and RowId_param - again, you may use, e.g., Organisation_entity (module contact) as pattern:
import { result } from "@aditosoftware/jdito-types";
import { ContextUtils } from "ContextUtils_lib";

result.string(ContextUtils.getCurrentContextId());
import { result, vars  } from "@aditosoftware/jdito-types";

result.string(vars.get("$field.CONTACTID"));
(Replace CONTACTID by the EntityField that is related to your own Context's primary key.)
Assign View reference
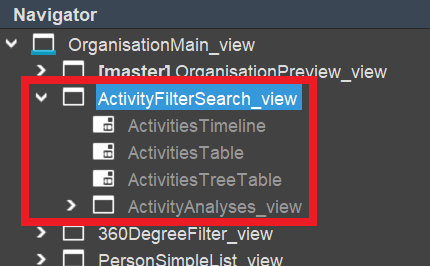
In the Context's MainView, add a View reference to ActivityFilterSearch_view, which will add a tab named "Activities":
Create Action "newActivity"
Create Action "newActivity" - again, you may use, e.g., Organisation_entity (module contact) as pattern:
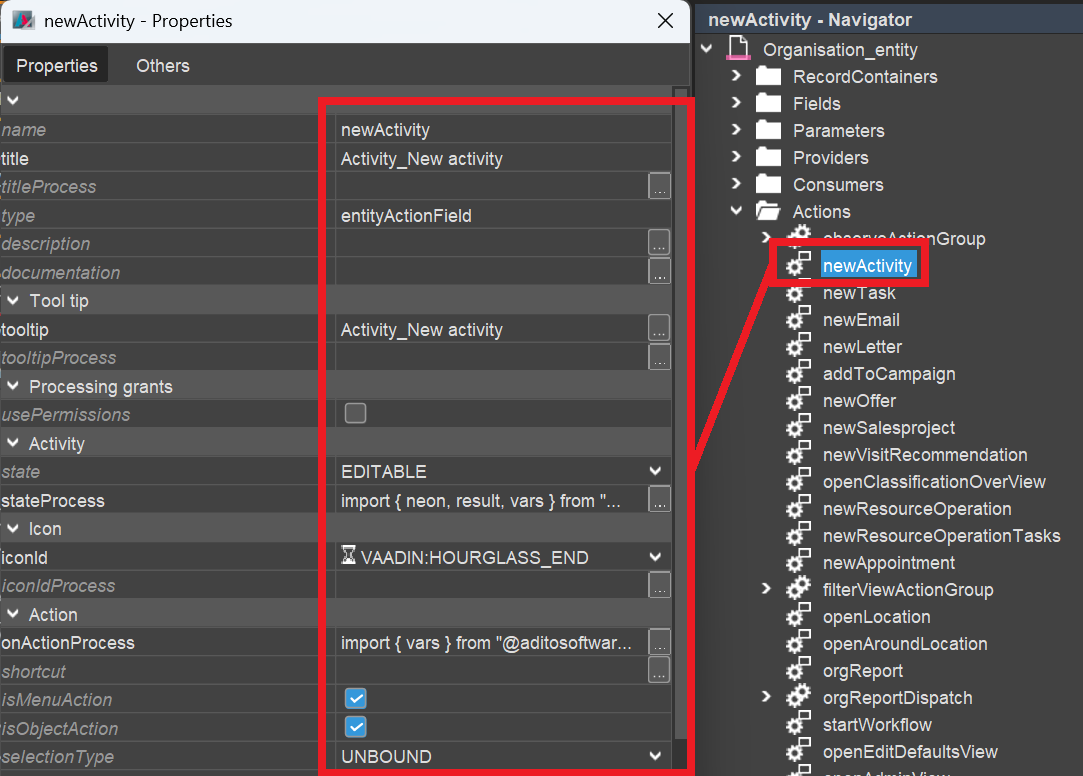
Set property iconId to "VAADIN:HOURGLASS_END". This icon will then be shown on the Action's button in the CardViewTemplate of the PreviewView (see chapter Add Action button to PreviewView).
The stateProcess needs to make sure that the Action is invisible for inactive records:
import { neon, result, vars } from "@aditosoftware/jdito-types";
import { $ContactManagementKeywords } from "ContactManagementKeywords_registry";

if(vars.get("$field.STATUS") == $ContactManagementKeywords.contactStatus$inactive())
{
    result.string(neon.COMPONENTSTATE_INVISIBLE);
}
else
{
    result.string(neon.COMPONENTSTATE_EDITABLE);
}
(Replace these status-related Keywords by the respective status-related Keywords of your own Context.)
The onActionProcess can be kept quite simple:
import { vars } from "@aditosoftware/jdito-types";
import { ActivityUtils } from "Activity_lib";

ActivityUtils.createActivity({
    "RowId_param": vars.getString("$field.CONTACTID")
});
(Replace CONTACTID by the EntityField that is related to your own Context's primary key.)
Add Action button to PreviewView
Add the Action "newActivity" to the CardViewTemplate of your Context's PreviewView, by setting it in one of the Action-related properties (favoriteAction1 or favoriteAction2). The Action will then appear as additional button (labled with an hourglass icon), instead of being selectable via the three dots button.
Availability in "Connections" ViewTemplate
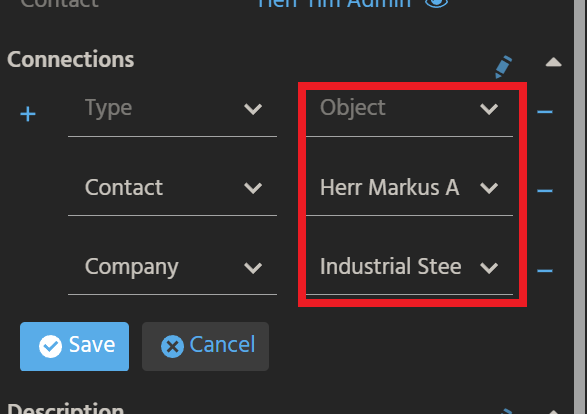
The PreviewView of Context "Activity" includes an editable ViewTemplate labelled "Connections", which shows a list of connected records, along with the respective Context's title.
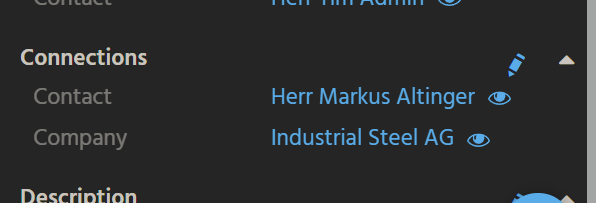
For showing the related record(s) of your Context here, and for adding further connections to your Context's records, the following steps are required:
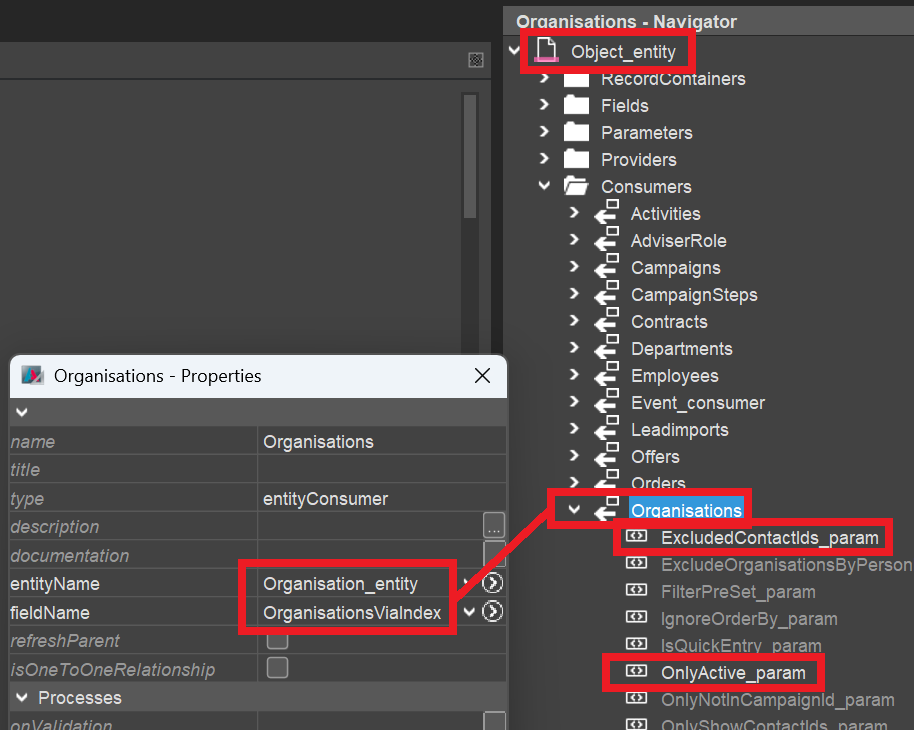
Create Consumer for Object_entity
Navigate to Object_entity (module root), create a Consumer named like the plural of your Context name (e.g., "Organisations") and connect it to a suitable Provider (usually having a similar name as the Consumer) of your Context.
If there is no such Provider yet, then create it, name and title it like the Consumer, expose it, and create all Parameters required for retrieving the respective dataset(s) in the RecordContainer.
Then, in the Consumer, fill the required properties of all relevant Parameters. (Usually, there should be at least a Parameter, in whose valueProcess you specify the primary key of the dataset connected to the Activity.)
Here is an example for Context "Organisation" (module contact):
Extend getContexts
In ContextUtils_lib (module root), you can find a method named ContextUtils.getContexts, which returns the names of all Contexts that should be selectable in the left part of the "Connections" ViewTemplate:

Now, make sure your Context's name is included in the whitelist of method ContextUtils.getContexts. When using modularization, you will do this via a ServiceImplementation. Then, the Transpiler will automatically generate the required function (returning the Context name(s)) in ContextUtils_lib (module root) ...
function _____GENERATED_contextSelectionList_service_cm_impl()
{
  //@ts-ignore
  return [
      "Organisation",
      "Person",
      "PrivatePerson"
  ];
}
...and add this function to the array contextServices, which will subsequently be looped over, in order to fill the whitelist. (See screenshot below.)
However, for testing purposes (when using an unmodularized project), you may simply add your Context's name manually to the whitelist:
whitelist.add("MyContextName");
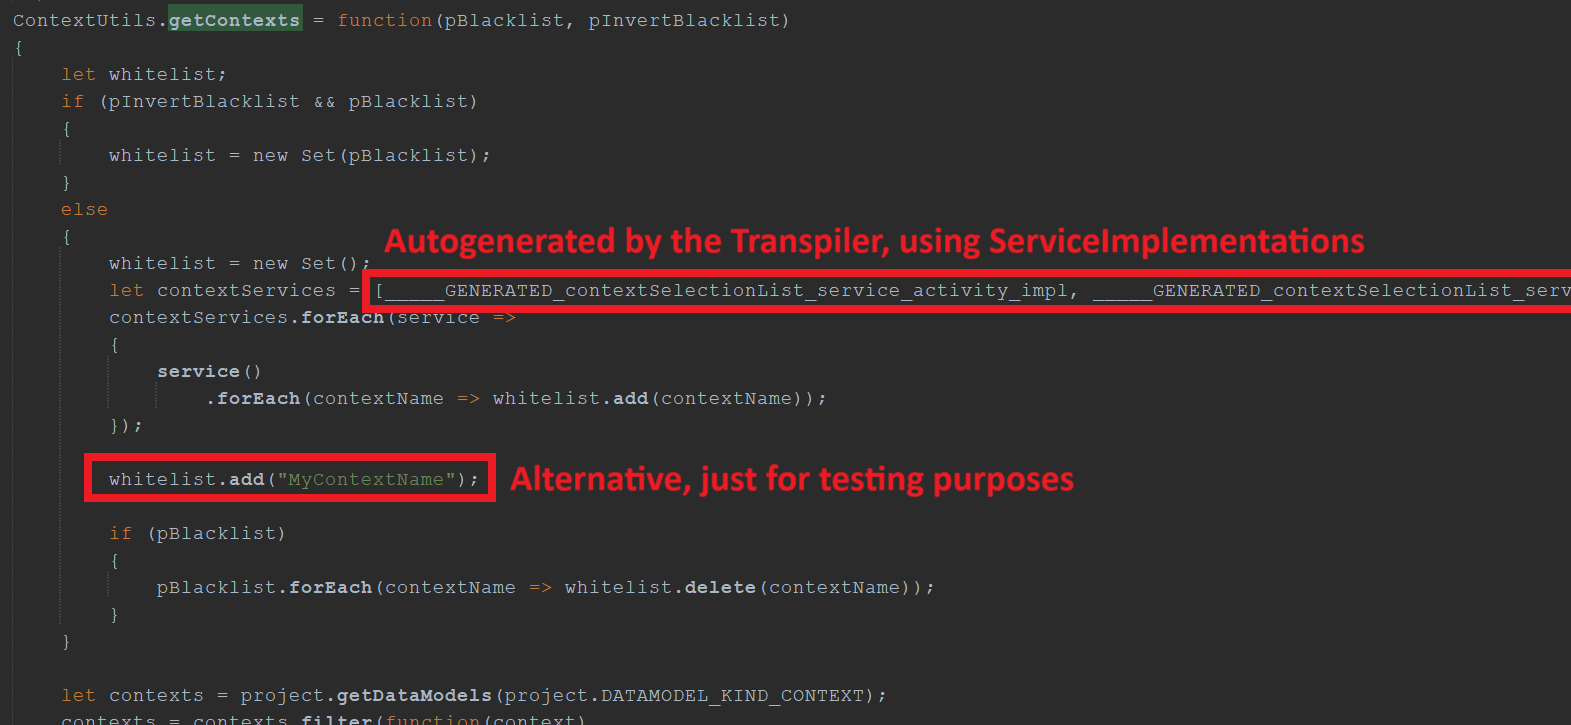
ContextUtils_lib.ContextUtils.getContexts (module root)
Extend getContextConsumer
In ContextUtils_lib (module root), you can find a method named ContextUtils.getContextConsumer, which returns the names of all Consumers that determine the records selectable in the right part of the "Connections" ViewTemplate:
Now, make sure your Context's name and the Consumer's name (see this chapter) is included in the consumerMapping of method ContextUtils.getContextConsumer. When using modularization, you will do this via a ServiceImplementation. Then, the Transpiler will automatically generate the required function (returning a mapping of Context name(s) and Consumer name(s)) in ContextUtils_lib (module root) ...
function _____GENERATED_contextConsumerMapping_service_cm_impl()
{
  let implementation = {
      "Organisation": "Organisations",
      "Person": "Persons",
      "PrivatePerson": "PrivatePersons"
  };

  //@ts-ignore
  return implementation;
}
...and automatically add this function to the array of generated functions in method getContextConsumer, which will subsequently be looped over, in order to fill the consumerMapping. (See screenshot below.)
However, for testing purposes (when using an unmodularized project), you may simply add your Context's name and your Consumer's name manually to the consumerMapping:
consumerMapping["MyContextName"] = "MyConsumerName";
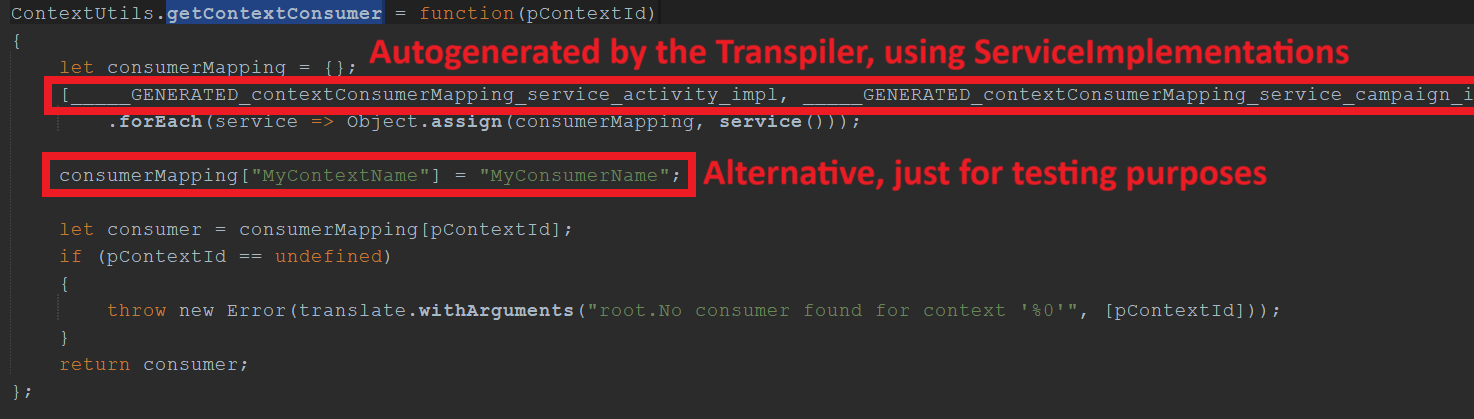
ContextUtils_lib.ContextUtils.getContextConsumer (module root)
Done!
Test
Now, test your customization by selecting any record in the FilterView of your Context, executing new Action "New Activity" in the PreviewView, creating and saving an Activity, and then checking, if the new Activity appears in the MainView's tab "Activities".