Authentication methods
ADITO has a central management point to configure authentication methods: the "login list".
You can find a property named "loginList" in the instance configuration: In the Navigator window, choose System > Client > Login > loginList. Clicking on the three dotted button opens the login list. You can add a login entry via the plus ("+") button. Example:
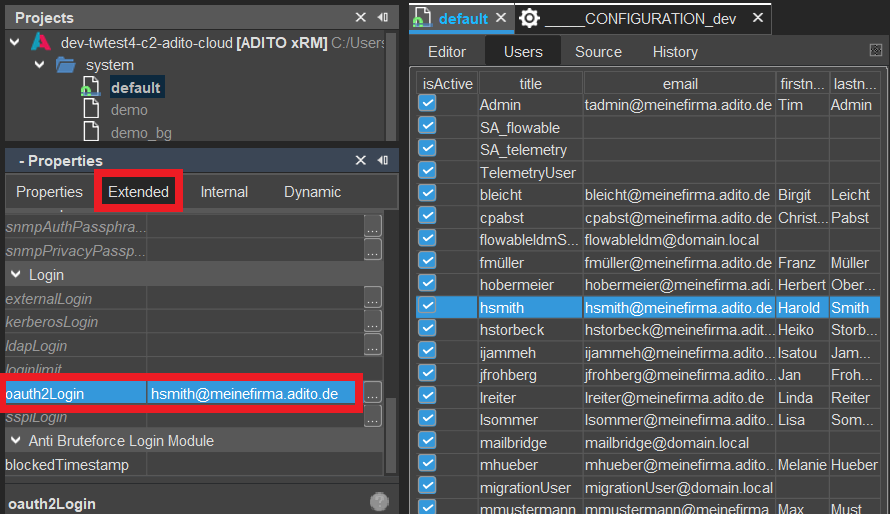
The main columns to set for a login are
- Type: This is the authentication method.
- Name: Choose a suitable name that fits to the type, e.g., "internal.oauth2_token".
- Properties: Each type has different properties that have to be filled/configured via a table with "Key" and "Value". (see example in screenshot above)
This given name needs then to be set
-
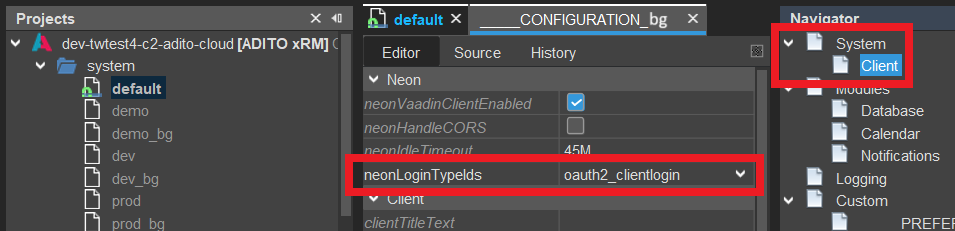
for web client login: in property "neonLoginTypeIds" (in the instance configuration, under System > Client > Neon), e.g.:
-
for web services: in the web service process' property "loginTypeId", e.g.:

The following sub-chapters cover the available login types and the corresponding properties that need to be set.
Default
The "default" authentication method is often used when a new project is set up. It does not need any extra configuration. The data is saved in the ASYS_USERS database which normally is in the "_____SYSTEMALIAS". It uses the basic authentication via username and password and is therefore often referred to as "Basic Auth". For web services, the header needs to include username and password, as well as the header "authMethod" set to "Basic".
The following logic applies: If property "neonLoginTypeIds" is set to "internal.default" and
-
property loginList is empty, then the "default" authentication method is automatically being used.
-
property loginList includes multiple entries, then the first entry is automatically being used - i.e., if the first entry has type "default", then the logic is the same as if loginList was empty.
OAuth2
You can find an example in appenexampledix aexample.
There are three OAuth2 login types selectable:
-
outh2-authorizationcodeflow: This is the login type for the client-sided access of users via delegated access permissions - i.e., it is primarily for the web client login, but in single cases it can also be used, e.g., for web services. Ultimately, this login type means that users actively authenticate themselves at the OAuth2 provider (i.e., if you login in the neon web client, and the authentication is realized via Microsoft login).
-
oauth2-token: This is no user (delegated) access, but an application access, which is mostly used for technical interfaces etc. I.e., here, there is no login in the web client, but a token is requested directly via web interfaces. Thus, this is the preferred login type for web services that communicate via OAuth2. Check the Webservice Documentation for for more information.
-
oauth2-clientcredentials: This login type is to be considered as deprecated. It was formerly used for web services, but it does not provide enough security: It only validates whether a token can be generated with the given information (tenantId, clientId, clientSecret, scope), but the tenant itself is not verified. Furthermore, this login type only supports Microsoft and not third-party providers.
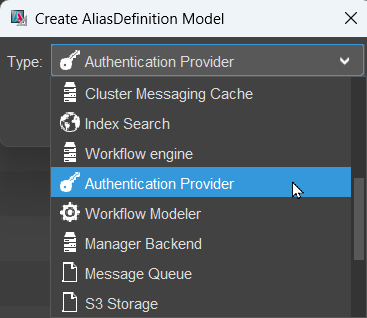
All three login types require a separate alias in your server instance, in order to receive the token and define where to authenticate. To add this alias, proceed as follows:
In the project tree, right-click on folder "alias" and choose "New" from the context menu. The name is arbitrary, but keep it self-explanatory like "oauth2-microsoft". In the next step, select the alias type "Authentication Provider".
Deploy these changes before you continue.
If you double-click on your system, the new alias will appear in the "Editor" part of the Designer (below Data_alias, _SYSTEMALIAS, etc.). Right-click on the alias and choose "Create" from the context menu.
Now click on the new alias and enter its authentication information in the property sheet. You can get this information from the Entra administrator, who created the application. In particular, these are the properties
-
tenantId: the ID of the company
-
clientId: the ID of the application
-
clientSecret: the passwort created in the application
-
scope (Please note: The following is only valid for provider MICROSOFT. The scope can vary, depending on the use case or the interfaces, respectively. E.g., it can point to specific Graph interfaces.):
-
for client login, e.g., https://outlook.office365.com/.default
-
for web services always <clientId>/.default
-
Now, open the respective entry in the login list and set column "properties" as follows:
| OAuth2 Login Type | Property (Key) | Value |
|---|---|---|
| all | alias | The given name of your authentication alias (e.g., MyAuthAlias) |
| "oauth2-authorizationcodeflow" and "oauth2-clientcredentials" | oauth2 login domain (optional) | Domain of your client credentials (e.g., demo.onmicrosoft.com). If you have multiple Microsoft accounts, the given domain will be preselected. This property allows the administrator to verify only the matching domain users to log into the system. You can see your entry when you try to log in and see the domain hint. |
| "oauth2-authorizationcodeflow" and "oauth2-clientcredentials" | oauth2 user template (optional) | Login template for the user for the OAuth2 authentication. |
For simplicity we will use the ".onmicrosoft.com" login email address for the configuration. This can also be your normal domain.
oauth2-token
Login type "oauth2-token" is mainly used for web services.
This login type only expects a token, which is extracted in "Bearer" format from the authorization header.
The configuration is analogous to the login type "outh2-authorizationcodeflow".
In the Microsoft example, the login is now used as follows:
-
Third-party application generates a Microsoft token using any flow.
-
Third-party application sends an HTTP request to ADITO and sets the token in the HTTP header.
-
ADITO validates the JWT token for a valid signature.
-
For application tokens (e.g., in the Client Credentials Flow), the "tid" claim of the JWT is checked → User is jDitoWebserviceUser.
-
For user tokens (e.g., in the Password or Authorization Code Flow), the "upn" claim of the JWT is checked → User is identified by the UPN (here, the "oauth2 user template" may also be used if necessary).
For third-party providers, the "getUsernameFromAccessTokenProcess" of the Authentication Providers is executed.
This must determine the user either via JWT or API query.
JWT signatures must be validated here if necessary; otherwise, the claims cannot be trusted, as the token is ultimately direct user input.
Certificate
From ADITO version 2024.1.4, authentication for the login types "oauth2-token" and "outh2-authorizationcodeflow" is also possible via a certificate. Currently, this only works for Microsoft, not for custom third party configurations.
The customer creates or requests a certificate, uploads it to a Microsoft Entra application, and sends it to ADITO, incl. key.
ADITO inserts the certificate in the ADITO keystore…
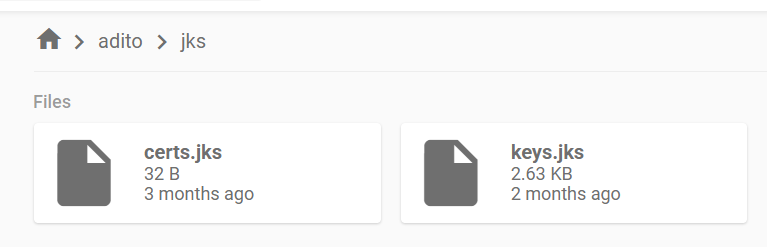
(For cloud systems, you can download the keystore in the file browser.)
…using the Java Keystore Explorer:

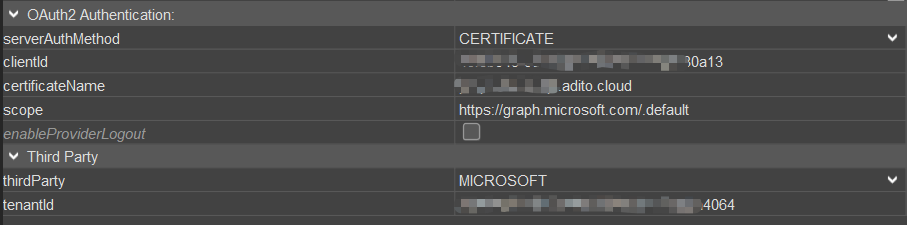
When you configure the "Authentication Provider" alias, first select "CERTIFICATE" as value of property "serverAuthMethod". Then the following properties will change accordingly. You need to set the certificate’s name as value of property "certificateName", and the properties "clientId", "scope", and "tenantId". Example:
Third Party: CUSTOM
Value "CUSTOM" is used for external OAuth2 providers other than Microsoft.
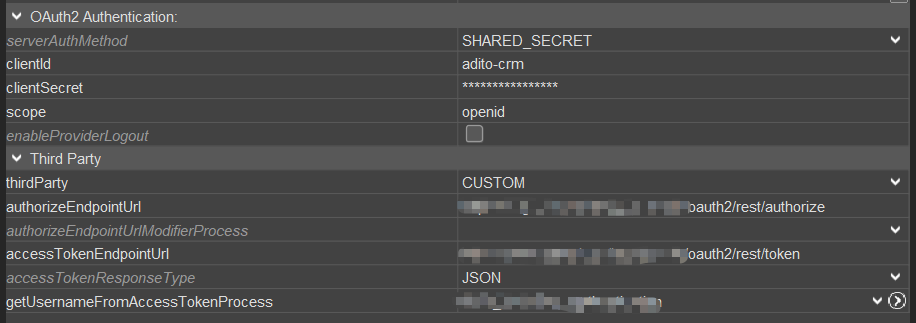
As you see, clientId, clientSecret, and scope also need to be set here.
Additionaly, the following properties are required to be configured:
-
authorizeEndpointUrl: The endpoint of the third party to request the authorization of the user, i.e., a URL to be used for redirecting the user.
-
authorizeEndpointUrlModifierProcess: Optional property, in case the authorizeEndpointUrl needs to be adapted dynamically. This process is executed before the auth endpoint is called. It provides the possibility to add additional URL parameters to the URL to be opened. The result must be a string starting with an ampersand ("&"), e.g. "&key=param".
Local variables available in the process: All values which were defined in the LoginType within the LoginList. Access is via the respective keys, without spaces.
Example: https://[OAuth2Provider]/oauth2/v1/auth?[SystemGeneratedParameters][ThisProcessGeneratedParameters]
Azure use case: If the "domain hint" is configured in the loginlist "domain_hint=[YOUR_DOMAIN]" is appended to the domain. If this is not the case, the account selection is forced by "prompt=select_account".
-
accessTokenEndpointUrl: The URL being the endpoint of the third party to request the access token.
-
accessTokenResponseType: The format of the REST response containing the token needs to be specified here, i.e., the settings whether, in the response, the token is included in the JSON body or as URL parameter.
-
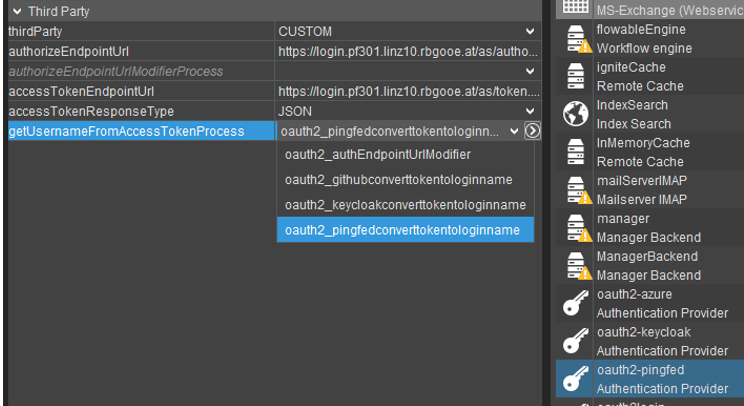
getUsernameFromAccessTokenProcess: Here you can select a process that is to be executed after the access token is received and before the user is searched in the ADITO system. It is a process that returns the correct user on the basis of the token (e.g., an ID or a name). The result must be the identification of the user who was also stored in the Designer. For this property, you cannot enter a process code, but you need to select a name of one of the processes shown in the combo box. These are all processes of variant "authentication" (see chapter [Processes of variant "authentication"]).
In this process, the token can also be vaildated, in case the OAuth2 provider allocates an own validation service or an own logic. (The ADITO core only validates validity, cliendId, and scope.)
-
This property is required. If it is not set, all login attempts will fail.
Processes of variant "authentication"
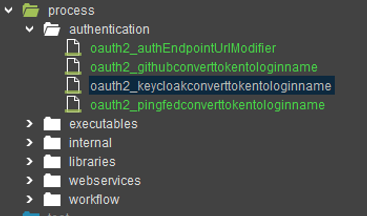
Processes of variant "authentication" are specific processes that convert the token received from the custom authenticator to a login name stored in your system. All processes of this variant are (after a deploy) selectable in the combo box of property "getUsernameFromAccessTokenProcess" of the "Authentication Provider" alias. Example:
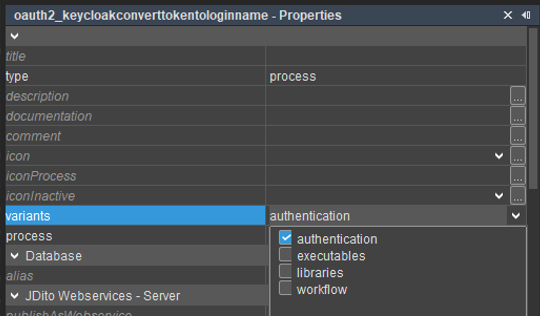
To create a new process of variant "authentication", navigate to the "Projects" window and right-click on "process". Choose "New" from the context menu and enter a self-explanatory name like "oauth2_asystemconverttokentologinname". Then, in the new processes property sheet, select "authentication" in property "variants".
These processes will be displayed as a group within the ADITO Designer
Local variables available in the process:
-
token = Access Token as string
-
token_raw = The complete REST response from the third-party api, which includes the access token, ID-Token and the refresh-token as a JSON.
The format as well as the contents vary between different third party providers. In some cases, the user identification is directly included in this response. If this is not the case, it must be requested via the third-party api using the access token.
Example processes for GitHub, Keycloak and Pingfed:
GitHub
    import { auth } from "@aditosoftware/jdito-types";
    import { net } from "@aditosoftware/jdito-types";
    import { util } from "@aditosoftware/jdito-types";
    import { vars } from "@aditosoftware/jdito-types";
    import { result } from "@aditosoftware/jdito-types";

    var token = vars.get("$local.token");

    var authConfig = auth.createConfigForNoAuth();
    var restConfig = net.createConfigForRestWebserviceCall()
            .actionType(net.GET)
            .url("https://api.github.com/user")
            .addHeader("Authorization", "token " + token)
            .addHeader("Accept", "application/vnd.github+json");

    var resultAsBase64 = net.callRestWebservice(restConfig, authConfig);
    var resultAsJsonString = util.decodeBase64String(resultAsBase64);
    var loginName = JSON.parse(resultAsJsonString).login;
    result.string(loginName);
Keycloak
    import { auth } from "@aditosoftware/jdito-types";
    import { net } from "@aditosoftware/jdito-types";
    import { util } from "@aditosoftware/jdito-types";
    import { vars } from "@aditosoftware/jdito-types";
    import { result } from "@aditosoftware/jdito-types";

    var token = vars.get("$local.token");

    var authConfig = auth.createConfigForNoAuth();
    var restConfig = net.createConfigForRestWebserviceCall()
            .actionType(net.GET)
            .url("http://localhost:8090/realms/oauthtest/protocol/openid-connect/userinfo")
            .addHeader("Authorization", "Bearer " + token);

    var resultAsBase64 = net.callRestWebservice(restConfig, authConfig);
    var resultAsJsonString = util.decodeBase64String(resultAsBase64);
    var userTitle = JSON.parse(resultAsJsonString).preferred_username;
    result.string(userTitle);

Pingfed

    import { auth, logging } from "@aditosoftware/jdito-types";
    import { net } from "@aditosoftware/jdito-types";
    import { util } from "@aditosoftware/jdito-types";
    import { vars } from "@aditosoftware/jdito-types";
    import { result } from "@aditosoftware/jdito-types";

    var token = vars.get("$local.token");

    var authConfig = auth.createConfigForNoAuth();
    var restConfig = net.createConfigForRestWebserviceCall()
            .actionType(net.GET)
            .url("https://????/idp/userinfo.openid")
            .addHeader("Authorization", "Bearer " + token);

    var resultAsBase64 = net.callRestWebservice(restConfig, authConfig);
    var resultAsJsonString = util.decodeBase64String(resultAsBase64);

    var loginName = JSON.parse(resultAsJsonString).Username;
    result.string(loginName);

ADFS

    import { util } from "@aditosoftware/jdito-types";
    import { vars } from "@aditosoftware/jdito-types";
    import { result } from "@aditosoftware/jdito-types";

    var tokens = JSON.parse(vars.get("$local.token_raw"));

    // parse the ID-Token to JSON
    function parseJwt (token)
    {
        var base64Payload = token.split(".")[1];
        var payloadBuffer = util.decodeBase64String(base64Payload);
        return JSON.parse(payloadBuffer.toString());
    }

    // In this case, we use the login-Attribute from ID-Token.
    // Depends on the configured claims in ADFS
    var upn = parseJwt(tokens.id_token).login;

    result.string(login);
Usertoken
If you want to have a temporary login in your ADITO Web Client - e.g., for a survey -, you can use the user token login method. You can decide whether you want a one time only usage or multiple usages and if you want to be remembered when you don’t log out of your account. The link for the login has the following format:
<yourADITOServerAddress> .com/login?tokenId= <YourTokenID>
This token is meant for (one-time) login, not for productive use.
A usertoken is an id (e.g., a UID) that is used for authentication of a person or a system. For the client login, you need a user name in addition to the token, while for web services, the token alone is enough. (See the Information)
You can generate and configure usertokens via the tab "User tokens" within the "Employee" Context of the web client (to be found in menu group "User Administration"):

The usertoken’s tokenId is generated automatically and made available
in column "Token". Besides, for security reasons, you can optionally set
an expiration date or set the usertoken invalid manually.
Alternatively, you can generate and modify usertokens via JDito:
    tools.addUserToken(...)
    tools.updateUserToken(...)
    tools.(...) // further methods available
Usertokens are stored in the system table ASYS_USERTOKEN.
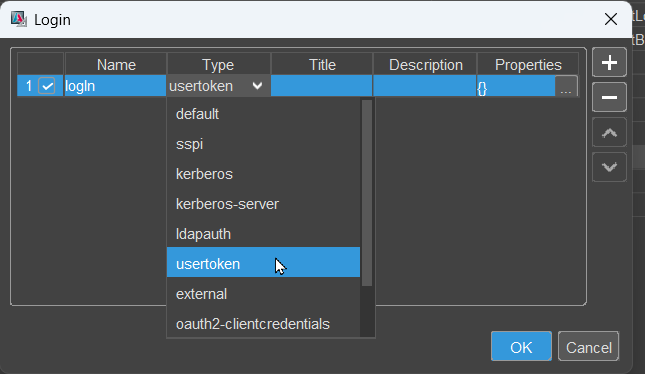
In the loginList you need to select type "usertoken":
Kerberos Server
Kerberos is an authentication service that provides a ticket for a successful login with your domain account. This token will be used to login in ADITO as well. The login type "kerberos-server" requires the following properties to be set:
| Key | Value |
|---|---|
| krb5 kdc | IP / Hostname of the domain controller, e.g., customer.com |
| krb5 realm | Domain of the user (in uppercase!), e.g., DOMAINCONTROLLER.HOST.CUSTOMER.COM |
| config | Additional information required for the Kerberos Server, e.g., default_tkt_enctypes, default_tgs_enctypes, permitted_enctypes with the value aes256-cts-hmac-sha1-96 aes128-cts-hmac-sha1-96 rc4-hmac. |
| login module | ADITO |
LDAP Auth
This authentication method should be treated as deprecated.
LDAP Auth (login type "ldapauth") is used in combination with the LDAP Plugin (see the ADITO Information Document AID097 LDAP) in order to re-use the Windows login credentials also for the ADITO login.
The following property settings are required:
| Key | Value |
|---|---|
| ldap provider | IP / Hostname of the LDAP controller |
| auth method | Authentication method you want to use (e.g., simple) |
| user key | LDAP key that is used to identify the user |
| dn base | Directory of your user in your LDAP |
External
External is used universally for various external authentication applications/servers. The property settings are:
| Key | Value |
|---|---|
| user template | Create a custom user template for authentication |
| auth header | Create a custom auth header |
Other Methods
These methods are not described in detail because they are not supported in the newer versions and mostly used for legacy systems.
-
Security Support Provider Interface (SSPI)
-
Kerberos
This list will possibly be continued depending on the supported versions.