Configuration of the Mailbridge
The following chapters describe the necessary steps to set up the mailbridge system.
Alias Definition and Configuration
The first thing you’ll need, is the definition of the mailserver alias.
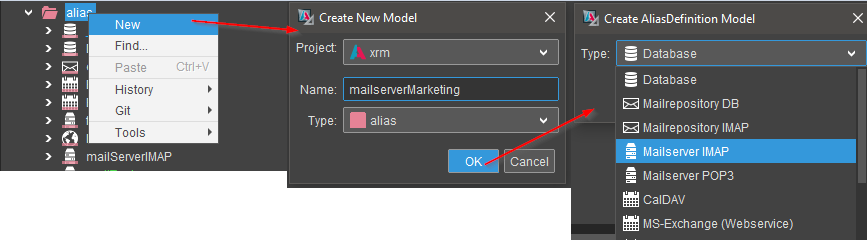
To add a mailserver alias right click on alias in the project tree and
choose new. Then name it appropriately, e.g. "mailserverMailbridge".
After you press Ok another dialog shows up, here you choose
Mailserver IMAP and press OK again.
If you want to have your emails copied to a mailrepository, you need to
set up a second alias definition for that. Although, all projects that
were based on the standard xRM project, already have an alias definition
for a db mailrepository named defaultDbRepository. If for some reason
this alias definition should not exist, proceed as previously described,
but choose "Mailrepository DB" instead of "Mailserver IMAP". If the
emails should be copied into another email account for storage, choose
"Mailrepository IMAP" instead of "Mailrepository DB". You’ll need
another mailserver user for the Mailrepository IMAP or you use the
same user as for the mailbridge, but you then have to use a different
folder within the mailbox.
Now deploy your new alias definitions.
System Configuration
The alias definitions now show up in your systems and alias
configurations can be created for them. Open the system, you want to
configure the mailbridge for, from the project tree. Then create the
alias configurations by right clicking on the light grey aliases and
selecting Create from the context menu.
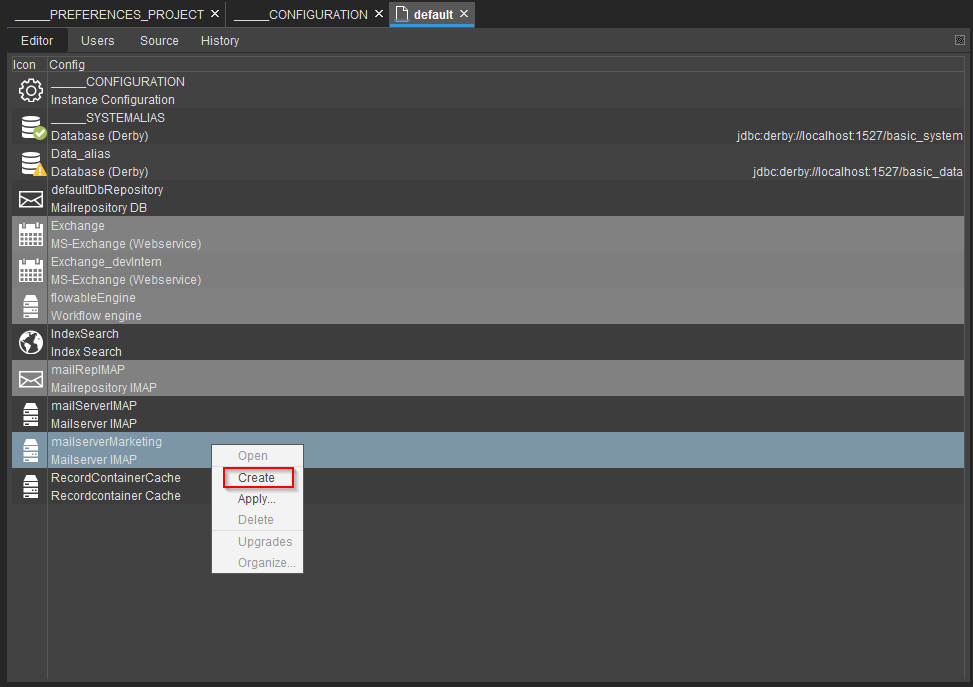
After creating the alias configuration, you have to configure the recieving side of the mailserver alias.

Important Properties
-
host
Enter the IP address or URL of your mailserver. This may be a selfhosted mailserver or a cloud based service like Microsoft Office 365.
-
port
The port your mailserver listens to for IMAP. By standard port 143 is used, but as this can be changed by the administrator, please ask your administrator, which port number is used by IMAP on your mailserver.
-
connectionSecurity
Can be set to
Off,TLSorSSLand has to match the security of your mailserver. -
authenticationType
This can either be
BASICorOAUTH2.-
BASIC
BASICuses the login credentials configured at the mailbridge user. -
OAUTH2
If you choose to useOAUTH2, more properties get added to the property sheet of the mailserver alias: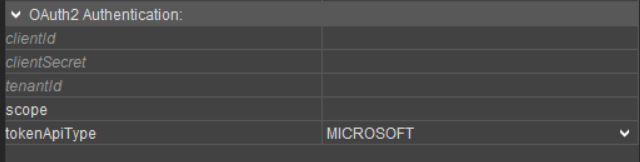
On how to configure OAUTH2 in your Acvtive Directory / Azure AD, please refer to Microsoft’s documentation regarding this topic. You have to make sure the mailbridge user is able to read, modify and delete mails of its associated mailbox.
The
scopeproperty should be set to the value/.defaultthis is the fallback to static consent system of OAUTH opposed to the dynamic consent system of OAUTH2. In dynamic consent the user gets asked if they permit a certain action. The mailbridge user is a technical user who can’t dynamically consent and therefore the fallback to the static consent is needed. This way the Azure administrator has to give the permission only once after configuring the app roles.
-
Preferences
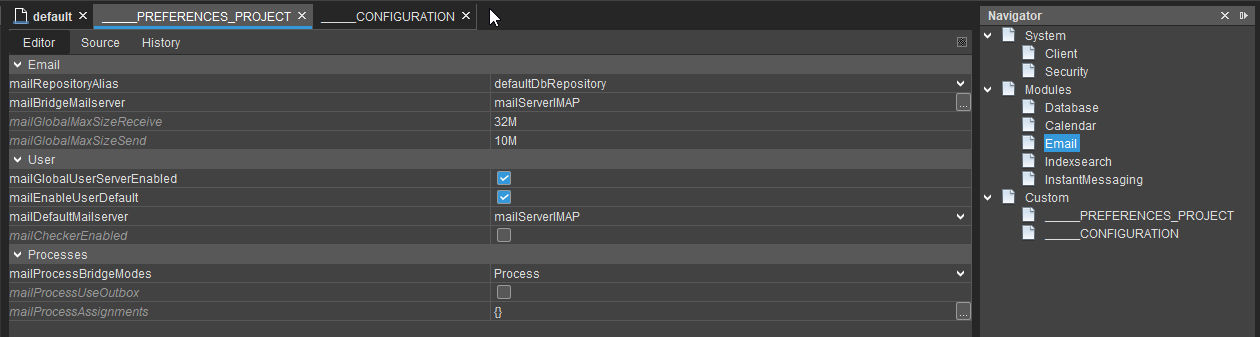
Now you have to make the project wide configurations. For that open the
preferences node of your project tree and open the
_PREFERENCES_PROJECT datamodel. After that you select Email in the
navigator tree.
Important Properties
-
mailRepositoryAlias
Select the alias of your mailrepository here.
-
mailBridgeMailserver
Open this property with the
…Button. Within the opened dialog you can configure for which mailservers a mailbridge exists.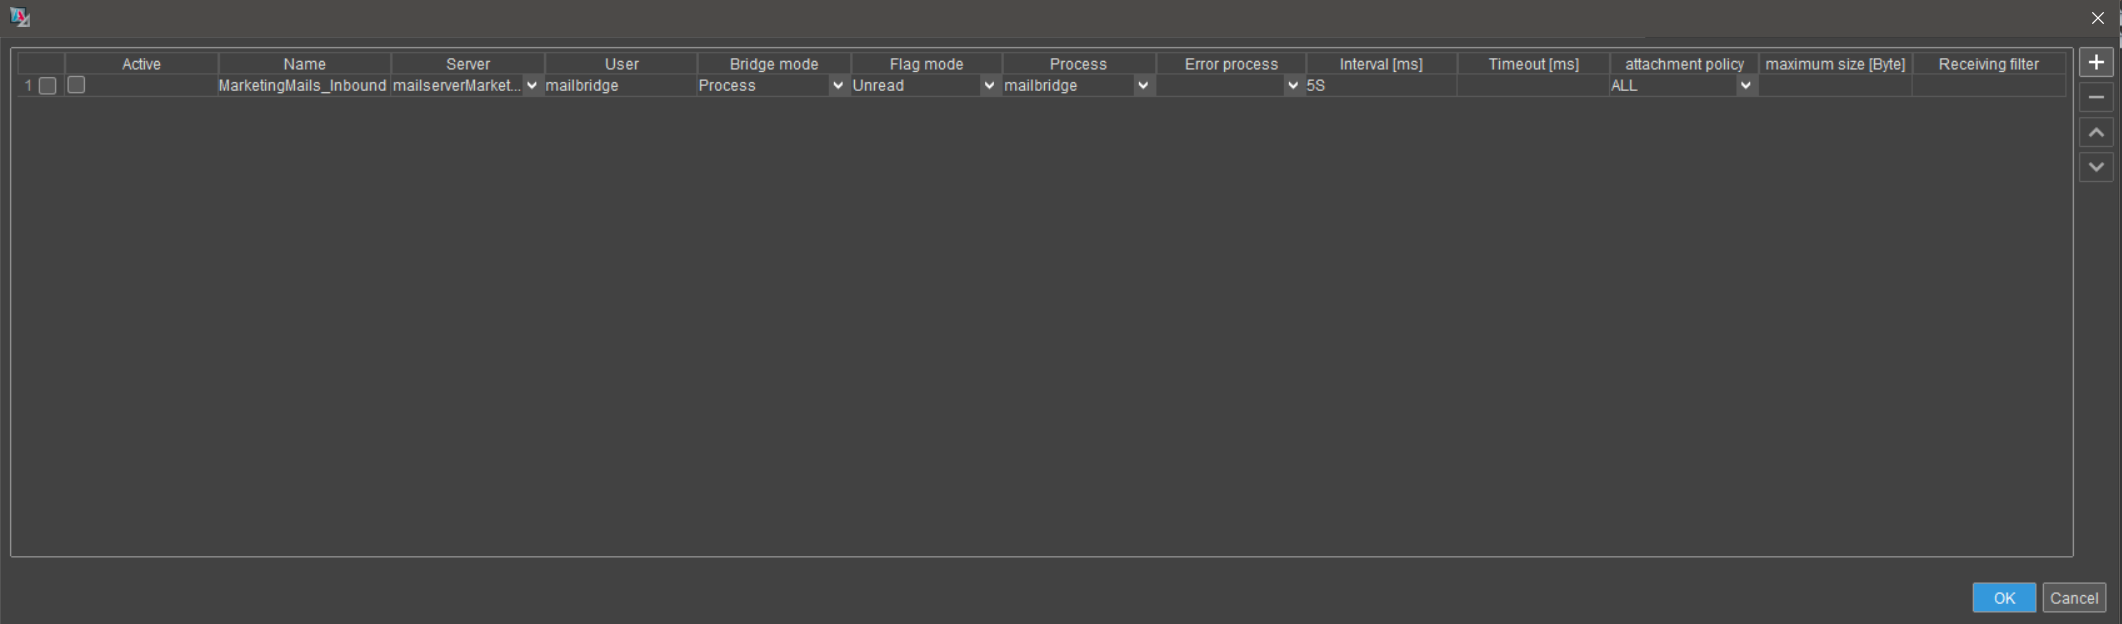
-
Active
If checked, this mailbridge will run. -
Name
The name can be set freely and is used to identify the mailbridge. It is recommended to use a name that describes which mailserver is -
Server
Choose the alias of one of your mailservers here. The mailbridge will access the chosen mailserver. -
User
Enter the login of an ADITO user, who has their Email configurations set. The mailbridge will use the configured credentials of this user to authenticate at the mailserver. -
Bridge mode
One of three modes:-
Process
In mode Process only the mailbridge process is executed, the email is not copied to the mailrepository. -
Copy
In mode Copy the email is copied to the mailrepository, no further processing is done. -
Both
In mode Both the actions of Process and Copy are combined. The email gets copied into the mailrepository and is then processed by the mailbridge process
-
-
Flag mode
This determines which emails are loaded by the mailbridge.-
New
Only fetches newly recieved emails, this does not include older unread emails -
Read
Only fetches emails that were read by an user -
Unread
Fetches all unread emails -
All
Fetches all emails in the specified inbox of the mailbridge user
-
-
Process
You can choose a process from your project, which gets executed when the mailbridge processes mails in mode Process or Both. You can use three special $local. variables in this process:-
$local.mail
Contains the complete mail as an object -
$local.recipients
Contains all recipient email addresses -
$local.sender
Contains the sender email address
-
-
Error process
You can choose a process from your project, which gets executed when an error occurrs while processing an email. I.e. an email with attachment, which are to big. The following $local. varaibles are provided in this process:-
$local.error
Contains the ADITO error code -
$local.errorid
Contains the id of the error -
$local.errormessage
Contains the complete error message -
$local.mailid
Contains the id of the email. This can be used to process the mail separately.
-
-
Interval (ms)
The time intervall for the regular runs of the mailbridge. If you just enter a number, it is interpreted as milliseconds. Alternatively you can write S, M or H after the number to change it. E.g.: 5S is equal to 5 seconds. To prevent high performance spikes, it should not be set below 5 seconds. -
Timeout (ms)
Time interval after which the mailbridge stopps trying to read from a mailbox. -
attachment policy
Determines how to process mails with attachments.-
ALL
Reads all attachments, should the email together with its attachments exceed the file size set in themailGlobalMaxSizeRecieveproperty or in themaximum sizecolumn of the mailbridge config, the email is not processed and an error gets thrown. -
THRESHOLD
Reads the email and all attachments, whose file size is below what’s set in themailGlobalMaxSizeRecieveproperty or in themaximum sizecolumn of the mailbridge config. Every attachment that’s bigger gets returned as an empty file. -
NONE
Only reads the email, attachments are replaced with empty files.
-
-
maximum size (Byte)
Overrides themailGlobalMaxSizeRecieveproperty. With this a mailbridge may handle bigger files or be restricted to smaller files than specified in the global property. -
Recieving filter
With these, filters you can add some extra processing to the mailbridge. Possible values are:-
CRLF
Replaces are line breaks with "\r\n". This can be used to ensure correct processing, if emails are read that were created by Linux or Mac OS users, as these operating system either only use \n (Linux) or \r (Mac OS). -
Extractattachment
Expects all incoming emails to only have one attachment and then uses the attachment to create the mail object. -
Extractattachment2
Expects all incoming emails to only have one attachment that’s encoded in MIME type "Message/rfc822". The mailbridge will extract the attachment and form the mail object based on the attachment. -
log
Wirtes the email to the log. -
printtext
Writes the email to the console logger.
-
-
Mailbridge User
A mailbrdige needs an ADITO user in order to authenticate itself at the mailserver. The user holds the necessary credentials, inbox folder name and outbox folder name.
You have to use a seperate ADITO user per mailserver. Only the credentials for one mailbox can be configured for one user.
If it does not exist yet, create a new user in the user management of the system, that’s using the mailbridge. E.g.: System default → Switch the system editor to User → Right click and select "Create User".
Important Properties
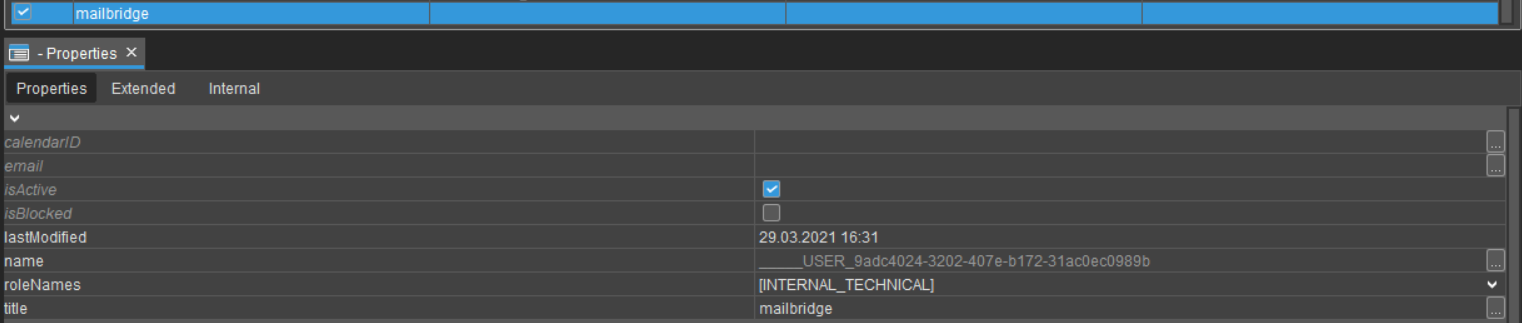
After the ADITO user was created, set the property title to the login
name. E.g. mailbridge, mailbridgeMarketing, etc. Then assign the role
INTERNAL_TECHNICAL to this user to prevent it from being used to log
into the client. All users with this role are typically used for
technical tasks and are not authorized to log into the client.
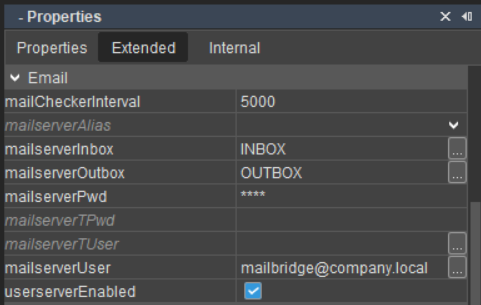
Now you have to switch to the Extended tab. Here you scroll down until
you see the group Email. Not all properties are needed for a
mailbridge user. The necessary properties are:
-
mailserverInbox
This has to be the name of the folder, which ADITO should treat as inbox. The mailbridge will read from this folder of the mailserver users mailbox. -
mailserverOutbox
This has to be the name of the outbox folder. Technically, the mailbridge doesn’t need this information but for some mailservers, this name is needed when accessing a mailbox. So you have to set it in order to prevent errors. -
mailserverPwd
The password of the mailserver user account. -
mailserverUser
The login of the mailserver user account. Depending on your mailserver the format can vary. Mircosoft Exchange typically usses the schema "username@domain.toplevel". -
userserverEnabled
This checkbox tells the mail subsystem that this user can be used for reading and sending mails.
Instance Configuration
The last configurations you have to make, are located in the instance
configuration. To get to the necessary properties, open the system for
which you want to activate the mailbridge(s), then doouble click on
_CONFIGURATION to open it. After that you need to look at the
Navigator and choose Modules. Now you should see the Module
properties and within those is the group Email.
Important Properties

-
mailGlobalEnabled
Activates / deactivates the email subsystem. If this checkbox is disabled, no emails can be read into or be sent out of ADITO -
mailBridgeEnabled
This activates the mailbridges on this specific system. Checking this checkbox adds another property (see below). -
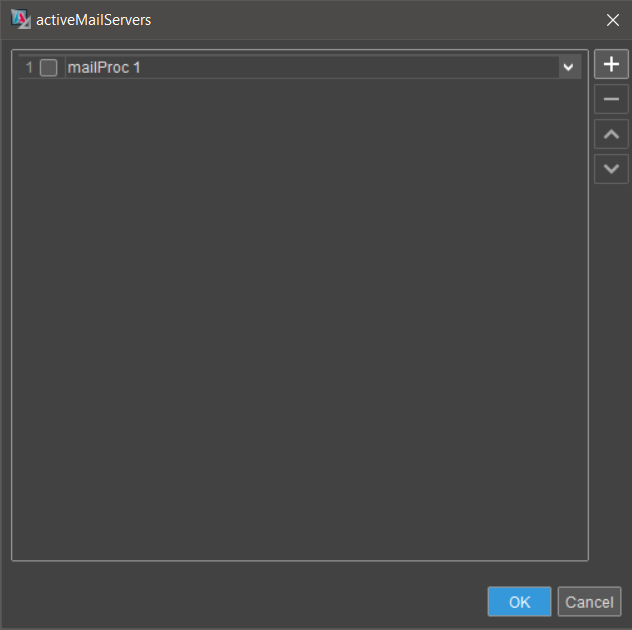
mailBridgeActiveMailservers
This property is only visible ifmailBridgeEnabledis active. With this property you can determine which mailbrdiges are active on this system. By default all mailbridges, which are defined in the preferences, are active. Clicking on the…button opens a dialog, which lets you choose which of the defined mailbrdiges should be active on this system. After you have chosen them, onyl the chosen ones will run.