Configure interface - Appointments
This chapter describes the interface that ADITO uses to access Microsoft Exchange Server calendar objects.
Scope of functions
Scope of functions of the interface
The web services interface can also be used to process group appointments if individual participants are not known in ADITO, because the interface does not directly access the mailboxes of the individual participants, but only passes the calendar object to the Exchange Server.
Appointments created in the Exchange client of an Exchange server are displayed in the ADITO calendar and vice versa. Changes to appointments made in an Exchange client are displayed in the ADITO calendar and vice versa. Changes to appointments (single and serial) made in ADITO are also displayed in any Exchange client and can be edited on both sides. All those entries can be viewed and edited for which a user account has been specified in ADITO. This is done via an Impersonation User. The permissions set in Exchange for the individual user are not changed via this Impersonation User.
ApplicationImpersonation is a role that exists in Microsoft Exchange
like this.
The permissions set in Exchange are taken into account here. Therefore, the calendar permissions in ADITO have to be set in the same way as in Exchange.
If you want to work with a Super User like in the Exchange interface, you can also assign the Impersonation role to such a user.
If you access mailboxes from Exchange 2003 with Exchange 2010, then you cannot access the mailboxes of the individual users from ADITO, because they are in too old a version.
-
Appointments can be linked in ADITO with records from the data database.
-
Appointment invitations are supported. Unconfirmed appointments are now also displayed in ADITO.
Restrictions
Group appointments can only be modified by the organizer.
Implementation
Services.wsdl
ADITO provides its own Services.wsdl internally, or a file that
already contains the access node to the endpoint. This can be used
alternatively to the file existing in the subfolder EWS of the
Exchange installation. This file is located in the core of ADITO and is
read at runtime of the server. This file does not exist in a directory.
To do this, set the useIncludedWsdl parameter to "yes" in the alias
configuration of the server. This is the default setting and should only
be deviated from in exceptional cases.
Alternative: Adjusting the WSDL file provided by the Exchange server
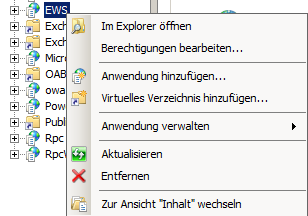
If the internal WSDL file of the ADITO server cannot be used, such a file on the Exchange server can also be used. For this purpose, however, it must be edited. After installation of the Microsoft Exchange Server a new subfolder with the configuration file for the web services connection is available for the standard website of the IIS. Open the website by clicking Open in Explorer in the overview of websites.
 There you will find a subfolder
 news (Exchange Web Services) and in it
the configuration file services.wsdl. This is to be edited.

The following sub node must be inserted into the root node:
    <wsdl:service name="ExchangeServices">
      <wsdl:port name="ExchangeServicePort" binding="tns:ExchangeServiceBinding">
        <soap:address location="http://[server]/EWS/Exchange.asmx"/>
      </wsdl:port>
    </wsdl:service>
If you are using a secure connection to Exchange, then you must of course specify https in this node, not http.
The URL of the service endpoint must not contain a space, otherwise it cannot be addressed.
Authentication
Default Authentication
The authentication type must also be set correctly for the EWS folder. This must be set to "Standard", i.e. the standard authentication must be activated:
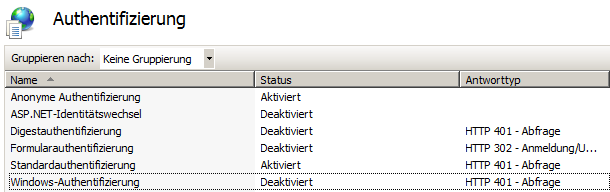
ASP.NET authentication, Windows authentication, and forms authentication should remain disabled because the interface may not work with these authentication types.
Using ADITO with Windows authentication enabled: Continue to work with standard auth.
Sometimes Windows authentication cannot be disabled, for example when emails need to be copied from one folder to another using Outlook Web App. Since logging in via NTLM (i.e. Windows authentication) has priority over standard logon, the ADITO server cannot provide calendar access if Windows authentication is specified. It must therefore be explicitly specified via the first startup parameter mentioned below (or the second if Autodiscover is used) that standard authentication is to be used:
    -Dhttp.auth.preference=basic
    -Dadito.http.auth.preferbasic=true
Starting with version ADITO 5.0 the checkbox "prefer basicauth" can be set in the exchange alias in the system configuration and has the same effect as setting the parameters. Now the Windows authentication can also remain activated. Starting with Exchange 2010-SP2 only the Windowsauth can be active, because the EWS then make an internal fallback to the basicauth.

If this parameter is set, it is no longer possible to log on to the ADITO client using Single Sign On.
OAuth2 Authentication
OAuth2 and how to configure it, is described in detail in the document AID032: Authentication Methods. Please refer to this more specialized documentation.
Using ADITO with Windows authentication enabled - Working with Windows-Auth.
To use Windows Authentication, the following steps must be met. The configuration connects to Active Directory using the Kerberos protocol, but is not equivalent in content to client logon using Kerberos.
- Access to the Kerberos configuration file must be stored in the ADITO service. To do this, edit the configuration of the server start file, e.g. ADITO5server.vmoptions:
        -Djava.security.auth.login.config=C:\ADITO5\config\kbv5_login.conf
        -Djava.security.krb5.conf=C:\ADITO5\config\krb5.conf
- Extending the Kerberos configuration file kbv5_login.conf:
        com.sun.security.jgss.krb5.initiate {
          com.sun.security.auth.module.Krb5LoginModule required debug=true doNotPrompt=false useTicketCache=false;
        };
- Extending the Kerberos configuration file krb5.conf:
        [libdefaults]
            default_realm = CUSTOMERDOMAIN.DE
        [realms]
            CUSTOMERDOMAIN.DE = {
                kdc = CUSTOMERSERVERKDC
            }
Impersonation: Assignment of the ApplicationImpersonation role.
The creation of the calendar entries is done with the user account and the permissions of the logged-in user. In order to avoid that every Exchange user has to be created in the user editor of the ADITO Designer with his own access data, this is done by an Impersonation user.
"Impersonation" is a role in Microsoft Exchange Server, called ApplicationImpersonation. Impersonation ("impersonation") allows a logged-in user to impersonate another user account. This allows the logged-in user to perform actions that would not be possible with their user account.
A user must have this role, and this role can be specified through the Exchange Management Shell. The command for this is (name of role assignment can be freely chosen):
New-managementRoleAssignment -name:[name of role assignment] -role:ApplicationImpersonation -user:[exchange user]
You can check whether the role is set correctly in the management shell:
Get-managementRoleAssignment.
The result can be seen here:

Configuration in ADITO
Setting up the alias
The connection of ADITO with the Exchange Web Services is done via an alias. For this case the new alias type "MS-Exchange (Webservice)" exists.
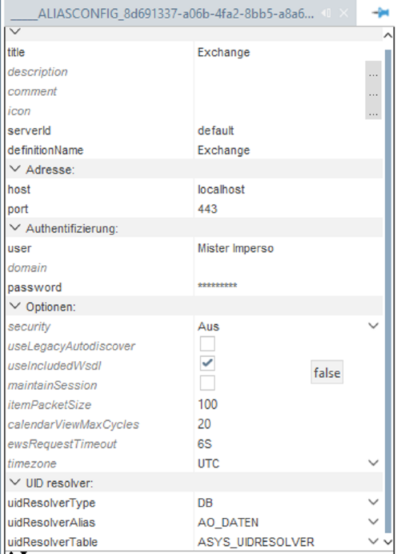
Here you can enter the following values:
| Element | Description |
|---|---|
| host | DNS name or IP of the Exchange server. When using CAS and Autodiscover: Enter nothing. |
| port | Port number of the Exchange server. Can be left blank when using CAS and Autodiscover. |
| security | Encryption type: Off or SSL encryption. |
| domain | Domain where the Exchange server is located. |
| user | The impersonation user is entered here. |
| password | Password of the user specified above. |
| timezone | Set the time zone where the Microsoft Exchange server is running. |
| uidResolverType | The type of the 'UIDResolver' responsible for resolving the ID mapping between Exchange and ADITO. Always set to "DB" for database storage of ID mappings. Other settings are for testing purposes only. |
| uidResolverAlias | Name of the database alias where the UID table for the UID resolver is located. |
| uidResolverTable | Name of the UID table. Select it from the database alias. If it does not exist, create it in the designer using the alias editor. To do this, select the database alias, go to "Edit" → "Create system tables". Create the table 'ASYS_UIDRESOLVER' and save the alias again. If needed, the name can be adjusted in the creation dialog. |
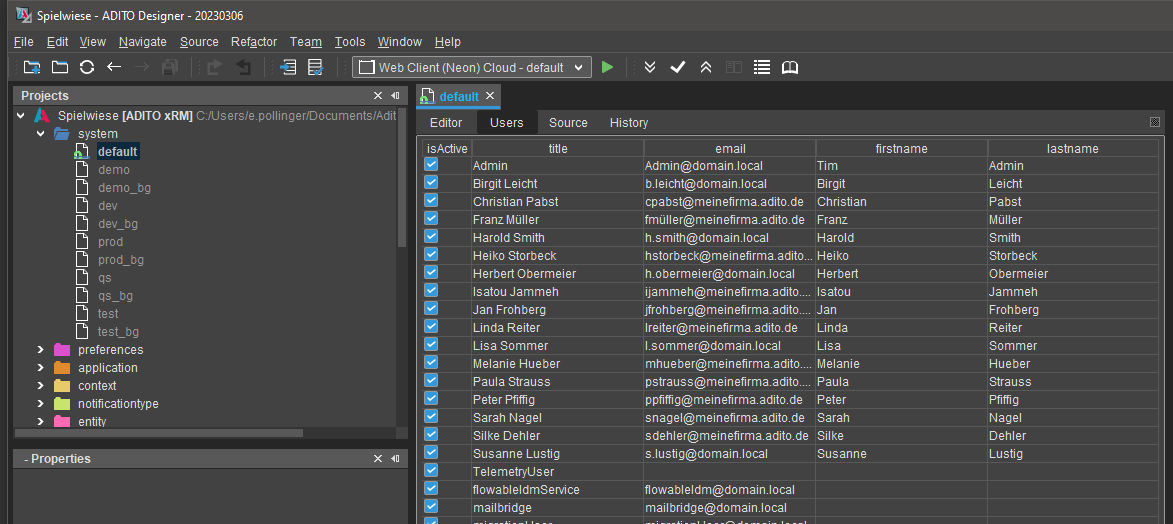
Configuration of users (from ADITO4)
In ADITO you configure the user properties in the system editor. To do this, click on the system alias and open the "User" tab.
In the user’s properties, you can specify the properties in the "Advanced" tab:
-
exchangealias: The Exchange Web Service alias just selected must be selected here. This setting can also be left blank. In this case the Exchange alias of the calendar backend will be used.
-
exchangeemail: The user’s email address, the one that is set up in Exchange as the "Primary SMTP Address".
Preferences Configuration
For the connection to Microsoft Exchange via Web Services to work, this must still be set in the preferences (Preferences in the System Editor, [SE]). At least the following settings have to be selected in the "Calendar" tab (next to Calendar enable: Yes):
-
CalendarAlias: Set the preconfigured alias here. The type of the alias determines at the same time the type of the backend. E.g. if an Exchange Webservice alias is selected, the backend is automatically set to EWS, if a Lotus Domino alias is selected, the backend is automatically set to Lotus Domino, etc.
-
CalendarAliasTask: If the tasks should still be kept in the ADITO database and not in the groupware system, the corresponding DB alias must be specified here.
Rights: Release of rights in Microsoft Outlook.
Since the Exchange Web Service interface takes over all rights of the Exchange server, the access rights for appointments must be set for the individual users. This can be set by each user in Outlook. If the permission is not assigned, ADITO aborts the creation of a task with the note that a folder cannot be accessed.
The assignment of rights on user level can be done as follows.
When using calendar caching, calendar entries are stored in the ADITO database as soon as a user logs in. This means when tapping the calendar entries, when viewing a calendar in ADITO, the information is displayed in the cache.
Thus, if the rights of ADITO and Exchange do not match (if there are more rights in ADITO than in Exchange), more information could be displayed in ADITO than what was specified as a restriction in Outlook. Therefore, the rights of ADITO and Outlook have to be synchronized.
ADITO can provide you with a plugin for this purpose, which synchronizes the rights.
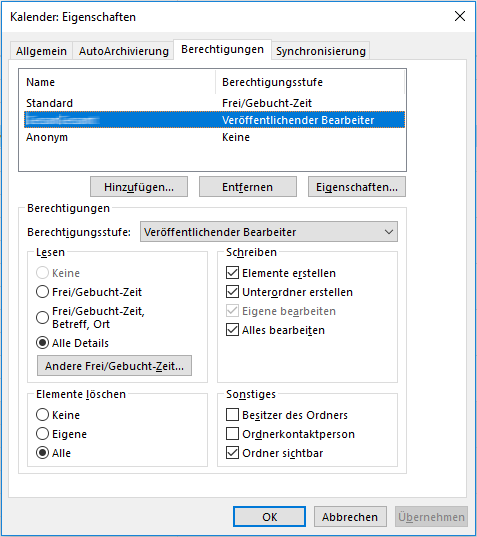
Appointment permissions
You can also release calendar permissions for appointments: image::AID081_OutlookKalenderberechtigungen_.png[]
For full access, the Publishing Editor role is provided here.
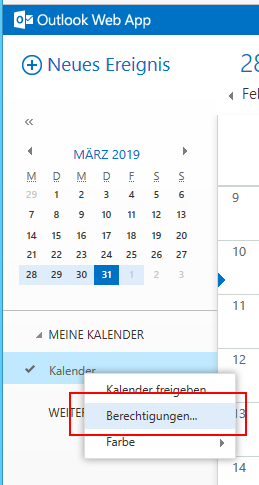
Rights in Outlook Web Access
Rights can also be assigned in Outlook Web Access as of Exchange 2013. The permission levels are identical to the regular install Outlook and correspond to the descriptions above.
Permissions via Microsoft Exchange Management Shell
In the Exchange Management Shell, the following command can be used to view the relevant permissions:
Get-MailboxFolderPermission -Identity aditotest2@exchangetest.local:\Kalender -User aditotest1
The user specified under -User is to be checked for the permissions he
has on the mailbox under -Identity.
The permissions can also be set via a command: addMailboxPermission.
Details about this command can be found here: https://docs.microsoft.com/en-us/powershell/module/exchange/mailboxes/add-mailboxpermission?view=exchange-ps
Overview of rights
The following settings assume User A as the logged in user, User B sets the above shares for User A.
*ADITO recommends the "Publishing Author" permission.
Calendar Permissions
| Configuration | Open calendar B in ADITO | Create group appointment A and B possible? | Create single appointment B | Create task B |
|---|---|---|---|---|
| No permission | No | Yes, invitation at B | No | Yes |
| Free / Booked (default in Outlook) | No | Yes, invitation at B | No | Yes |
| Free / Booked, Subject, Location | No | Yes, invitation at B | No | Yes |
| Contributor | No | Yes, invitation at B | Yes | Yes |
| Examiner | Yes | Yes, invitation at B | No | Yes |
| Non-editing author | Yes | Yes, invitation at B | Yes | Yes |
| Author | Yes | Yes, invitation at B | Yes | Yes |
| Publishing author | Yes | Yes, invitation at B | Yes | Yes |
| Owner | Yes | Yes, invitation at B | Yes | Yes |
Using Microsoft Office365
Microsoft offers with its Office 365 solution for Office 2013 the possibility to run an Exchange server also as a cloud-based solution. To connect ADITO to Office 365 via the EWS interface, the following criteria must be met for the connection to work.
-
Basic authentication must be disabled:. The parameter mentioned in the Default Authentication chapter, which prefers Basic authentication, must not be specified.
-
The internal Services.wsdl must be used:. The file cannot be customized in Office 365. Therefore, the internal
Services.wsdlmust be used. -
Nothing has to be specified in the property exchangealias of the users:. See also the chapter Configuration in ADITO.
-
To assign the ApplicationImpersonation role, follow these instructions to connect to Office365 via PowerShell: https://docs.microsoft.com/de-de/powershell/exchange/exchange-online/connect-to-exchange-online-powershell/connect-to-exchange-online-powershell?view=exchange-ps
Office 365 may require a connection with autodiscover. In most cases, it should work without though. See the notes in chapter Exchange server with autodiscover.
Note that the host may differ depending on whether you are hosted in the German or international cloud.
Germany: outlook.office.de International: outlook.office365.com
To test your connectivity to the Office 365 servers, Microsoft provides an URL, which can be used for this purpose: https://testconnectivity.microsoft.com/
Error analysis: Dates
ADITO debug parameters
The interface error outputs are often very concise. If you want more
detailed error messages for problems related to the Exchange Web Service
interface, it is recommended to use the parameter
-dadito.debug=Webservice at server startup. This enables debugging of
web service error messages.
Output of the http transfer
To output the http communication in the console logger, the following parameters can be set:
    -Dcom.sun.xml.internal.ws.transport.http.client.HttpTransportPipe.dump=true
    -Dcom.sun.xml.internal.ws.transport.http.HttpAdapter.dump=true
These log the HTTP connections and can be used in order to log web services in general.
Output of the EWS communication
To output the communication from and to Exchange in the server log, the
following parameter can be set: -Dadito.exchangews.debugextended=true
JDito methods to change the calendar behavior.
The following JDito methods are available to change the behavior of the calendar. Please refer to the JDito manual or the designer help for the exact code instruction. You can enter the mentioned methods in the autostart process of the client.
calendars.setMeetingModificationByOrganizerOnly
Sets whether group appointments can be modified only by the organizer.
calendars.setIgnoreUnknownUsersOnWrite
With this command you can set that for ADITO unknown users are ignored.
This is for example the case if users of a calendar backend like
Microsoft Exchange are not created in ADITO. In order to enable that
calendar entries can still be changed in ADITO or links can be created
for them, the check for unknown users must be deactivated. In contrast
to setIgnoreInactiveAttendees here users are used, which are not known
in ADITO at all, i.e. those, which were not created as user data models.
calendar.setIgnoreInactiveAttendeesOnWrite
This process allows you to set that attendees not known to ADITO are
ignored when writing an appointment. This value is overridden by the
removeInactive parameter in calendar.setCalendarUser. This means
that setCalendarUser must be executed before setting the unknown
attenddees. Here users are specified, which are known in ADITO, but are
no longer active. This is for example the case if an employee leaves the
company but is still present in group appointments. The user is here in
contrast to 'setIgnoreUnknownUsersOnWrite' as a user data model in
ADITO.
Series appointments and search for them: RecurrenceFix
When using serial appointments, it can happen that they are not displayed. The access to the calendar backend is done within a search interval. If, for example, the start of a serial appointment is outside this search interval, it can happen that a single item is no longer displayed, even if it is within the interval.
With the ADITO server start parameter
-Dadito.exchangews.userecurrencefix=true this behavior can be
circumvented. As of version 4.3.11 this is the default behavior and the
parameter no longer needs to be set manually.