Renderers
A Renderer is an ADITO model that can be assigned to an EntityField in a ViewTemplate (e.g., MultiEditTable), in order to change its appearance or its functionality (e.g., edit options).
Currently, there are 2 categories of Renderers available
- ViewRenderer: Renderer for changing the appearance.
- EditRenderer: Renderer for adding edit functionality (visible, e.g., as additional buttons).
To create a Renderer, navigate to folder "renderer" in the "Projects" window. Then, right-click on "renderer" and choose option "New" from the context menu. A model create dialog will appear, in which you enter the name of the renderer and leave the model type preset to "renderer". After confirming with "OK", a second dialog appears, requesting the Renderer's type.
Currently, the following Renderer types are available:
- NUMBERFIELD
- BADGE
- MULTISELECTCOMBOBOX
If a Renderer suitable for your use case already exists, you can re-use it, without having to create a new one. Each Renderer can be used for multiple use cases.
NUMBERFIELD
If you choose Renderer type NUMBERFIELD, an EditRenderer will be created. If assigned to an EntityField in property editRendererMapping of a ViewTemplate (only available in ViewTemplates of some types, e.g., MultiEditTable), the following additional buttons will appear in the client:
- Reset button (circular arrow): If you have changed an EntityField's value, but not saved yet, this button allows you to reload its value from the RecordContainer.
- "Set maximum" button: This button overwrites the currently displayed value with the maximum value as defined in the corresponding EntityField's properties
maxValueormaxValueProcess. If these properties are not set, the "Set maximum" button is not displayed. - Incrementer and decrementer buttons:
- By default, a "Plus" and a "Minus" button are displayed, allowing the client user to increase or decrease the currently displayed value in steps of 1.
- You can customize the step by setting one of the following properties
numberfieldStep: Enter a positive decimal value to define the step size. This will effect both the button for increasing and for decreasing the value. This property is ignored, if propertynumberfieldStepsProcess(see below) is set.numberfieldStepsProcess: Create arbitrary incrementer/decrementer buttons by defining their corresponding step size, which can be positive and negative decimal values, specified as an array. The following example results in four incrementer/decrementer buttons, corresponding to steps of size -100, -0.5, 0.5, and 100 (make sure to useresult.objectand notresult.string, in this case):
result.object([-100, -0.5, 0.5, 100]);
NUMBERFIELD example in xRM
You can study an example of the usage of a Renderer of type NUMBERFIELD in ViewTemplate "MultiEditTable", included in ProductpriceFilter_view. Here, the EntityField PRICE of Productprice_entity (module product) has the Renderer "numberInput" assigned, see property editRendererMapping. The Renderer "numberInput" itself can be found in the "Projects" window, under "renderer". For testing purposes, you may change its properties numberfieldStep or numberfieldStepsProcess, or set the EntityField PRICE's properties maxValue or maxValueProcess, in order to get familiar with the effects of this Renderer in the client. (Note that if there is code set for property maxValueProcess, then the value of property maxValue will be ignored.)
BADGE
If you choose Renderer type BADGE, a ViewRenderer will be created. If assigned to an EntityField in a ViewTemplate (e.g., of type MultiEditTable), the EntityField's value will be displayed on a background that shows the color that is defined in the EntityField's properties color or colorProcess. (The font color will automatically be shown in the complementary color.)
Renderer type BADGE has no specific renderer properties to set, it is simply created and assigned to an EntityField using the ViewTemplate's property viewRendererMapping (only available in ViewTemplates of some types, e.g., MultiEditTable).
BADGE example in xRM
You can study an example of the usage of a Renderer of type BADGE in ViewTemplate "MultiEditTable", included in ProductpriceFilter_view. Here, the EntityField PRICELIST of Productprice_entity (module product) has the Renderer "badge" assigned, see property viewRendererMapping. The Renderer "badge" itself can be found in the "Projects" window, under "renderer".
For testing purposes, you may edit the EntityField PRICELIST's properties color or colorProcess, in order to get familiar with the effects of this Renderer in the client. (Note that if there is code set for property colorProcess, then the value of property color will be ignored.)
MULTISELECTCOMBOBOX
Using a Renderer of type MULTISELECTCOMBOBOX is an alternative to using a list of checkbox items that are all visible permanently.
Basics
Given an EntityField that holds multiple items (via dropdownProcess or via Consumer), with the option to select one or multiple of them (selectionMode = MULTI). By default, this will result in a list of all selectable checkbox items. Now, for a small number of items, this is fine:

However, a larger number of selectable items might spoil the respective ViewTemplate's appearance. In these cases, the Renderer MULTISELECTCOMBOBOX should be preferred. It is an EditRenderer and packs all checkbox items in a combo box. Only if you open the combo box, the selectable items are visible (if required, in a scrollable way).
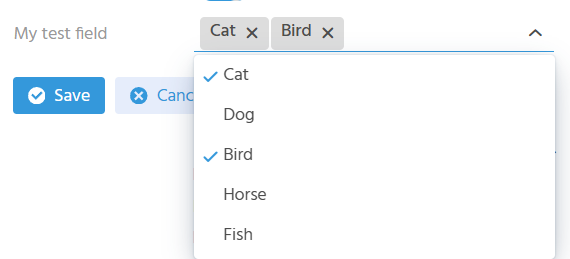
Independent from if the combo box is opened or closed, the selected items (or a part of them) are shown above the combo box, along with the option to deselect them (via the cross icon to the right), without having to open the combo box.

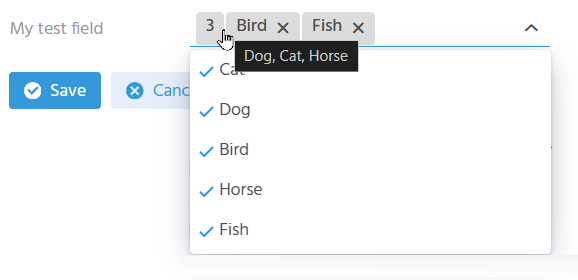
How many of the selected items are shown above the combo box depends on the available space. If there is not enough space to display all selected items, then a number is shown on the left.
Example: If, e.g., 5 items have been selected in total, with the last 2 of them shown above the combo box, then this number is 3. If you hover over this number with the mouse pointer, the further selected items are shown in a tooltip.
Furthermore, the MULTISELECTCOMBOBOX includes a filter (like a lookup): Simply type in a filter value on the right of the selected items, then the combobox will be filtered accordingly:

Configuration
The configuration of a MULTISELECTCOMBOBOX takes 2 steps:
-
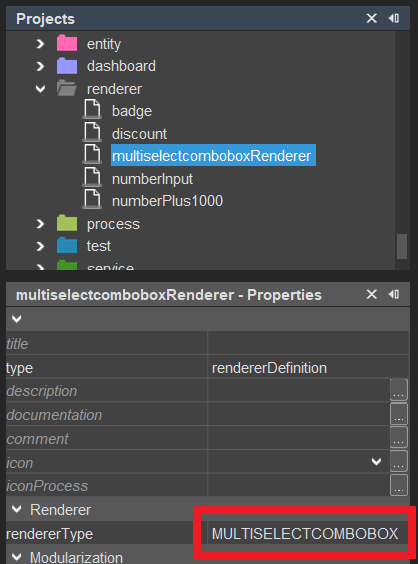
Create a new Renderer of type MULTISELECTCOMBOBOX In the "Projects" window, right-click on folder "renderer" and choose "New" from the context menu. In the following dialog, give the new Renderer a suitable name and make sure that "renderer" is selected as type. After clicking "OK", select MULTISELECTCOMBOBOX in the subsequent dialog. Once confirmed with "OK", the new Renderer is added to the list of existing Renderers.
-
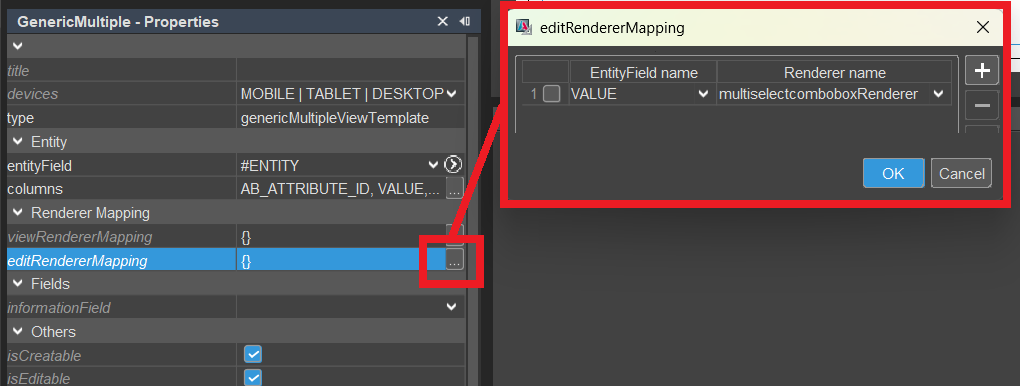
Now, the new Renderer can be assigned to the respective multiselection EntityField, via property editRendererMapping of a ViewTemplate (only available in ViewTemplates of some types, e.g., Generic):
Value format
When working with an EntityField that has a Renderer of type MULTISELECTCOMBOBOX, the value format is the same as it is without the Renderer.
Example:
Given an EntityField MYTESTFIELD, with selectionMode = MULTI and a dropDownProcess as follows:
result.object([
    ["id1", translate.text("Cat")],
    ["id2", translate.text("Dog")],
    ["id3", translate.text("Bird")],
    ["id4", translate.text("Horse")],
    ["id5", translate.text("Fish")]
]);
If you select and save, e.g., "Cat", "Bird", and "Fish", then
vars.get("$field.MYTESTFIELD")as well asvars.get("$this.value")
will return a multistring - in this case "; id1; id3; id5;".
Therefore, if you want to further process the value (e.g., in an onDBInsert process), you will have to decode it first, in order to get it as an array:
var myFieldValue = vars.get("$field.MYTESTFIELD") ; // ";id1; id3; id5;"
var myFieldValueArray = text.decodeMS(myFieldValue); // ["id1", "id3", "id5"];
Vice versa, if you want to preset the selection of specific items of the combo box, in a valueProcess, then you need to encode the value first:
if (vars.get("$sys.recordstate") == neon.OPERATINGSTATE_NEW && vars.get("$this.value") == null) {
    var initialValue = ["id1", "id2"];
    var encodedValue = text.encodeMS(initialValue);// "; id1; id2; "
    result.string(encodedValue);
}