Further design elements
Client navigation helpers
In ADITO, there are several ways to navigate through the various Contexts and Views. In the following chapters, you can find a description of additional functions, which increase the convenience when navigating in the client.
QuickEntry
The round blue button in the upper right corner of the ADITO client provides "QuickEntry" functionality, i.e., it enables you to quickly create new datasets of various Contexts. Technically, this means that specific EditViews are linked here. To add an EditView to the QuickEntry, proceed as follows:
- Click on the EditView in the "Projects" window.
- Set the View's property
title. This text will appear in the list behind the quick create button. - Open the editor dialog "Quick Entry" by clicking on the editor button (three-dotted button) in the View's property
quickEntry. - In this dialog, press the "Plus" button, to add a new line.
- Select the required EditView in the combobox of the new line.
- Move the new View up to the required position.
- Set a suitable icon in the EditView's
iconproperty. Otherwise, a question mark will be displayed in the QuickEntry list. You will need to log out and back in to make this take effect. - Confirm with OK.
Do not set the quickEntry property for Views other than EditViews. This can lead to errors in the client.
To remove a View from the list behind the Quick Create button, right-click on its property quickEntry and choose "Restore Default Value" from the context menu.
linkedColumns
Some ViewTemplateTypes, e.g., Table and TreeTable, have a property named linkedColumns. Here, you can specify an arbitrary number of columns (but usually only 1 or 2) that should get a hyperlink to the MainView. By default, this link is automatically given to the first column, which is often not suitable.
Examples: In the TableViewTemplates of
- ActivityFitler_view, the column SUBJECT
- CompanyFilter_view, the column NAME (company name)
- PersonFilter_view, the columns FIRSTNAME and LASTNAME
are linked.
linkedContext
Every EntityField has got properties named linkedContext and linkedContextProcess. Here, you can specify any Context of your application. The effect in the client is, that
- the field's content is shown in blue font color, indicating a hyperlink. If you click on it, the MainView of the specified Context is opened.
- in the PreviewView, beside the field, a small blue "eye" icon is shown, indicating a hyperlink. If you click on it, the PreviewView of the specified Context is opened.
Examples: In the TableViewTemplates of
- ActivityFilter_view, the column RESPONSIBLE has a link to Context "Person" (via property
linkedContext) - PersonFilter_view, the column ORGANISATION_CONTACTID (in the client titled "Company") has a link to Context "Organisation", but only, if it's not a "private" Person. To realize this condition, property
linkedContextProcessis used.
Depending on the ViewTemplateType, there are various fallback logics for property linkedContextProcess. For example, in certain cases, the target Context of the EntityField's Consumer is linked. Find more information in the description of the respective ViewTemplates.
Color
Colors help the user to navigate in the ADITO client. For example, a blue button with a white plus sign means "Here, you can create something new." Therefore, the definition of further colorings should always be done with caution and integrated into a general color concept.
Several ADITO models have color-related properties:
-
color: Here, you can select a fixed value from a list of predefined colors. It is not possible to choose arbitrary colors.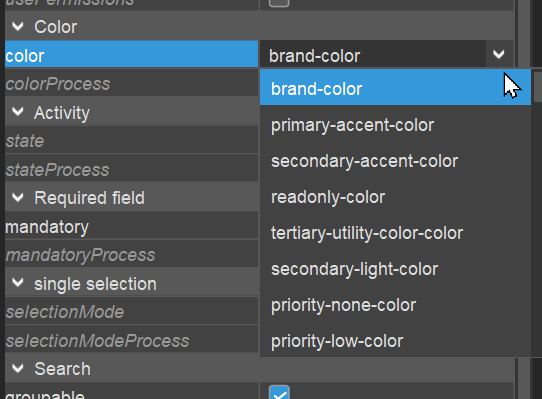
-
colorProcess: Here, you can enter code which ends with aresult.string()command having a color value as argument. It is not possible to choose arbitrary colors, but you have to use one of the color values available via the constantsneon.<...>COLOR(importsystem.neonfirst). This will prevent that, by mistake, colors are used that violate the defined Theme. Example:import { neon, result, vars } from "@aditosoftware/jdito-types";
if(vars.get("$field.ADVERTISINGBAN_ICON") > 0)
{
result.string(neon.PRIORITY_MEDIUM_COLOR);
}
else
{
result.string(neon.PRIORITY_LOW_COLOR);
}
Currently, the color properties of an EntityField have only an effect in a limited number of cases, e.g., for
- EntityFields that are displayed as colored score card (ViewTemplate type "Score Card")
- EntityFields of contentType IMAGE (and there it works only if its
valueProcessprovides one of ADITO's predefined vector graphic icons, see example below). Furthermore, the number of available colors is also cautiously limited to those colors that are available via the constantsneon.<...>, e.g.neon.PRIORITY_HIGH_COLOR. And, as you can see, these color constants do not refer to explicit color names, but they refer to their purpose. - specific types of Avatars
Login web page
The client web page showing the ADITO login mask consists, by default, of
- a standard background, showing a marketing-style photo of ADITO,
- an ADITO logo, placed above the login fields, and
- a browser tab title, e.g. "My ADITO".
If you want to customize these design elements, you have 2 options:
1. via the SSP
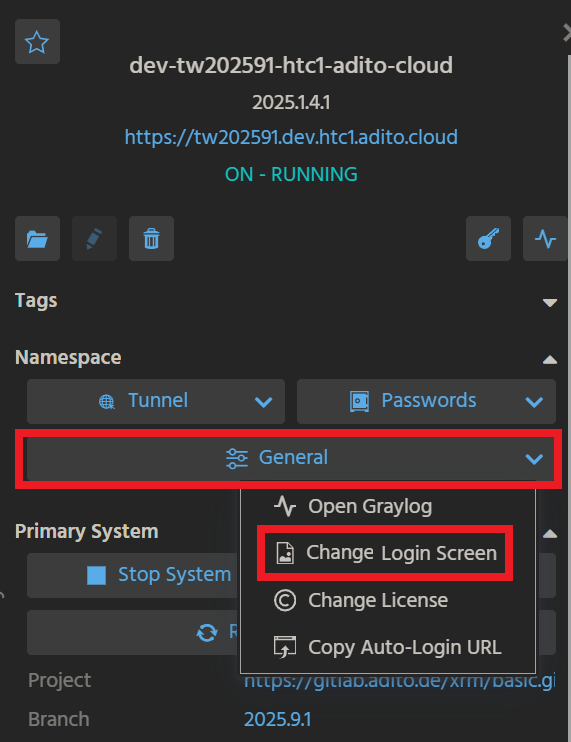
In the PreviewView of your system, click on button "General" (in section "Namespace") and then choose option "Change Login Screen":
This will open a mask, in which you can upload images of the logo and/or of the background:
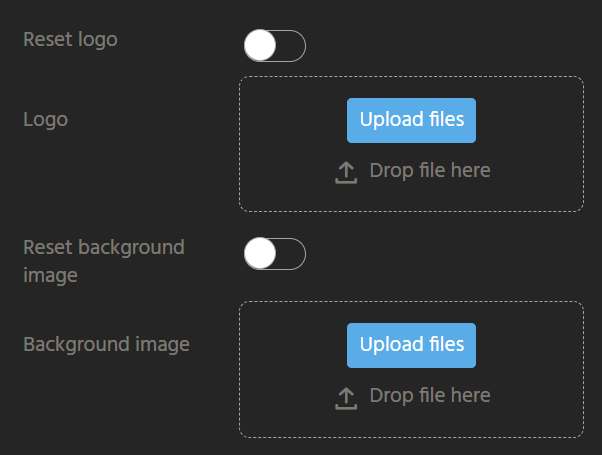
If you had uploaded images before, they will not be shown here, but you can
- override them by uploading new images;
- reset them via the toggle switches.
After saving your changes, you need to wait for at least 30 minutes, until the server will automatically synchronize the changes. You can accelerate this by restarting your system: In the PreviewView of your system,
- click on button "Stop System" (in section "Primary System");
- wait at least 1 minute;
- click on button "Start System".
Open/refresh the URL of your system: After 2-3 minutes, the restart of the server is completed, and the modified login web page should appear.
2. via the Designer
The second approach, via the ADITO Designer, also allows you to change the logo and/or the background, but additionaly, you can also customize the browser tab title and the client timeout.
Proceed as follows: In the "Projects" window of the Designer, double-click on system > <system name> and then, in the Editor window, double-click on "____CONFIGURATION". Then, in the Navigator window, navigate to System > Client. This will open a property list in the Editor window: Look at section "Client", which includes the following properties:
clientTitleText: Here, enter the text you want to be displayed as title of the browser tab. Default value: Namespace of the system, e.g., "dev-mysystem-htc1-adito-cloud".clientLogo: If you want your own logo to be displayed above the login mask, choose it using the file browser, available via the three dots button. Default value: Stylized lettering "ADITO".clientBackground: If you want your own background image to be displayed, choose it using the file browser, available via the three dots button.clientTimeout: Specifies the timeout of a client in milliseconds. If a user does not work within this timespan, the connection is disconnected and the login web page is shown. The value is freely selectable as a positive integer, along with the unit. Default value: "1D" (one day).
Save your changes and restart your system (see above, option "1. via the SSP").
Automatisms
Besides the design elements that can be controlled manually, ADITO includes various automatisms to ensure a well-balanced design.
Visibility of tabs
The visibility of a tab in a MainView is calculated automatically, in order to avoid empty tabs, as far as possible. The visibility of a tab depends on the visibility of the components in it: If there is a View reference, e.g., to a table, and this reference is not visible, then the tab will also be invisible.
Example: Person_entity (module contact): In the detail area of the MainView, there is a View reference to PersonTaskAppointment_view. This View, in turn, includes a View reference to the tasks (TaskFilter_view) and to the appointments (AppointmentFilter_view). If both tasks and appointments are invisible, then the tab is invisible. If at least one of these View references is visible, then the tab is also visible.
In any case, the reason for the invisiblity does not matter - be it because of permissions, Consumer state, settings of the "devices" property, or just because the View reference is empty.
The calculation of visibility also works for deeply nested Views - the principle remains the same: The visibility depends on the visibility of the View reference(s). The same applies to one-to-one Consumers (property isOneToOneRelationship set to true), as they are also realized as reference.
However, if a ViewTemplate of the original Entity is involved, its invisibility does not contribute to the (in)visibility of the View it is assigned to. Example (fictitious): Person_entity (module contact): In the detail area of the MainView, there is PersonAttributes_view (via View reference on #ENTITY). PersonAttributes_view, in turn, has 2 elements:
- AttributeRelationFilter_view (via View reference on Attributes)
- "Generic" ViewTemplate with 3 EntityFields of Person_entity, e.g., ROLE, LETTERSALUTATION, CONTACTTYPE
Now, if
- AttributeRelationFilter_view is invisible
- all 3 EntityFields of the "Generic" ViewTemplate are invisible (e.g., because of property
hideEmptyFields) then the tab nevertheless remains visible, but white and "empty".
To sum it up: The (in)visibility logic for tabs only works for View references loaded via a Consumer, but not for the direct usage of ViewTemplates. (This may change in future ADITO versions.)
Furthermore, there is a specific debug level available: NEON_COMPONENT_VISIBILITY (see system > <system name> > ____CONFIGURATION > Logging > loggingDebugLevel)
This debug level helps to analyze, why a component is visible or not: When dependencies are involved, there is a logging of changes of the visibility of View references and of the reason for these changes. The content of the logging will give you (in technical language) the following information: "Component PersonTaskAppointment_view is invisible, because TaskFilter_view is invisible and AppointmentFilter_view is invisible."
Visibility of drawers
The explanations in chapter Visibility of tabs are analogously valid for drawers: If a drawer has got no visible content (be it because of stateProcess, permissions, etc.), no empty drawer is shown.
Visibility of EntityFields
Some ViewTemplateTypes (e.g., "Generic") have a boolean property named hideEmptyFields. If this property is set to "true" (which is the default value), then the title and the complete space reserved for this EntityField is hidden for all records that have no value for this field. Thus, the design of these kinds of ViewTemplates can vary from record to record - e.g., for one record, the ViewTemplate shows 3 lines (title and value), for another record, it shows 7 lines.
If, however, hideEmptyFields is set to "false", then the ViewTemplate always shows the same number of lines for all records, i.e., all EntityFields' titles are always shown, even when the field has no value.